
Do you love the timeless look of mid century modern design? Imagine transforming a forgotten piece into a stylish focal point for your home! A DIY dresser makeover offers immense satisfaction. You can create a unique mid-century modern dresser that perfectly fits your space. Many people prefer DIY furniture makeovers; over 60% of customers choose DIY for customization. These mcm pieces are smart investments, often increasing in value.
You’ll discover how to find that perfect vintage piece, prepare it meticulously, apply authentic finishing techniques, and style it for a truly retro refresh. Upcycling is cost-effective and sustainable. It lets you refresh your dresser while creating something truly one-of-a-kind.
Key Takeaways
Upcycling an old dresser saves money and helps the environment. It keeps furniture out of landfills.
Find your vintage dresser at places like thrift stores or estate sales. Look for strong pieces, even if they have small flaws.
Clean, repair, and sand your dresser well before painting or staining. This makes the new finish look good and last long.
Choose paint or stain colors that fit the mid-century modern style. Use a good topcoat to protect your finished dresser.
Style your refreshed dresser with retro accessories. Take ‘before and after’ photos to show off your hard work.
Why a Mid-Century Modern Dresser Makeover?
The Enduring Appeal of Mid-Century Modern Style
You might wonder why mid century modern design remains so popular. It’s all about timeless appeal and smart design. This style focuses on clean lines and organic shapes. Think about furniture that looks good from every angle. Functionality is key; every part serves a purpose. The “less is more” idea means no extra frills. This creates a calm and focused space in your home. This design also blends well with nature. It uses materials like rich wood, sleek metal, and clear glass. These materials add different textures and warmth. While neutral colors form the base, bold colors add character and a pop of fun. Iconic lighting pieces are like art themselves. This design style is truly timeless. A mid-century modern dresser fits perfectly into this aesthetic. It brings a classic, sophisticated feel to any room.
Benefits of Upcycling Vintage Furniture
Choosing to upcycle furniture offers many benefits beyond just saving money. When you repurpose your dresser, you actively help the environment. Upcycling greatly reduces waste. It keeps usable items out of landfills, preventing harmful chemicals like methane from going into the air. You also save a lot of energy. Making new furniture uses substantial power from fossil fuels. Upcycling avoids these energy-heavy steps of extraction and manufacturing. It often uses less energy than even recycling. Plus, you can choose eco-friendly paints and finishes for your dresser makeover. This makes your project even greener. You create something unique, sustainable, and truly special.
Sourcing Your Mid-Century Modern Dresser
Now, where do you find these hidden gems for your project? You can find great mcm pieces in many places. Thrift stores are often a treasure trove. You might discover a solid wood dresser with good bones for a very low price. Sometimes, you see pieces for just $14.99 or even $5! Estate sales are another excellent option. People often sell entire households of items, and you can find quality vintage furniture. Look for dressers with sturdy construction. Don’t worry if they look a little rough or have minor cosmetic flaws. You can transform them with a little effort. You are looking for potential, not perfection. These older mcm pieces often have better craftsmanship and durability than many new ones.
Preparing Your Vintage Dresser for Refinishing
You found your perfect vintage dresser. Now, you need to prepare it for its stunning transformation. This preparation stage is crucial. It ensures your new finish looks professional and lasts for years. Do not rush this part. A little extra effort here saves you headaches later.
Essential Tools and Materials for Prep
Before you begin, gather all your supplies. Having everything ready makes the process much smoother. You will want to have these essentials on hand:
Chemical strippers: Expect to spend $15-$40 per quart. These remove old finishes.
Sandpaper and sanding blocks: Budget $20-$50. You will need various grits.
Stain: This costs $10-$30 per quart if you plan to stain.
Finish (polyurethane, varnish, or oil): Plan for $15-$50. This protects your work.
Brushes, rags, and protective equipment: Set aside $30-$60. Safety gear is important.
Having these items ready prevents interruptions. You can focus on the task at hand.
Deep Cleaning and Degreasing Techniques
Your vintage find likely carries years of dust, grime, and old polish. You must clean it thoroughly. Start by removing all hardware, drawers, and any removable shelves. Use a mild detergent mixed with warm water. A soft cloth or sponge works well. For stubborn dirt or greasy buildup, a dedicated degreaser helps. You can find these at most hardware stores. Wipe down every surface. Make sure you get into all the nooks and crannies. Rinse the dresser with a clean, damp cloth. Let it dry completely before moving on. This step ensures your new finish adheres properly. It also prevents any old gunk from showing through.
Repairing Damage and Stripping Old Finishes
Vintage furniture often has character, but sometimes that means damage. You can fix many common issues. Here is how you can tackle wood and veneer repairs:
Begin by ensuring straight edges for easier work. A sharp chisel can help you achieve this.
Utilize a rub joint with hot hide glue for strong bonds. This works especially well where clamping is difficult.
Shape the veneer patch to fit snugly after leveling the repair to the substrate.
Level the veneer patch to the surrounding wood. Use tools like a block plane, scraper, and sandpaper. Be careful not to damage the old veneer.
Trim the patch as needed. A chisel works well in tight spaces. Reattach any displaced veneer.
For old finishes, you need to strip them away. Products like Citristrip work wonders. Apply it generously to the surface. Let it sit for the recommended time, usually 20-30 minutes. Then, scrape off the old finish with a plastic scraper. This prevents gouging the wood. You might need a second application for tough spots. Always work in a well-ventilated area. Wear gloves and eye protection for safety.
Sometimes, you might want to change the hardware. If you fill old handle holes, use wood filler. Apply it in thin layers. Let each layer dry completely. Sand it smooth before painting or staining. This gives your dresser makeover a seamless look.
Proper Sanding for a Smooth Surface
Sanding is crucial for a professional finish. It smooths the wood and helps the new finish absorb evenly. The grit sequence you use depends on your desired finish and wood type.
Here is a general guide for sanding:
Finish Type | Wood Type | Grit Sequence |
|---|---|---|
Paint | All | 120-grit, 150-grit |
Water-Based Stains | Closed-grain | 150-grit, 220-grit |
Water-Based Stains | Open-grain | 120-grit, 150-grit, 180-grit |
Oil-Based Stains | Closed-grain | No finer than 180-grit |
Oil-Based Stains | Open-grain | 120-grit, 150-grit, 180-grit |
Water-Based Clear Coat | All | 120-grit, 150 or 220-grit |
Oil-Based Clear Coat | All | Up to 150-grit |
For most furniture hardwoods, like cherry and mahogany, finish sanding with 180- or 220-grit sandpaper works best. Hard-to-stain woods, such as alder, birch, maple, and poplar, often do well with 120-grit sandpaper. Coarse sandpapers below 100 grit are usually for distressing or rough areas. The most common grades for furniture finishing range from 120 to 220 grit. Higher grits like 320, 400, and 600 grit are for special purposes.
Always sand thoroughly and with the grain. Ensure you sand the entire surface with the same grit. This prevents uneven stain absorption.
If you use a power sander, follow a sequence like this:
In Rotary Mode
40 grit
60 grit
80 grit
100 grit
120 grit
In Random Orbit Mode
120 grit
150 grit
180 grit
220 grit
320 grit
This careful sanding prepares your mid century modern piece for its stunning transformation. You are setting the stage for a beautiful finish on your mcm pieces.
Achieving a Mid Century Modern Finish
You have meticulously prepared your vintage dresser. Now comes the exciting part: giving it that authentic mid century modern look. This stage truly brings your vision to life.
Choosing Paints and Stains for a Retro Look
Deciding between paint and stain is a big choice for your dresser makeover. Many people love the natural beauty of wood. If your dresser has beautiful wood grain, you might want to preserve it. You can simply clean, sand, and then apply a clear finish or a wood stain. This highlights the original craftsmanship. However, painting furniture offers endless possibilities for color and style.
When you choose paint, you have many options. Fusion Mineral Paint is a popular choice. It offers a smooth, matte finish. It also has a built-in topcoat, making it very durable. You do not need extra waxing or topcoats. It adheres well to many surfaces without much priming or sanding. Rustoleum Chalked paint gives a chalky, distressed look. It usually needs a topcoat for protection.
Here is a quick comparison to help you decide:
Feature | Fusion Mineral Paint | Chalk-Type Paint |
|---|---|---|
Durability | Built-in topcoat, very durable, waterproof, scuff-resistant, no waxing or topcoat needed. | Requires a topcoat (wax or poly) for durability and protection. |
Adhesion | Excellent adhesion to most surfaces (laminate, metal, glass, plastic, previously painted surfaces, wood, veneer, raw wood, concrete, brick, tile, fabric) without priming or sanding. | Good adhesion to most surfaces, but sanding or priming may be needed for very slick surfaces. |
Finish | Smooth, matte, modern finish. | Chalky, matte, distressed finish. |
Application | Self-leveling, easy to apply, minimal brush strokes. | Can be thick, may show brush strokes, requires more effort for a smooth finish. |
Cure Time | Full cure in 21 days. | Full cure in 30 days. |
Prep Work | Minimal prep work (clean and degrease). | Minimal prep work (clean). |
Cost | Generally more expensive per ounce. | Generally less expensive per ounce. |
For an authentic mid century modern aesthetic, consider specific colors. Eichler homes, famous for their mid-century design, used a subtle, earthy palette. These included natural, muted colors like grays, browns, rusts, greens, and ochres. These colors blended with the California landscape. You can find modern paint matches for these original Eichler colors.
Other popular colors that evoke a retro vibe include:
Skipping Stones (DET567)
Terra Rosa (DE5096)
Art and Craft (DET682)
Big Sur Blue Jade (DET577)
Rose de Mai (DET432)
Pink Punch (DE5048)
Mahogany Cherry (DE5020)
Reclaimed Wood (DET625)
Golden Appeal (DE5382)
Even Growth (DE5494)
Trail Dust (DE6123)
Blue Tapestry (DET545)
You can also use metallic gold or black for legs and molds. This adds a touch of sophistication.
Step-by-Step Application of Finishes
Applying your chosen finish correctly ensures a beautiful and lasting result. Take your time with each step.
Allow the stain to dry for 4-6 hours. Then you can apply a second coat of stain or a top coat.
Apply a top coat to ensure longevity. You can use Polycrylic, Minwax Paste Finishing Wax, or Minwax Polyurethane.
For Polycrylic:
Use a foam brush.
Move quickly because it dries fast.
Brush in the direction of the grain.
Allow 2 hours to dry.
Lightly sand with a fine grit sponge.
Wipe clean.
Apply 3 coats, sanding between each.
Cure for 48 hours after the final coat.
For Minwax Paste Finishing Wax:
Apply a thin layer with an old t-shirt.
Let it dry for 10-15 minutes.
Buff in circular motions with a clean t-shirt.
Only one coat is necessary.
For Minwax Polyurethane:
Use a foam brush.
Work swiftly in sections.
Allow 4-6 hours to dry.
Lightly sand with a fine grit sponge.
Wipe clean.
Apply a second coat.
A minimum of 2 coats is recommended.
Cure for 48 hours after the final coat.
Applying a Durable Topcoat
A durable topcoat protects your hard work. It makes your mcm pieces last for years. Water-based polyurethane, also called polycrylic, offers great durability. It protects against wear and tear. Wax gives a unique look, but it needs reapplication. Oil-based topcoats are not ideal for painted furniture. They can create a yellow haze over time.
Here are some best practices for applying a topcoat:
Stir the poly completely before and during application. This avoids bubbles.
Use a high-quality paintbrush or a paint sprayer.
Brush or wipe quickly in one direction, from end to end. Do not back-brush if the product is drying.
Sanding between coats is usually not needed unless you see imperfections.
Avoid applying in very high (>80%) or very low humidity.
Do not apply in direct sunlight.
Allow the piece to fully cure before you place items on it.
For a smooth finish with minimal brushstrokes, Varathane Water-Based Polyurethane is a great choice. It also has low VOCs. General Finishes High Performance Topcoat is another excellent option. For white paint, CrystaLac Extreme Protection Polyurethane works well. It does not yellow. If you want a matte finish, try General Finishes Flat Out Flat.
Hardware Selection and Installation
Hardware is like jewelry for your dresser. It can truly define the style. Mid-century modern hardware features bold shapes, sleek lines, and organic curves. You can find pulls with subtle hourglass shapes or slim forms. Round knobs in classic finishes like brushed gold are also characteristic.
You can polish existing handles to bring back their shine. Use a metal polish and a soft cloth. If you want new hardware, look for mid-century modern styles. Berenson Hardware is a good source. You can also check Top Knobs and Belwith Keeler.
Consider adding new knobs or pulls to refresh your dresser. You can also incorporate modern twists. Think about a geometric dresser makeover or a two-tone dresser makeover. Pinterest offers lots of inspiration for unique touches. These small details make your dresser truly one-of-a-kind.
Styling Your Refreshed Mid-Century Modern Piece
You have put in the hard work. Now, it is time to show off your beautiful creation! Styling your refreshed piece makes it truly shine in your home.
Integrating Your Dresser into Home Decor
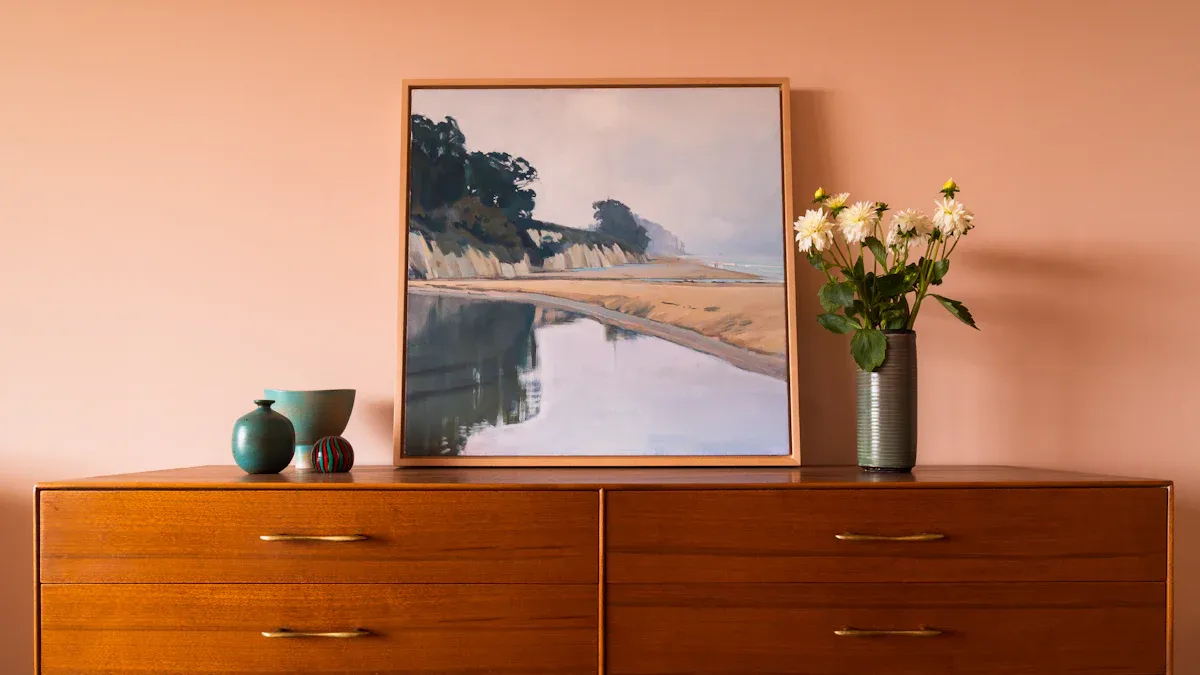
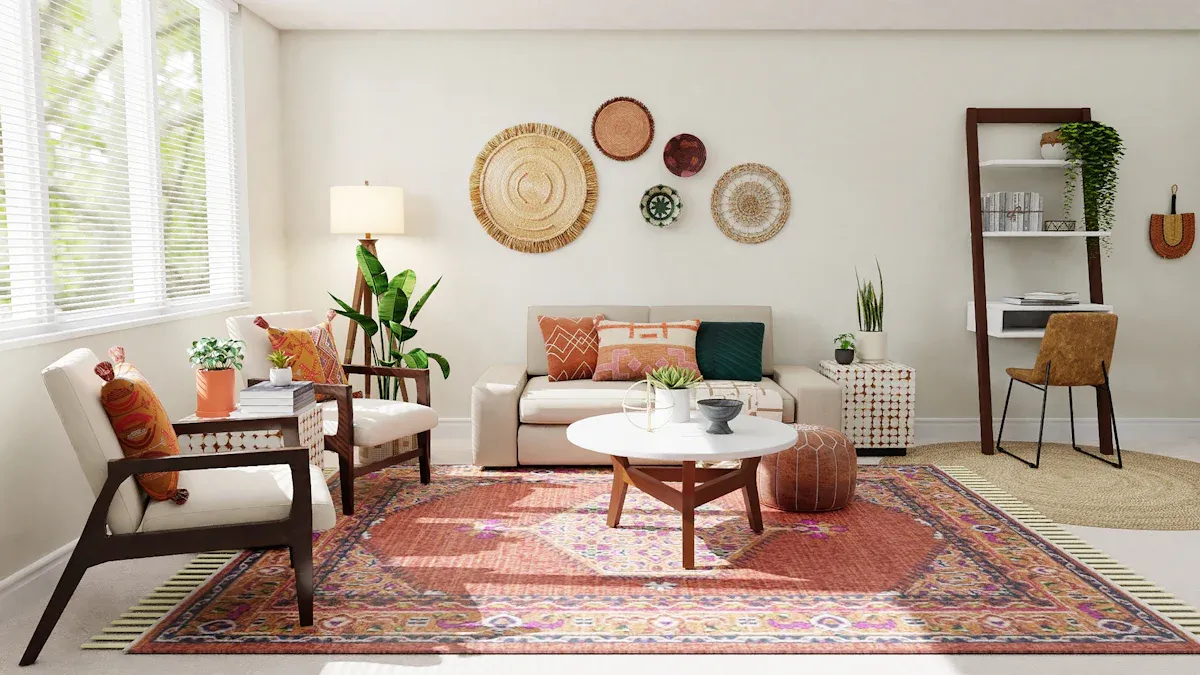
Your newly transformed mid-century modern dresser can become a focal point in any room. Think about where it will best serve its purpose. Will it be in your bedroom, offering stylish storage? Or perhaps in your living room as a chic console table? Its clean lines and updated finish will complement various decor styles. You can pair it with other vintage finds or mix it with contemporary pieces for an eclectic look. This dresser makeover adds character and functionality.
Accessorizing for an Authentic Retro Vibe
Accessorizing is key to achieving that authentic retro feel. You want to choose items that complement your mcm pieces without overwhelming them.
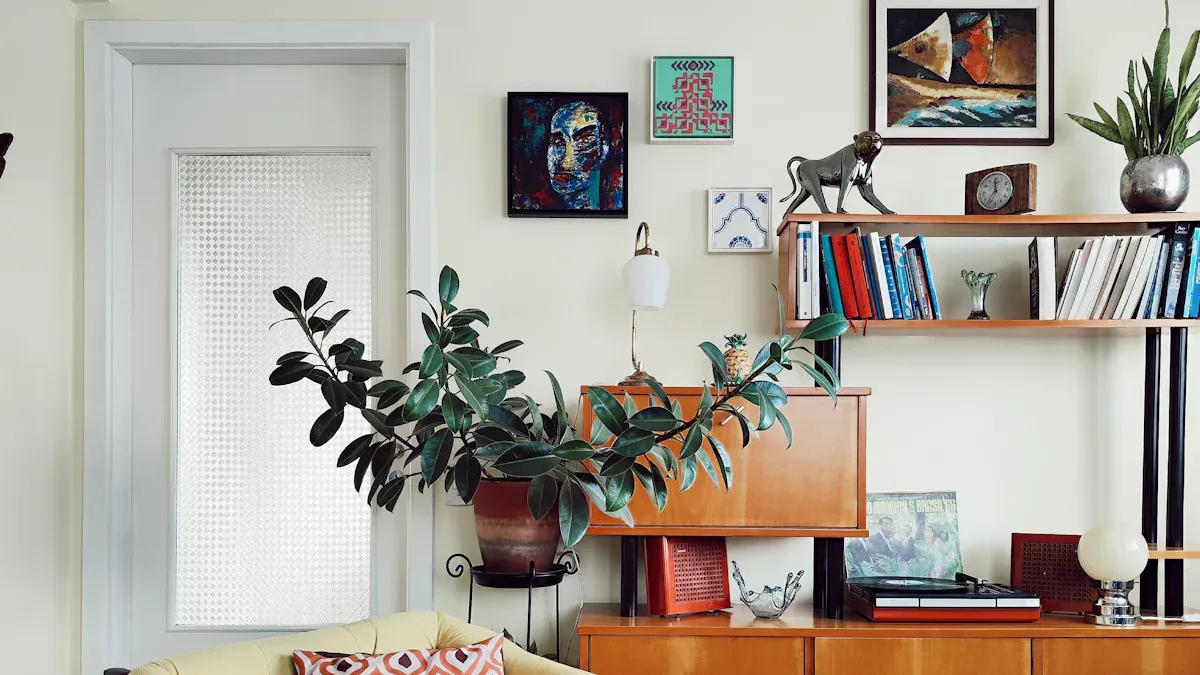
Decorative Objects: Look for tabletop sculptures like abstract brass forms or marble geometrics. Colored glass, such as Empoli or Murano, adds a pop of color. Vintage barware, including Italian crystal decanters and unique cocktail shakers, brings sophistication. Retro clocks and decorative boxes also fit perfectly.
Materials: Incorporate materials like Murano glass, solid brass, marble, travertine, rosewood, and teak.
Art & Lighting: Statement wall art with unusual frames or sculptural elements works well. Abstract art prints and framed botanical illustrations are great choices. Consider sculptural lighting, such as mushroom-shaped table lamps or arc lamps, to complete the look.
Showcasing Your Before and After Transformation
You did an amazing job! Now, share your success. Taking great “before and after” photos helps you celebrate your hard work. It also inspires others.
Find or Create a Good Background: Use an uncluttered, neutral backdrop. Good natural lighting is best. If an indoor wall does not work, try staging outdoors.
Use Props to Set the Mood: Stage your furniture to create a perfect, dream-like space. Props should show beauty, not just daily use.
Set a Theme using Color or Subject: Make sure your photos feel cohesive. Use props that fit together. Repeat colors or find objects that tell a similar story.
Keep in Mind the Style and Era of the Furniture: Match your props to the furniture’s style. Use modern decor for contemporary items.
Sometimes More is Less: For complicated designs, use fewer props. This prevents the photo from looking cramped. Simpler pieces can handle more staging.
You now feel immense satisfaction and creative fulfillment after your DIY mid century modern dresser makeover. You transformed a forgotten piece into a cherished retro furniture. This project lets you refresh your dresser. Embrace your inner DIYer! Experiment with colors and techniques. Personalize your projects to reflect your unique style. Share your stunning before-and-after transformations and tips in the comments. Explore more DIY furniture flips. Continue your journey of sustainable home decor.
FAQ
Can I paint over veneer on my mid-century modern dresser?
Yes, you can paint over veneer. First, clean and lightly sand the surface. Then, apply a good primer. This helps the paint stick. Finally, apply your chosen paint for a fresh look.
How do I get rid of the old smell from vintage furniture?
Clean the dresser thoroughly with a mild cleaner. You can also place baking soda inside drawers for a few days. Another option is to use activated charcoal. Ensure good ventilation to air it out.
Should I always strip the old finish before painting?
Not always. If the old finish is in good condition and adheres well, you can often just clean, degrease, and lightly sand it. Then, apply a good primer. This saves you time and effort.
What kind of hardware works best for a mid-century modern look?
Look for sleek, minimalist hardware. Brushed gold, brass, or black pulls and knobs are popular. Geometric shapes or simple bar pulls also fit the style. You can find many options online or at specialty stores.
