
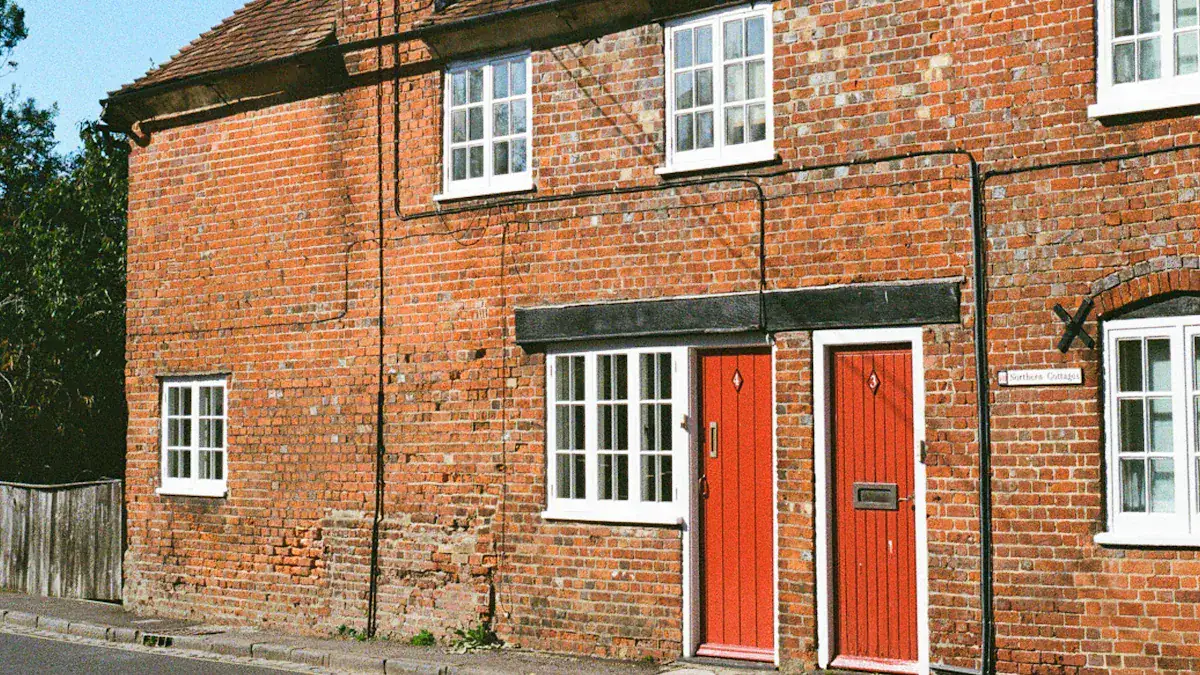
Old houses possess unique character. Their construction methods differ significantly from modern buildings. Understanding the types of walls in old houses is crucial. This knowledge ensures proper maintenance and renovation. It also preserves their historic integrity. For example, German Colonial homes often featured thick sandstone walls. Spanish Colonial structures used rocks, stucco, and adobe brick, creating thick walls. These historic walls require a different approach. Common wall types include plaster and lath, solid masonry, and timber frame. Knowing the specific type of walls helps homeowners immensely.
Key Takeaways
Old houses have different wall types. These include plaster and lath, solid masonry, and timber frame. Knowing your wall type helps with care.
You can identify wall types by looking at them. You can also tap on them to hear the sound. Special tools like borescopes can help find hidden details.
Plaster and lath walls are strong. They resist wear and tear. They also help keep moisture out. They need special care for cracks and damage.
Solid masonry walls are made of brick or stone. They keep indoor temperatures steady. They need regular care to fix mortar and manage water around the foundation.
Timber frame walls use large wood beams. They have different materials inside them. Watch out for moisture. Moisture can cause rot and attract bugs.
How to Tell What Kind of Walls You Have
Identifying the specific construction of your home’s walls is the first step. This helps homeowners plan any work. Knowing how to tell what kind of walls you have prevents damage. It also ensures proper repairs.
Visual Cues for Wall Identification
Homeowners can often identify plaster and lath walls by their unique appearance. These walls often have a textured, sometimes bumpy surface. This is especially true in older homes where multiple layers were applied. They may feel rough to the touch. Hairline cracks or seams can be visible on the surface. These are less common in drywall. Small gaps or fissures might appear near corners of windows, doors, or where walls meet the ceiling. This is common in homes built before the 1950s. Plaster walls are typically thicker than drywall. They range from 1/2 inch to 1 inch.
They can have multiple layers, giving them a more substantial feel. Signs of wear, such as visible cracks or gaps, are common around edges, corners, and window/door frames. This happens because plaster pulls away from the lath over time. Chipped or cracked areas can also be present.
These are often at corners or around openings. The construction process for these walls involves nailing small wooden lath strips horizontally across wall studs. These strips are spaced closely but not flush. A ‘scratch coat’ of plaster is then applied. Some plaster oozes between the lath boards.
This forms a ‘key’ that locks it in place. Once the scratch coat dries, a ‘brown coat’ is added. This thickens and evens out the first layer. Finally, a ‘veneer coat’ is applied. This third layer sometimes contains fine sand. It creates a smooth finish. Solid masonry walls, like brick or stone, often show their material directly. They might have plaster applied right onto the masonry. Timber frame walls may show exposed beams. They might also have infill materials visible.
Sound Test: Hollow vs. Solid Walls
A simple sound test can provide clues. Gently knock on different areas of a wall. A hollow sound often indicates plaster and lath or an early stud-frame wall. These walls have an air gap behind the surface. A solid thud suggests a masonry wall. This means it is made of brick, stone, or concrete. This quick test helps homeowners narrow down the possibilities.
Probing and Inspection Techniques
When visual and sound tests are not enough, homeowners can use specialized probing and inspection techniques. These methods help identify the types of walls in old houses. They also help identify construction materials.
Surface Penetrating Radar (SPR): This tool determines masonry wall thickness. It also locates reinforcing bars. This tool works best on dry walls. Moisture can reduce its penetration depth.
Infrared Thermography (IRT): This method identifies anomalies like voids and moisture. It uses temperature differences. It works best with significant temperature variations. These can be between the building and surrounding air, or between interior and exterior wall surfaces.
Borescope: This tool allows viewing of concealed conditions within walls. It shows connectors, cracks, or deterioration. It uses a small borehole, minimizing damage.
Pulse Velocity: This technique evaluates masonry structures. It checks for cracks, deterioration, and construction quality. It measures the time a mechanical energy pulse takes to travel through the material.
Water Penetration Tests: These tests identify moisture paths and water penetration through masonry walls. They use a spray chamber to apply water flow and pressure to the wall surface.
Pachometer: This device locates metal objects. These include veneer ties and joint reinforcing within masonry walls. It can also estimate the depth of masonry cover if the reinforcement size is known.
These advanced tools offer a deeper understanding of wall construction. They help homeowners make informed decisions.
Plaster and Lath Walls: Common Interior Walls
Construction and Materials
Plaster and lath walls represent a traditional method of interior walls construction. Builders created these interior walls by first nailing narrow strips of wood, called lath, to wall studs or ceiling joists. These wooden laths typically measured about one inch wide, four feet long, and a quarter-inch thick.
Workers spaced them approximately three-eighths of an inch apart. Sometimes, metal lath, available in 27-inch by 8-foot sheets, or rock lath (also known as button board or gypsum-board lath), an early form of drywall with holes for plaster keying, replaced the wooden strips. Rock lath usually came in 2 by 4-foot panels.
After securing the lath, workers applied plaster. Traditional plaster often contained lime or gypsum. Lime-based plaster sometimes included horsehair for reinforcement. The application process involved several steps. First, workers placed temporary lath guides vertically on the wall. They then applied a “scratch coat” of plaster using a wooden board. They dragged the board upward, forcing plaster into the lath gaps.
This action created “keys,” which are curls of plaster forming behind the lath. These keys were essential for the plaster to adhere. This first coat was about a quarter-inch thick. Once the wall was covered, workers removed the temporary guides and filled their slots. After the scratch coat dried, they applied a second layer, called the “brown coat” or “browning.” This rough, sandy plaster was about a half-inch thick. Finally, a smooth, white finish coat completed the process. After complete drying, the interior walls were ready for painting. This multi-layered approach created durable and aesthetically pleasing interior walls.
Historical Context
Plaster was the most common interior finishing material during the 19th and early 20th centuries. After the mid-1850s, houses and buildings were constructed with wood lath for plaster application.
Until approximately 1900, all plaster interior walls and ceilings utilized lime-based plaster over wooden lath. This method defined historic home interiors for generations. From the early 1900s up to the 1960s, rock lath, a type of gypsum board, became more common. This evolution in wall construction reflects changing material availability and building practices over time.
Key Characteristics
Plaster and lath interior walls possess distinct structural and aesthetic characteristics. Structurally, they are highly resilient and tougher than drywall. They effectively resist everyday wear and tear. These interior walls were built for longevity, often lasting as long as the property with proper maintenance.
Even when damaged, they do not crumble or deteriorate rapidly. Minor damages may not require immediate repair. When properly installed, lath and plaster better withstand the movement and settling of a structure compared to drywall. The application of plaster over a lath base creates a monolithic shell. This enhances the building’s structural integrity by tying it together more cohesively. Lath and plaster naturally repel moisture, preventing mold and structural damage. This makes them ideal for humid areas. They are also incredibly sturdy, require minimal maintenance, and maintain structural integrity over long periods.
Aesthetically, these interior walls offer a unique visual charm and vintage look. This look is irreplaceable for some homeowners. Plaster can be molded into various shapes and styles, providing flexibility for different aesthetic looks and feels. The multiple layers of liquid plaster were essential for covering variations in framing lumber. This created straight walls. In older, historical homes, lath and plaster construction adds authenticity and character. It preserves the original aesthetic. They provide aesthetic versatility with limitless possibilities for textures and finishes, from smooth to artisanal. They also allow for customization and artistry. This enables the creation of decorative features like cornices and ceiling medallions. These features infuse spaces with unique character. Their adaptability allows for unique curves, arches, and exquisite features, providing flexibility for desired visual effects.
Common Issues
Plaster and lath walls can develop several common issues over time. Cracked plaster is a very frequent problem. Different types of cracks indicate various underlying issues. Hairline cracks are small and often benign. They do not necessarily indicate serious trouble unless they grow. Delaminating cracks signal plaster pulling away from the lath.
These can be dangerous, especially on ceilings. They often run parallel to the lath. Settlement cracks converge, suggesting structural sagging or foundation problems. Discolored plaster often appears as brown water stains. This indicates early water damage and leaks. Bubbling plaster occurs when water damage becomes severe. This can happen without prior water stains. It requires removal and patching. Bulging plaster means plaster is coming loose from the lath. This is similar to delaminating cracks but without surface cracks. It indicates detachment.
Maintenance and Repair
Proper maintenance and repair are crucial for preserving plaster and lath interior walls. For repairs, homeowners should first fix the lath. They replace missing lath and refasten loose pieces using drywall screws.
Drilling pilot holes prevents splitting the wood. If no stud is available, they insert a piece of lath into the cavity. They then screw it to the back of existing lath to create an anchor. Next, they stabilize the wall’s edge. They drill 3/16-inch masonry bit holes every three inches, about one inch from the damaged area’s edge, until they hit the lath. They mark holes that miss the lath. After vacuuming and spraying holes with plaster conditioner, they wait 15 minutes. Then, they fill unmarked holes with plaster adhesive and wipe off any excess.
For patching holes where the lath is in good condition, the process involves troweling on layers of mud. Historically, plaster was applied in several coats over wood lath. The first coat keyed into the spaces between the lath.
This formed a stable base. Finish coats followed after drying. While replacing missing plaster with blue board is common, troweling on a base coat is a faster alternative. Homeowners should use a softer, slower-setting lime-based plaster for repairs. Products like Big Wally’s line of plaster-repair products take about an hour to set. They resist cracking and require no sanding. Homeowners should avoid “patching plaster” sold at home centers. This type of plaster is much harder than original plaster and sets too quickly. These careful repair methods help maintain the integrity and appearance of these unique interior walls.
Solid Masonry Walls
Construction: Brick and Stone
Solid masonry walls represent a robust form of construction. Builders created these walls from individual units like bricks or stones. Solid brick walls consist of multiple layers, or “wythes,” of bricks laid with mortar. Stone walls use various types of cut or uncut stones, also bound with mortar. In some older European-influenced homes, builders applied plaster directly to the brick surface. This eliminated the need for lath. This method created a durable and often aesthetically pleasing interior finish.
Historical Prevalence
Solid masonry walls have a long and significant history across many civilizations. The Harappan Civilization in the Indus Valley used fired bricks for city walls from 3,000 BC to 1,750 BC. Mesopotamia’s UR III Dynasty featured fired brick surfaces on city walls around 2,100 BC. The Early Roman Republic used 60cm-length bricks on city walls in the 4th century BC. The Roman Empire saw widespread use of masonry city walls across Europe and the Middle East. This included the Aurelian walls of Rome in 217 AD.
In China, masonry city walls first appeared during the Eastern Han Dynasty (25 AD – 220 AD). They wrapped earth walls with bricks or stones. By the Ming Dynasty (1368 AD – 1644 AD), almost all Chinese cities built masonry city walls.
Characteristics and Performance
Solid masonry walls offer distinct characteristics. They possess significant thermal mass. This allows them to store heat, creating a ‘thermal lag’ that moderates indoor temperature fluctuations. This ‘flywheel effect’ helps maintain stable temperatures. They also exhibit thermal inertia, combining heat storage with resistance to heat movement. Structurally, these walls provide excellent load-bearing capacity.
Retrofitting clay-brick walls with Textile Reinforced Mortar (TRM) can increase their load-bearing capacity by approximately 90%. Concrete-brick walls see about a 23% increase. TRM-upgraded walls also reduce thermal transmittance. Clay-brick walls show about a 44% reduction, and concrete-brick walls about 34%. This enhances energy performance.
Common Problems
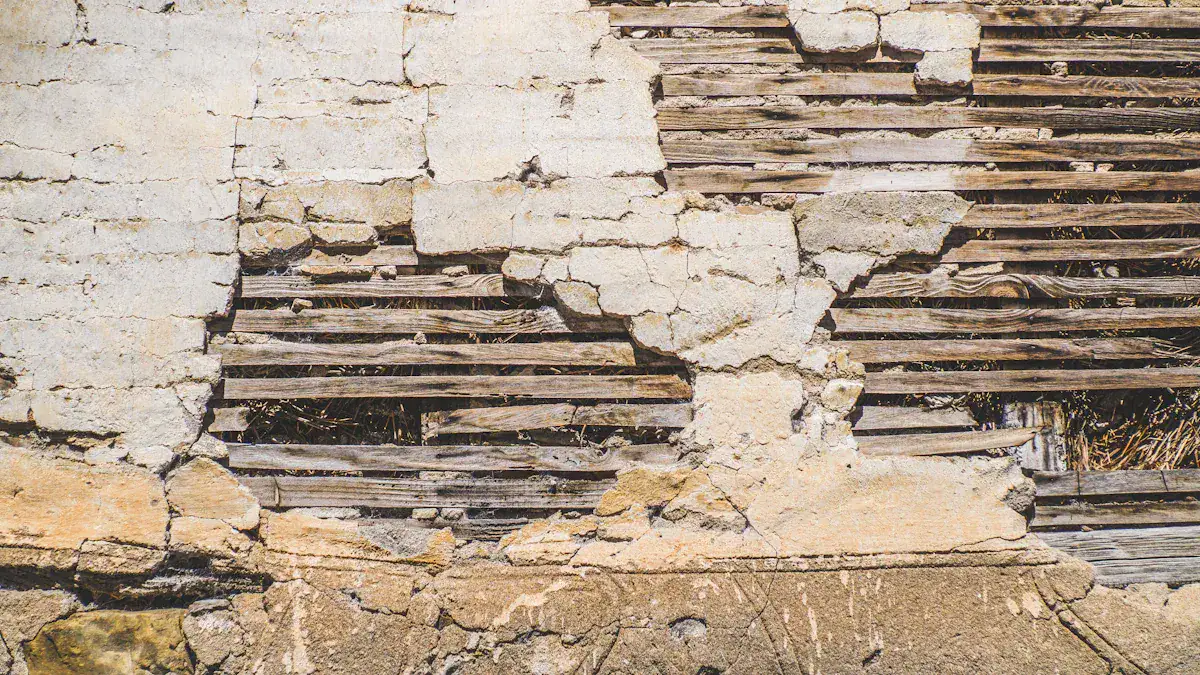
Solid masonry walls can develop several common problems. Mortar deterioration is frequent. Constant exposure to weather and moisture, like rain and snow, causes mortar to absorb water. This leads to freeze-thaw cycles. Water expands when it freezes, causing cracks, flaking, or spalling. Mortar also loses binding strength over time due to aging and natural wear. This results in crumbling and separation.
Poor quality or incorrect mortar mixes and improper installation also contribute to deterioration. Dampness is another major issue. Rising damp occurs when groundwater is drawn into the base of the walls through capillary action. This moisture carries salts upwards, leaving a horizontal wet stain or ‘tidemark’. This phenomenon can damage masonry, plaster, wood, and paint. It is a significant cause of moisture-related damage in older buildings.
Essential Maintenance
Proper maintenance is vital for solid masonry walls. Repointing involves removing deteriorated mortar and replacing it with fresh mortar. Remove mortar to a depth of 2-3 times the joint width. Type N mortar is often recommended for its durability and softness. Managing moisture around the foundation is also crucial.
Address cracks and damaged mortar joints before sealing. Apply a primer, a parge coat, and asphalt-modified polyurethane membranes. Install drainage systems like dimple board and French drains at footing level. Ensure proper grading with a 5% slope extending at least 6 feet from the foundation. Extend downspouts at least 10 feet away. Use breathable sealing systems, such as silane/siloxane penetrating sealers, for brick foundations. These repel liquid water while allowing vapor to escape.
Refresh most sealing systems every 5-10 years. Avoid painting brick foundations with non-breathable house paint. This traps moisture and causes freeze-thaw damage. Conduct a thorough assessment of mortar condition every 20 to 30 years. An annual overall facade conditions survey is also recommended for these important walls.
Timber Frame Walls
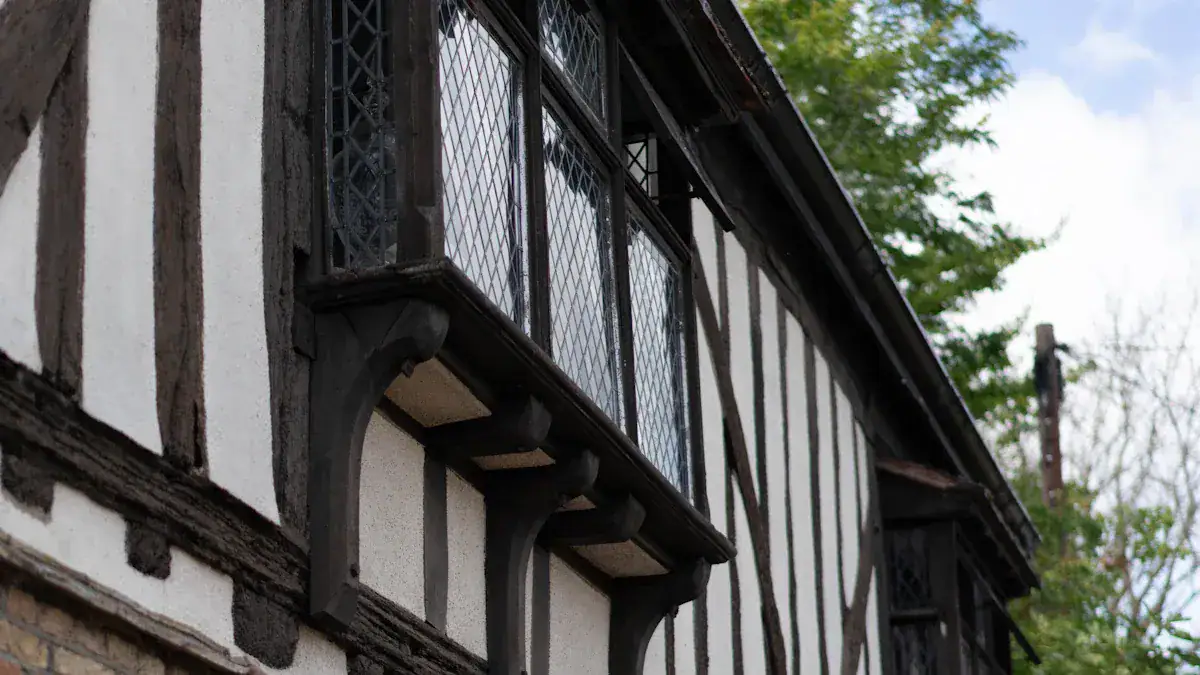
Traditional Timber Frame Construction
Traditional timber framing uses large, solid wood beams. Builders connect these beams with time-honored techniques. Meticulously crafted mortise and tenon joints, secured with wooden pegs, are visible. This highlights the honesty of every detail. Heavy timbers provide structural support. Workers carve sections out to allow elements to assemble like a puzzle. This differs from the standardized lumber in light-frame construction.
Wooden pegs and carved joinery connect structural units. This avoids nails found in contemporary methods. The inherent solidity of the timber frame structure eliminates the need for internal load-bearing walls. This enables open interior spaces. A mortise and tenon joint involves a ‘tongue’ (tenon) on one timber fitting into a ‘mouth’ (mortise) on another. This forms a strong joint. Kneebraces use the strength of triangles. Lap joints have notches carved into beam ends, allowing overlap.
Historical Significance
Timber framing has a long history. Early humans used it for shelters in the Neolithic Era. Ancient civilizations like Egyptians, Chinese, and Romans mastered it for temples and homes. In the Middle Ages, it was widespread in Europe. Half-timbered constructions became common in Basque architecture by the 15th century.
Scandinavia saw stave churches in the 12th and 13th centuries. It was prominent in residential architecture in the British Isles during the 15th and 16th centuries. European settlers introduced it to North America in the 17th century. It was widely adopted in colonial settlements. Its popularity declined in the 19th century. However, it saw a resurgence in the 20th century due to interest in sustainable building.
Infill Materials and Methods
Timber frame walls often feature various infill materials. Wattle and daub was a common infill in ancient times. It involved sticks, sometimes woven, installed into the framing. Workers coated these with daub, a mixture of clay, chalk, and a binder like grass or straw. As brick manufacturing advanced, brick infill became a standard replacement. People sometimes call it nogging. Stone infill was used where stone rubble and mortar were available. Other infill types include bousillage, unfired brick, and planks. European settlers brought techniques like English wattle and daub to the United States. The Fairbanks House (1637) in Dedham, Massachusetts, shows this tradition. Brick nogging became more popular in the Massachusetts Bay area by the early seventeenth century. German earthen infill, similar to wattle and daub, was also used.
Structural Characteristics
Timber frame walls typically consist of a frame of wall studs. Cladding attaches to both sides. This cladding can be a lining or decking. The cavities within the wall can be void, partially filled, or completely filled with insulation.
Timber is sensitive to fire. Effective protection against fire exposure is crucial. Load-bearing timber assemblies must meet the ‘R’ performance criterion. This indicates fire resistance in minutes under standard fire exposure. Higher loads generally lead to earlier failure when exposed to fire. Design considerations for fire situations account for the reduction in cross-sections due to charring. They also consider the impact of heat on strength.
Common Issues and Preservation
Timber frame walls face several common issues. Moisture leads to rot and attracts insects. Indoor moisture sources include plumbing leaks, condensation, and appliance leaks. Poor ventilation in bathrooms and kitchens traps steam. Basements are naturally humid. Outdoor moisture sources include poor drainage, clogged gutters, and sprinklers aimed at walls. Mulch against the foundation retains water.
Wood rot is caused by decaying fungi. These fungi feed on cellulose and lignin, breaking down cell walls. This causes the wood to lose strength. Rot develops when moisture, fungi, and neglect combine. Insects like termites and carpenter ants accelerate decay. They damage wood fibers, creating entry points for fungi. This leads to a destructive cycle. Infill degradation can cause drafts or structural weakness.
Addressing underlying dampness is crucial for preservation. Simply using insecticides is ineffective if the moisture source remains. This type of wall construction requires careful attention to moisture management.
Early Stud-Frame Walls
Evolution of Stud Framing
Early stud-frame construction marked a significant change in building, moving away from heavy timber. Builders used smaller, more standardized lumber. Two main types emerged: balloon framing and platform framing. Balloon framing used exterior wall studs that ran continuously from the foundation to the roof.
This created an unbroken path, allowing fire to travel rapidly through open cavities. This fire hazard became a major concern, highlighted by events like the Chicago fire of 1871. Platform framing addressed this issue. Its wall studs extended only one level at a time. The floor above then sat directly on these studs, creating a platform for the next level and acting as a fire break. This prevented the vertical spread of flames.
Historical Development
Stud framing became very popular. Balloon framing was common in the mid-west and plains states due to accessible mills, a need for rapid construction, and scarce heavy timber. William Bell’s book, ‘Carpentry Made Easy,’ published from 1858 to 1904, showed its widespread use. The shift from heavy timber to balloon framing was gradual. It changed building methods significantly.
Exterior Finishes and Siding
Early stud-frame homes used various exterior finishes. In the 18th and 19th centuries, common siding materials included stone, brick, and wood. Brick structures appeared in Virginia as early as 1611. Dutch and British immigrants brought this method. Residential wood siding became widely used. This happened when transporting brick became more expensive. Wood was readily available.
Characteristics and Advantages
Early stud-frame construction offered several advantages. It used less lumber than heavy timber framing. This made it more affordable. It also allowed for faster construction. Builders could erect homes more quickly. This method provided flexibility in design. It allowed for different layouts and sizes for interior walls.
Common Issues and Upgrades
Early stud-frame construction had some common problems. Balloon-framed homes often featured full-height studs, running from the foundation to the roof. This created continuous, empty cavities connecting different floor levels. In a fire, these acted like chimneys. Hot gases and smoke spread rapidly upward, reducing escape time.
Proper fireblocking was often missing. Building codes recognized this hazard by the late 1800s. However, implementation was often inadequate. Carpenters sometimes underestimated fireblocking’s importance. This led to careless installation, making the firestopping practically worthless. The lack of insulation in these early cavity interior walls also caused energy inefficiency. Upgrades often involve adding insulation and improving fire safety.
Other Types of Walls in Old Houses
Old houses sometimes feature wall types less common today. These unique constructions reflect local materials and building traditions. They offer distinct characteristics and historical insights.
Adobe and Rammed Earth Walls
Adobe and rammed earth walls represent ancient, sustainable building methods. Builders create adobe walls from sun-dried bricks made of clay, sand, and straw. They stack these bricks with mud mortar. Rammed earth walls use a mixture of soil, sand, clay, and sometimes a stabilizer like cement. Workers compact this mixture into forms, creating solid, monolithic walls. Both types offer excellent thermal mass. They keep interiors cool in summer and warm in winter. These walls are common in arid regions.
Early Concrete Block Walls
Early concrete block walls provided a durable and affordable building solution. Harmon S. Palmer invented a machine to produce concrete blocks in 1900. These early blocks contained cement, sand, and water, sometimes reinforced with steel. Harmon H. Palmer, his son, invented the first hollow concrete block in the 1920s. This design used less material. It made blocks lighter and easier to handle.
Hollow blocks also offered better insulation. This made them suitable for homes and other structures. By the 1930s, concrete blocks became very popular due to their low cost. Builders used them extensively in public works projects, homes, commercial buildings, and industrial facilities.
Demand for building materials during World War II increased their use. They were crucial in rebuilding after the war. People used them for foundation walls, often with a rock-faced finish. They also built basement walls and partition walls. Exterior walls were typically plain-faced and often covered with stucco. Builders also used them as a back-up material or for cavity wall construction.
Log Construction Walls
Log construction walls showcase natural timber. Builders use various methods to create these walls. The Scandinavian Full-Scribe method uses naturally-shaped logs. Workers scribe and custom-fit these logs to each other. They use notched corners for a tight fit. The Flat-on-Flat method stacks logs flattened on the top and bottom. This often uses butt-and-pass corners. Milled log houses use a tongue-and-groove system for alignment and sealing. Log profiles vary.
D-shape logs are round on the exterior and flat inside. Full-round logs are round both inside and out. Square logs are flat on both sides. Corner joinery also differs. Interlocking saddle notches create tight, interlocked corners. Dovetail joints are cut on the end of square logs for a secure fit. Builders include slip joints above window and door openings. These prevent warping from wall shifts. Adjustable jacks under vertical elements allow for height adjustments.
This post explored the diverse types of walls in old houses. Each type possesses unique characteristics and historical significance. Understanding the specific type of walls in an old house is crucial. Homeowners must identify the wall type before any repairs or renovations. This ensures appropriate methods and materials. Proper care preserves the original construction of old homes. It ensures their longevity and maintains their historical value. Appreciate these unique types of walls in old houses. They tell a story. Preserving these various types of walls in old houses is important.
FAQ
How can homeowners tell if their walls are plaster and lath?
Homeowners can look for visual cues. Plaster walls often have a slightly uneven or textured surface. They may show hairline cracks. A sound test also helps. Tapping the wall produces a solid thud. This differs from the hollow sound of drywall. Probing techniques can confirm the wall type.
Can homeowners hang heavy items on plaster walls?
Yes, homeowners can hang heavy items on plaster walls. They must use appropriate anchors. Toggle bolts or molly bolts work well for heavier objects. Finding a stud behind the plaster provides the most secure hanging point. Avoid using simple nails for heavy items.
Are old house walls well-insulated?
Many old house walls lack modern insulation. Early stud-frame walls often had empty cavities. Plaster and lath walls also provided minimal thermal resistance. This can lead to higher energy costs. Homeowners can add insulation during renovations. This improves energy efficiency.
What is the best way to repair a large crack in a plaster wall?
First, homeowners clean the crack. They remove any loose plaster. Next, they stabilize the lath if it is loose. They then apply a bonding agent. Finally, they fill the crack with a suitable plaster compound. They apply multiple thin coats for the best results.


