You can transform your living spaces with diy pallet projects. This trend is booming, showing a 3.7% annual growth in diy home improvement. Pallet wood offers an easy, eco-friendly way to create unique items. You will discover pallet ideas that are both affordable and versatile for your home and garden. Even beginners can create amazing projects using wood pallets. These easy pallet project ideas will help you create functional pallet pieces for your home and outdoor garden areas.
Getting Started with Pallet DIY
Safe Pallet Sourcing
You begin your pallet journey by finding the right wood. Look for pallets marked with “HT”. This means “Heat Treated”. These pallets are safe. They have been heated to a core temperature of 56°C (132.8 °F) for at least 30 minutes. This process kills pests. The stamp includes the IPPC symbol, country code, a unique facility number, and “HT”. Avoid pallets marked “MB”. This means “Methyl Bromide”. Methyl bromide is a neurotoxic gas. It can cause headaches, dizziness, and nausea. It is dangerous. Also, avoid any pallet with spills or stains. You want clean wood. Pallets often use Southern yellow pine or oak. These are strong woods. You can also find poplar, gum, maple, and alder. Douglas-fir is common on the West Coast. Choose sturdy, clean pallet wood for your projects.
Pallet Wood Prep
You have your safe pallet. Now, prepare the wood. First, clean it. Sweep off loose dirt. Use a scraper for tough spots. Then, wash the pallet. Mix dish soap with water. Scrub the wood well. You can also use a bleach or vinegar solution. Rinse the pallet thoroughly with a hose. Let it dry completely in the sun. Sand the wood after it dries. This makes it smooth. Next, disassemble the pallet. Wear safety glasses and gloves. Use a wrecking bar or sawzall. Alternate prying sides to prevent splitting. A rubber mallet helps with stubborn nails. This step prepares your wood to build amazing things. You create new life for old wood. You will build your vision. You create something unique.
Essential Tools
You need the right tools to build your pallet creations. A reciprocating saw, like a Sawzall, cuts through nails. An orbital sander smooths the wood. A wireless electric drill is essential for many tasks. A nail gun speeds up assembly. You will need an air compressor for the nail gun. A miter saw makes precise cuts. A table saw helps rip wood lengthwise. These tools help you create your diy projects easily. You can build anything with them. You will create beautiful pieces.
Easy DIY Pallet Projects for Home
You can transform your indoor spaces with these easy diy pallet projects. You will create functional and stylish pieces for your home.
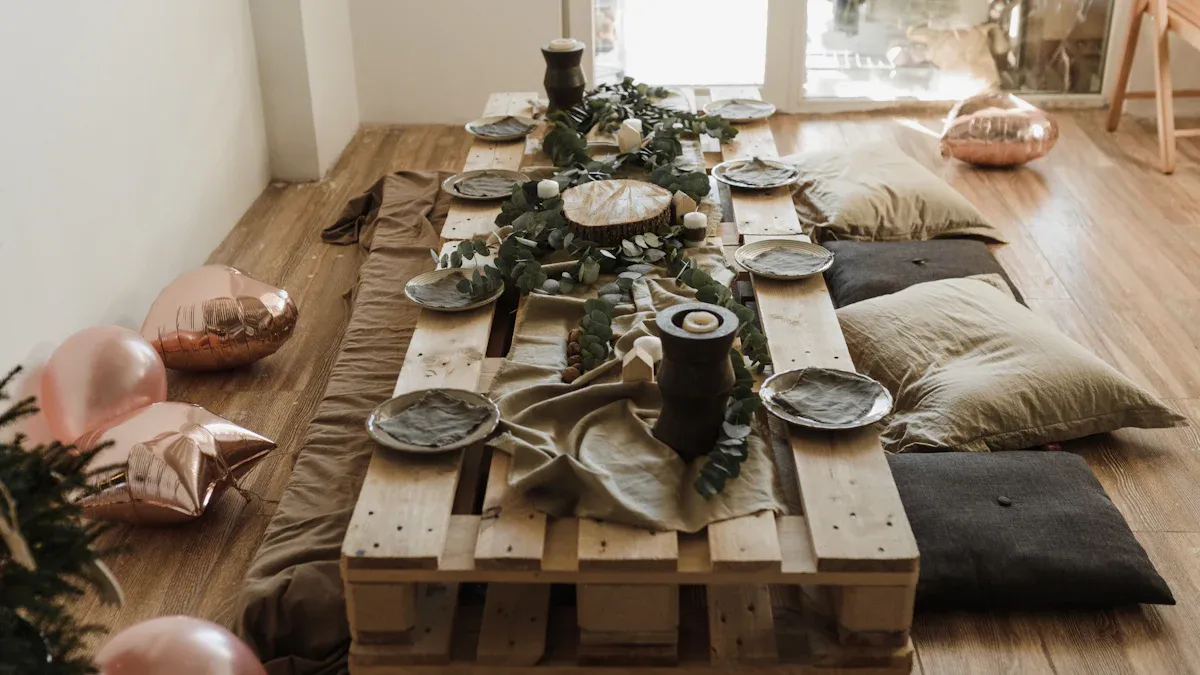
Rustic Coffee Table
You can build a charming coffee table. This pallet project adds rustic appeal to your living room. A standard rectangular coffee table often measures 48 inches by 24 inches. Its height is typically 16–18 inches. You can aim for these dimensions.
Minimal Required Materials: Pallet wood, sandpaper, wood glue, 3-inch deck screws, 1-inch staples, optional hairpin legs.
Simple, Actionable Steps:
Disassemble your
pallet. Sand the wood smooth.Cut pieces for your tabletop. You can arrange them to your desired size.
Builda simple frame for the base. Use 3-inch deck screws to connect the frame segments.Attach the tabletop boards to the base. Use wood glue and 1-inch staples for a strong hold. You can also use #8 screws (1¼ inch) if adding hairpin legs.
Simple Bookshelf
You can create a practical bookshelf. This pallet piece organizes your books and decor.
Minimal Required Materials: Pallet wood, screws, optional wall ties or floor anchors.
Simple, Actionable Steps:
Cut
palletboards to your desired shelf lengths and support pieces.Assemble the shelves. Use screws to secure the horizontal shelves to vertical supports.
Consider stability. You can use wall ties to secure the bookshelf to a wall. Floor anchoring with anchor bolts also prevents tipping.
Entryway Shoe Rack
You can build an organized entryway. This easy pallet shoe rack keeps clutter away.
Minimal Required Materials: Pallet wood, screws.
Simple, Actionable Steps:
Cut
palletboards to form shelves and side supports.Assemble the rack. Screw the shelves between the side supports.
You can stack multiple units for more storage.
Wall-Mounted Shelf
You can create extra display space. This pallet wall shelf is perfect for small items.
Minimal Required Materials: Pallet wood, screws, wall anchors.
Simple, Actionable Steps:
Cut a
palletboard to your desired shelf length.Attach smaller
palletpieces underneath for support.Mount the shelf to your wall using screws and wall anchors.
Pet Bed Frame
You can build a cozy bed for your furry friend. This pallet frame is perfect for a medium-sized dog. A bed for a dog weighing 26-40 lbs needs dimensions of 30 inches by 20 inches.
Minimal Required Materials: Pallet wood, screws, pet bed cushion.
Simple, Actionable Steps:
Disassemble a
pallet. Cut pieces tocreatea frame.Assemble the frame. Use screws to join the sides.
Insert a pet bed cushion. Your pet will love its new
home.
Kitchen Island Cart
You can create a mobile workspace. This pallet kitchen island cart adds versatility.
Minimal Required Materials: Pallet wood, screws, casters.
Simple, Actionable Steps:
Builda sturdy base frompalletwood.Attach a tabletop. You can use more
palletwood or a different surface.Install casters on the bottom. Soft-wheel casters work well on linoleum floors. Casters with brakes offer some stability. You can also use feet that lock down to lift weight off the casters for more stability.
Easy Pallet Projects for Garden
You can transform your outdoor spaces with these straightforward projects. You will design functional and beautiful additions for your garden.
Vertical Herb Garden
You can plant a pallet herb garden. This vertical planter saves space. It brings fresh herbs to your outdoor area.
Minimal Required Materials: Reclaimed wood structures, soil, herb plants.
Simple, Actionable Steps:
Prepare your reclaimed wood structure. Ensure it is clean.
Attach fabric or mesh to form pockets for soil.
Fill the pockets with soil.
plant a pallet herb garden. Most herbs generally thrive with 6 to 12 inches of root space. Cilantro requires a container at least 6 inches deep. Mint needs soil 10 to 12 inches deep for proper drainage and nourishment.When choosing plants for the top levels of this tiered
planter, prioritize those with shallow roots. Basil or mint work well here. Succulents and small flowering plants also fit. You cancreate colorful plantersthis way.
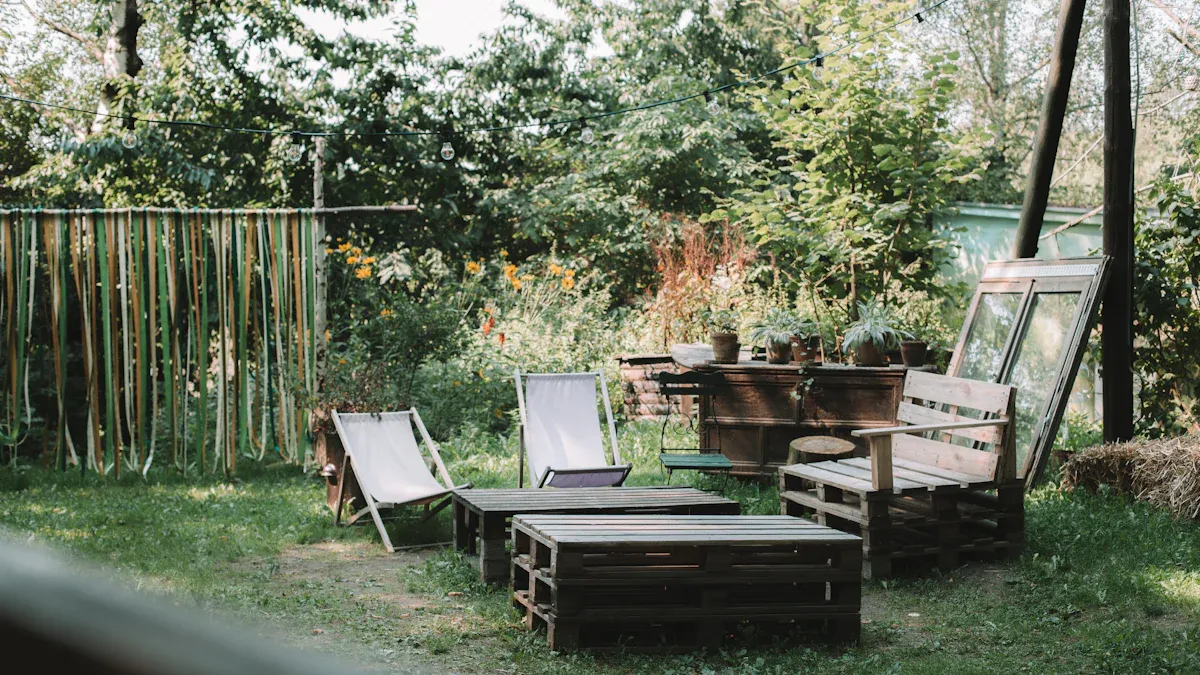
Outdoor Bench
You can fashion a comfortable outdoor bench. This seating adds charm to your garden.
Minimal Required Materials: Reclaimed wood structures, screws, sandpaper.
Simple, Actionable Steps:
Disassemble the reclaimed wood structures. Sand the pieces smooth.
Cut pieces for the seat and legs.
Assemble the bench. Use screws to join the parts securely.
Place it in your
gardenfor relaxation.
Garden Tool Organizer
You can organize your garden tools. This outdoor organizer keeps everything tidy.
Minimal Required Materials: Reclaimed wood structure, heavy-duty screws or framing nails, optional wood stain and weatherproofing sealant.
Simple, Actionable Steps:
Acquire a reclaimed wood structure. Optionally, pry off some slats for easier staining and attachment.
Stain or apply weather sealant. Allow it to cure.
Attach the reclaimed wood structure to a shed, fence, or house. Use long screws or framing nails. Ensure they go through both the wood structure and the supporting structure.
Ensure the wood structure is elevated a few inches off the ground. This prevents debris accumulation.
Reattach any slats you removed earlier.
Mount the wood structure on a wall. Use it to hold yard tools like grass trimmers and hedge clippers.
Compost Bin
You can assemble a compost bin. This helps your garden thrive.
Minimal Required Materials: Reclaimed wood structures, wire mesh, hinges.
Simple, Actionable Steps:
Form four sides using reclaimed wood structures.
Connect the sides with hinges or screws.
Line the inside with wire mesh. This allows air circulation.
Start composting for your
gardento enrich your soil. This helps yourplanterbeds.
Small Patio Base
You can design a small outdoor patio base. This provides a stable surface.
Minimal Required Materials: Reclaimed wood structures, gravel, landscape fabric.
Simple, Actionable Steps:
Prepare the ground. Lay down landscape fabric.
Spread a layer of gravel.
Arrange reclaimed wood structures on top. Form your patio base.
Enjoy your new
outdoorspace.
Kids’ Mud Kitchen
You can fashion a fun mud kitchen for kids. This outdoor play area sparks imagination.
Minimal Required Materials: Reclaimed wood structures, screws, old kitchen utensils.
Simple, Actionable Steps:
Before starting, ensure the wood is not damaged. Verify the wood is not full of chemicals. Check that there are no nails poking out of the wood.
Assemble a basic frame from reclaimed wood structures.
Add a countertop and shelves.
Attach old pots, pans, and utensils.
Your children will love this
outdoorplanterfor imaginative play.
Finishing Your Pallet Creations
You have built amazing things. Now, make them last. Proper finishing protects your pallet creations. It also makes them look professional.
Sanding and Finishing
Sanding is key for a smooth, safe finish. You want to remove splinters and rough spots. Start with a coarse grit. Use 60-80 grit sandpaper to remove old finish and level splinters. Then, move to 120 grit. This smooths out roughness. It evens out grain variations. Next, use 180-220 grit. This prepares the surface for stain or paint. For a truly silky feel, finish with 320-400 grit. This creates a glass-like surface, especially if you plan a clear sealant. Each finer grit removes scratches from the previous one. This ensures a uniformly smooth surface.
Securing Your Projects
Your pallet projects need to be strong. Use the right fasteners. Screws provide excellent holding power. Wood glue adds extra strength to joints. For larger pieces, consider brackets or corner braces. Always pre-drill holes. This prevents wood splitting. Make sure all connections are tight. Your creations will stand the test of time.
Painting and Staining
You can add color or enhance the wood’s natural beauty. Painting gives a fresh, new look. For outdoor projects, use exterior paint. Water-based acrylics are easy to apply. They dry fast and have less smell. Even entry-level exterior paint works if you have a budget. Staining brings out the wood grain. Test the stain on a hidden area first. This ensures it looks right. Sand the wood with the grain. Remove all dust with a tack cloth. This prevents blotchy stain. Apply a wood conditioner first. This helps the pallet wood absorb stain evenly. Make sure the wood is completely dry. Avoid staining on humid days. Start with a light coat. You can always add more for a darker shade. For outdoor items, like a garden bench, apply a sealant. Spar urethane or epoxy are great choices. They repel water and resist UV fading. Your outdoor pieces will stay beautiful.
Pallet wood offers immense potential for creative and functional projects. You gain affordability, sustainability, and personalization. Embrace your inner diy spirit. Start your own diy pallet projects journey. It is easy. Explore these pallet ideas. Share your amazing pallet creations. Discover more pallet inspiration.
FAQ
What kind of pallets are safe to use?
You should always look for pallets marked “HT.” This means “Heat Treated.” These pallets are safe. They have been treated to kill pests. Avoid “MB” (Methyl Bromide) pallets. This ensures safety for your diy projects.
What tools do I really need for pallet projects?
You need a reciprocating saw for disassembly. An orbital sander smooths the wood. A drill is essential for many tasks. These tools help you create amazing things for your home.
What are some easy outdoor pallet projects?
You can build a vertical herb garden. An outdoor bench adds seating. A garden tool organizer keeps things tidy. A compost bin helps your garden thrive. You can also make a kids’ mud kitchen for outdoor fun.
What finishes work best for outdoor pallet furniture?
For outdoor items, use exterior paint or stain. Apply a weather-resistant sealant. Spar urethane or epoxy works well. This protects your creations from the elements.