
You want a kitchen refresh, right? But new cabinet hardware can cost a fortune! Don’t worry; you can totally transform your space without breaking the bank. Painting your existing hardware is a super effective, budget-friendly solution. Imagine the satisfaction of a DIY project that makes such a huge difference! Learning how to paint cabinet hardware is easy, too, perfect for any skill level.
Why Update Hardware with Paint
Save Money, Boost Style
You want a fresh look for your kitchen, but new hardware can really add up. Think about it: a full set of new knobs and pulls for all your cabinets costs a lot. When you choose to paint your existing hardware, you save a ton of money. This smart move lets you achieve a high-end look without the high-end price tag. You can pick any color or finish you like, matching your kitchen’s style perfectly. It’s amazing how a simple change like this can make your whole kitchen feel brand new and much more expensive than it actually was.
Quick Kitchen Refresh
Are you looking for a fast way to update your kitchen? Painting your cabinet hardware is one of the quickest and most impactful projects you can do. You don’t need to tear out cabinets or spend weeks on a big renovation. This project takes just a weekend, maybe even less. You remove the hardware, give it a fresh coat of paint, and put it back. Suddenly, your kitchen has a whole new vibe. It’s an instant facelift that makes a huge difference in how your space feels.
Sustainable Upcycling
Choosing to paint cabinet hardware is also a great choice for the planet. Instead of throwing away your old knobs and pulls, you give them a new life. This is called upcycling, and it reduces waste. You prevent perfectly good items from ending up in a landfill. Plus, you save resources that would go into making new hardware. You feel good knowing you made an eco-friendly decision while making your kitchen look fantastic. It’s a win-win for you and the environment!
Materials & Tools for Painting

Before you start your exciting project to paint cabinet hardware, gather all your supplies. Having everything ready makes the process smooth and fun!
Cleaning & Prep Supplies
First, you need to get your hardware super clean. You can use a strong degreaser or a simple vinegar solution to soak away grime. For really tough dirt, a TSP substitute works wonders. Even regular Dawn dish soap mixed with warm water can do the trick. Make sure you have some old rags or paper towels for scrubbing and drying. If your hardware has old paint or rust, you might need some fine-grit sanding blocks to smooth things out.
Primer & Paint Choices
Choosing the right primer is key for paint to stick well. For metal hardware, you have great options. Oil-based primers are a classic choice and work on many metals. Latex primers are flexible and good for galvanized metals. Shellac-based primers dry fast and stick to almost anything. You might hear about KILZ 3 Premium primer or Zinsser 123 Bullseye primer; both are excellent for slick surfaces.
Now for the fun part: paint! For a durable finish, look for paints made for trim or cabinets. These paints, like Benjamin Moore Advance or Sherwin-Williams Emerald Urethane Trim Enamel, are tough. They resist chips and stand up to daily use. A semi-gloss finish is often best because it’s easy to clean and very durable. If you prefer spray paint, Rust-Oleum 2x (satin black is popular!) or Rust-Oleum Universal Metallic Spray Paint can give you a smooth finish. COLORSHOT Premium Spray Paint also offers great results in gloss, satin, or matte. Some people even prefer Krylon spray paint because it dries so fast! For a different look, you could try Rub ‘n Buff, which gives a metallic sheen.
Application Essentials
You’ll need some basic tools to apply your paint. If you’re spraying, make sure you have a comfortable grip. For brush-on paints, small artist brushes or foam brushes work well for detailed hardware. Don’t forget gloves to keep your hands clean!
Workspace Setup
Setting up your workspace safely is important. Always ensure good ventilation by opening windows and doors. A fan helps too! Wear personal protective equipment (PPE) like goggles and gloves to protect your eyes and skin from paint fumes and chemicals. Lay down drop cloths or old newspapers to protect your surfaces. This helps you keep your area tidy and safe while you paint cabinet hardware.
How to Paint Cabinet Hardware: Step-by-Step

You are ready to transform your kitchen! Follow these steps to successfully paint cabinet hardware and get amazing results.
Remove & Clean Hardware
First, you need to take off all your cabinet hardware. Grab a screwdriver and carefully remove each knob and pull from your cabinets and drawers. Keep all the screws in a safe place, like a small bowl or a Ziploc bag, so you do not lose them.
Now, it is time to get them sparkling clean. This step is super important for paint to stick well. You want to remove all the grease, grime, and old finishes.
Soaking for Deep Clean: Submerge your hardware in a solution of warm water and mild detergent. You can add a splash of white vinegar too. Let them soak for about 20-30 minutes. This helps loosen up all the dirt and grime.
Effective Scrubbing: Use a soft-bristled brush, like an old toothbrush, to gently scrub all the intricate details. Rinse your brush often to avoid just moving grime around.
Tackling Stubborn Stains: Do you have some really tough spots? Make a paste with baking soda and water. Apply it to the stain, let it sit for a bit, then gently scrub. You can also use white vinegar on a cloth for stubborn grease. Just avoid harsh chemicals; they can damage your hardware.
For stubborn stains or discoloration, more potent cleaners or simple solutions like baking soda can be effective. Always remember to rinse and dry the hardware thoroughly afterward. Make sure each piece is completely dry before moving on.
Prep for Painting
Sometimes, your hardware might have old paint or a really slick finish. If so, a light sanding helps the primer stick better. Use a fine-grit sanding block (around 220-grit) and gently scuff up the surface of each piece. You do not need to remove all the old finish, just create a little texture. After sanding, wipe down each piece with a clean, damp cloth to remove any dust. Let them dry completely.
Prime for Adhesion
Priming is a crucial step. It creates a perfect surface for your paint to grab onto. Lay out your hardware on a protected surface in a well-ventilated area. You can use a piece of cardboard or an old sheet.
If you are using spray primer, hold the can about 8-12 inches away. Apply a thin, even coat. Do not try to cover everything in one go. Light coats are better! If you are brushing on primer, use a small brush to get into all the nooks and crannies. Let the first coat dry according to the product instructions, then apply a second thin coat. This ensures great adhesion for your paint.
Apply Your Finish
Now for the fun part – adding color! Just like with primer, thin, even coats are your best friend.
If you are using spray paint, shake the can well. Hold it about 8-12 inches away and apply a light, even coat. Keep your hand moving to avoid drips. Let this first coat dry completely. Check your paint can for specific drying times, but usually, it is about 30 minutes to an hour. Once dry, apply a second thin coat. You might even need a third coat for full coverage, especially if you are going from a dark color to a light one.
If you are brushing on your paint, use a small, good-quality brush. Apply thin coats, brushing in one direction if possible. Let each coat dry fully before applying the next. Patience here will give you a smooth, professional finish.
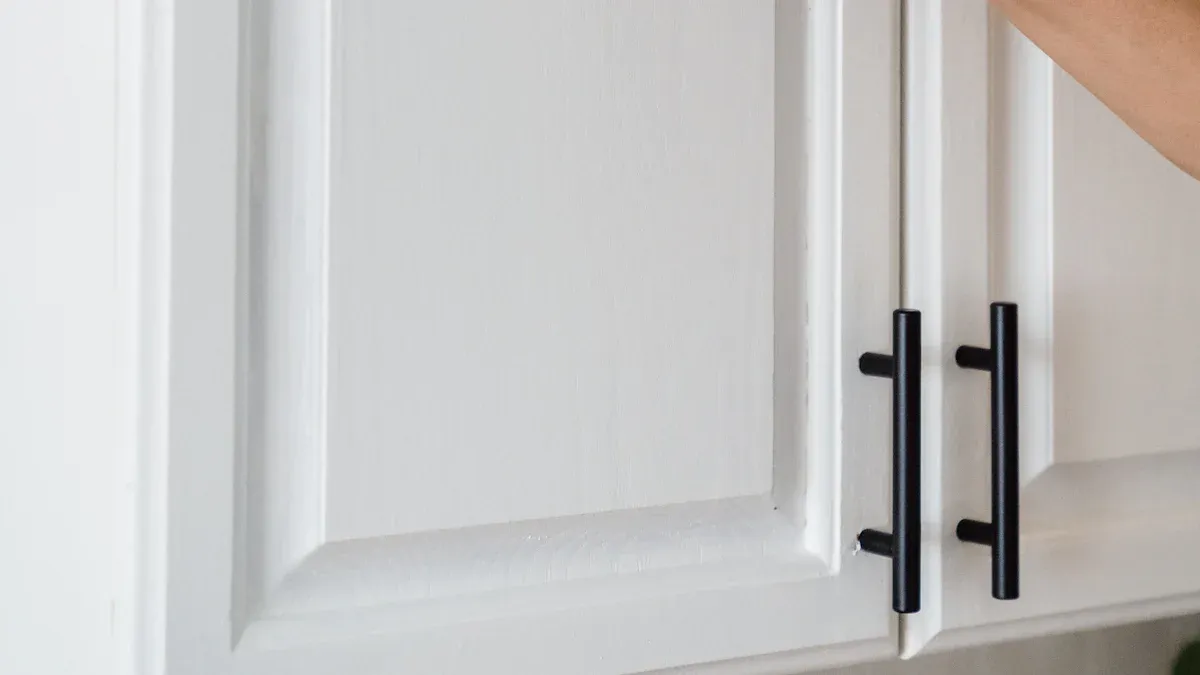
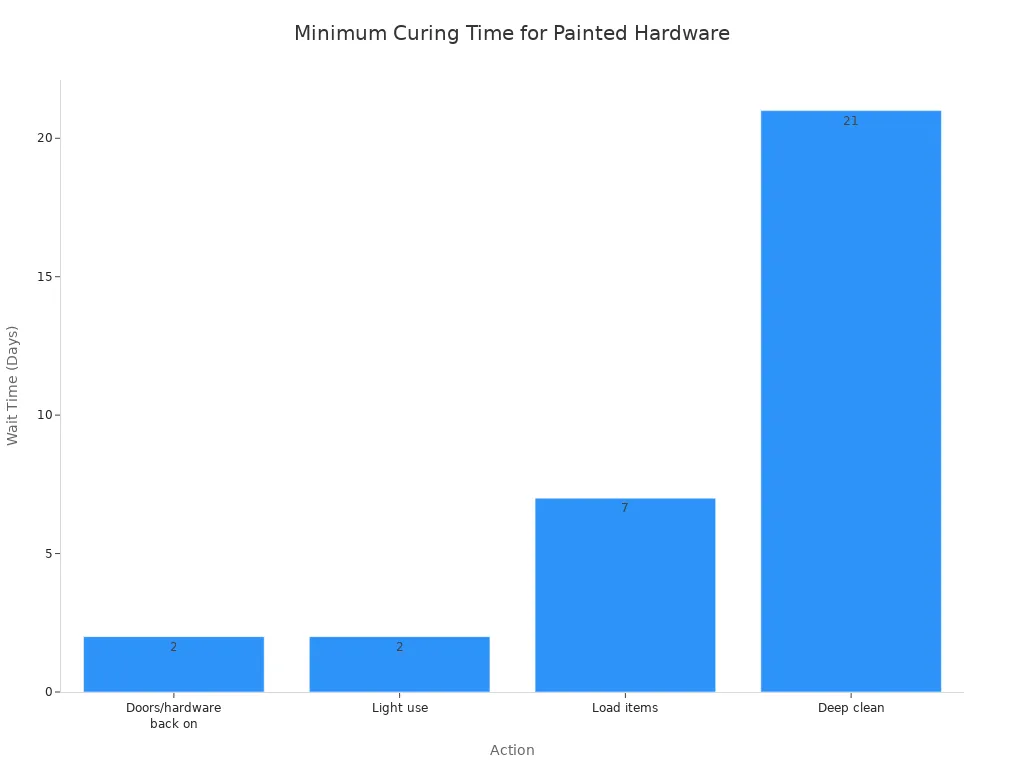
Cure & Reinstall
You have painted your cabinet hardware, and it looks fantastic! But do not rush to put it back on. The paint needs time to cure, which is different from just drying. Curing means the paint hardens completely. This makes it durable and chip-resistant.
You can rehang doors and reattach hardware after 48–72 hours. However, avoid adding heavy hardware or slamming them until after the full cure, which typically takes about 2–3 weeks, to prevent damaging the new paint. For painted cabinet hardware, it is ideal to wait a full 48 hours before reattaching it to allow the paint to bond. However, it’s important to be gentle with the hardware for at least a week to prevent scratches or chips, as full curing takes longer than just drying.
Here is a general guide for wait times:
Action | Wait Time |
|---|---|
Doors/hardware back on | 2–3 days |
Light use | 2–3 days |
Load items | 7–14 days |
Deep clean | 21–30 days |
Add sealant/topcoat | After full cure |
Once your hardware is fully cured, carefully reattach each piece to your cabinets and drawers. Enjoy your refreshed kitchen!
Pro Tips for Lasting Results
You have done all the hard work, now make sure your beautiful new hardware lasts! These tips help you get professional-looking results and keep them that way.
Avoid Common Mistakes
You want great results, right? Then don’t rush! Patience is key when you paint. Many people try to apply too much paint at once. This causes drips and uneven coverage. Instead, apply thin, even coats of paint. Allow each coat to dry completely before you apply the next one. If you use spray paint, shake the can well before you start. Maintain a consistent spray speed and distance, holding the can about 6-8 inches away from the hardware. Use smooth, sweeping motions. Avoid holding the can too close or too far. You will prevent those frustrating drips and get a much smoother finish.
Achieve a Smooth Finish
Getting that perfectly smooth finish is all about technique. After you clean and prime your hardware, remember those thin coats. If you are spraying, overlap each pass slightly. This helps create an even layer. For brushed applications, use a good quality brush and try to brush in one direction. Light sanding between coats with very fine-grit sandpaper can also help, but make sure to wipe away all dust before the next coat.
Ensure Long-Term Durability
You want your updated hardware to stand up to daily use. A protective sealant is essential. It adds an extra layer of defense against moisture, stains, and scratches. Choose sealants that work well with your paint type. General Finishes High Performance Topcoat is a great choice. It is easy to apply and offers robust protection. You can also consider General Finishes Flat Out Flat Topcoat for a matte look with durability. These topcoats give your hardware a tough, long-lasting finish.
Care for Painted Hardware
Keeping your newly painted hardware looking good means cleaning it right. You should avoid certain cleaning products. Abrasive powders can dull the surface. Bleach and ammonia can strip finishes, cause peeling, or leave permanent marks. Strong enzymatic cleaners are also a no-go. Do not use abrasive cleaners, including Mr. Clean Magic Erasers. Solvent-based cleaners and harsh chemicals like bathroom cleaners are harmful. Cleaners with wax, baking soda, or silicone can damage painted surfaces. Stick to a soft cloth and mild soap and water for cleaning. This keeps your hardware looking fresh for years.
You now see the huge impact and cost-effectiveness of painting cabinet hardware. It is a fantastic kitchen update! You save money, boost your kitchen’s style, and feel great about a DIY project. You can confidently tackle this project. Professional-looking results are totally achievable for you. Go ahead and transform your kitchen space with minimal investment.
FAQ
How long will the painted hardware last?
Your painted hardware can last for many years! Proper cleaning, priming, and a good topcoat are very important. Avoid harsh cleaners. Be gentle with them, especially during the first few weeks. This helps your paint stay strong.
Can I paint all types of cabinet hardware?
Yes, you can paint most metal hardware. This includes brass, nickel, and even plastic pieces. Just make sure you clean and prime them well. This helps the paint stick firmly.
What if I want to change the color later?
No problem at all! You can always repaint your hardware. Just clean it again, lightly sand it, and apply new primer and paint. It is easy to change your kitchen’s look whenever you want.
Is a topcoat really necessary?
Absolutely! A topcoat protects your paint from chips and scratches. It adds an extra layer of defense. This makes your hardware much more durable. It ensures your hard work lasts a long time.
