
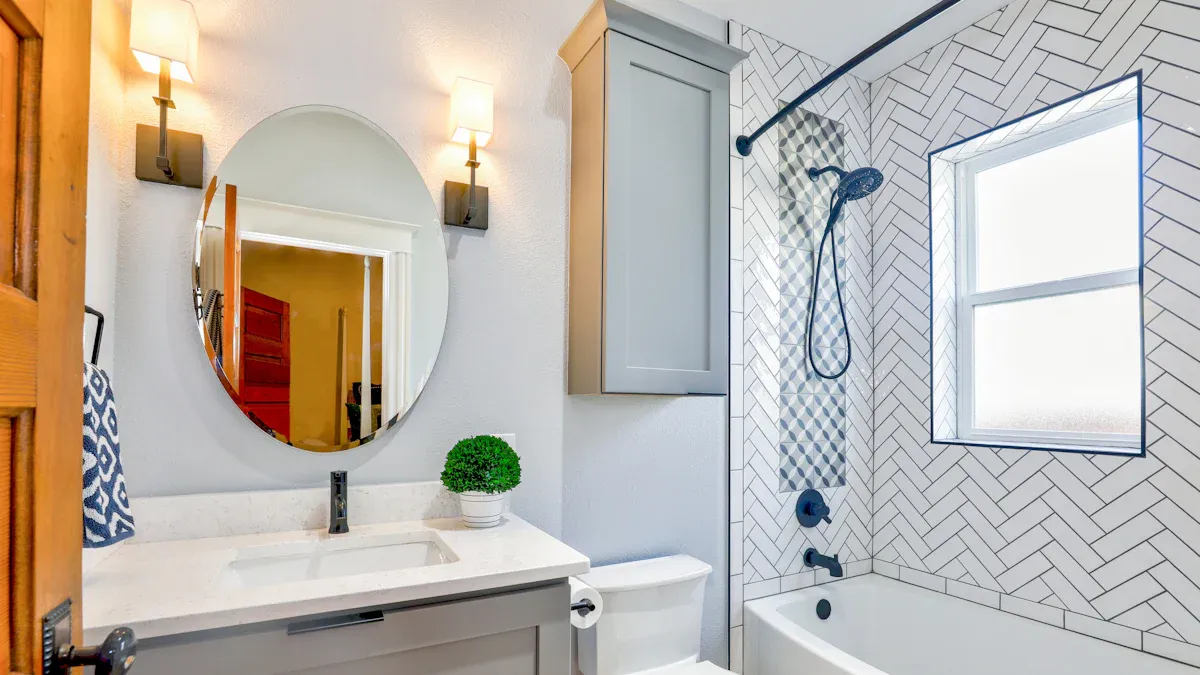
Looking for a fresh bathroom aesthetic without the hefty price tag of a major remodel? A full bathroom renovation can be quite expensive. Painting your toilet flush handle offers an easy and affordable solution. This quick toilet upgrade provides a significant aesthetic boost. You can renew a worn toilet handle or perfectly match existing fixtures.
It’s an effortless way to update your toilet. This simple project gives your toilet’s flush handle a durable finish. You’ll be amazed at how a small change to your handle transforms your bathroom. We’ll show you how to paint toilet handle for a lasting result.
Why Paint Your Toilet Handle?
Cost-Effective Bathroom Refresh
You want to update your bathroom, but a full remodel can cost a lot. Painting your toilet handle is a smart, budget-friendly choice. It’s an easy way to give your bathroom a fresh look without spending much money. Think about it: buying a new toilet flush handle can add up. Look at the typical costs for new handles:
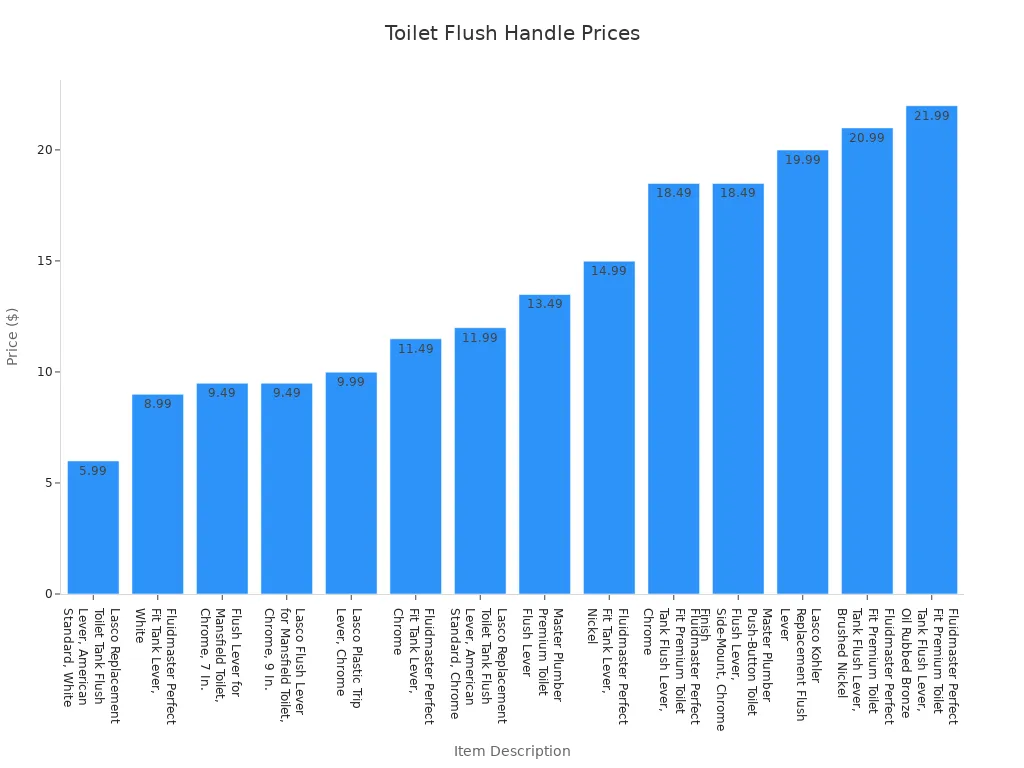
As you can see, even a simple handle can cost you. Painting lets you achieve a similar effect for just a few dollars. This quick toilet upgrade is a fantastic part of any bathroom remodel ideas you might have. You save money and still get a great result.
Matching Existing Fixtures
Does your current toilet handle clash with your other bathroom fixtures? Maybe you updated your faucet to a sleek brushed nickel, but your handle is still chrome. Painting your toilet handle lets you perfectly match your existing decor. You can choose from popular finishes like:
Brushed Bronze or Aged Brass: These warm tones blend well with neutral colors.
Polished Nickel: A classic choice that always looks good.
You can make your toilet look like it belongs with the rest of your bathroom. This small detail makes a big difference in your overall bathroom remodel. It helps create a cohesive and stylish space.
Renewing Worn Handles
Over time, your toilet handle can start to look tired. Constant use and humidity can cause problems. You might notice your handle:
Feels wobbly or stuck.
Doesn’t flush properly.
Shows signs of corrosion or rust.
Instead of replacing it, you can repaint it! A fresh coat of paint covers up wear and tear. It makes an old handle look brand new. This simple repaint job extends the life of your existing toilet handle. It also gives your toilet a clean, updated appearance. You get a renewed handle without the hassle of installation.
Materials for Painting Your Toilet Handle
Before you start to paint your toilet handle, you need to gather the right supplies. Having everything ready makes the process smooth. You want to make sure your newly painted toilet flush handle looks great and lasts a long time.
Handle Removal Tools
First, you need to take the handle off your toilet. This usually requires just a few simple tools. You might need an adjustable wrench or pliers to loosen the nut on the inside of the toilet tank. Sometimes, a screwdriver helps if there are screws holding the handle in place. Make sure you have a small container nearby to keep any nuts or washers safe. You do not want to lose any parts of your toilet.
Cleaning and Sanding Supplies
Proper preparation is key for a durable finish. You need to clean your handle thoroughly. Use a good cleaner degreaser to remove all grime and oils. Products like Rust Remover or Metal Prep work well. These aqueous cleaning products get the surface ready. After cleaning, you must sand the handle. This helps the paint stick. Start with 80-grit sandpaper to remove any existing paint or rough spots. Then, follow up with a light sanding using 120-grit sandpaper. You can also use super high grit automotive sandpaper or steel wool to rough up the surface. This ensures excellent paint adhesion.
Primer and Metal Paint
Choosing the right primer and paint is crucial for your bathroom environment. You need products designed for metal and high humidity. For primer, consider Zinsser 272479 Bulls Eye 1-2-3 Plus Spray Primer. It offers excellent adhesion to metal and resists mildew and mold, which is perfect for a toilet. It also dries quickly. For the topcoat, Rust-Oleum Protective Enamel Spray Paint is a great choice. Many DIYers use it for metal projects in humid spaces, like a shower door frame. This paint protects against rust, chipping, and fading. You can pick any color to match your bathroom remodel.
Optional Clear Topcoat
Adding a clear topcoat is a smart extra step. It gives your painted handle an extra layer of protection. A clear coat protects against corrosion and oxidation. It also enhances the natural shine of your chosen color. Look for clear coats designed for non-porous surfaces. These have adhesion promoters that help the coat bond to the paint. This makes your repaint job more durable. It extends the life of your toilet handle and keeps it looking fresh.
Painting Your Toilet Flush Handle: Step-by-Step
You’re ready to transform your toilet flush handle! This step-by-step guide makes the process easy. You will get a professional, durable finish. Just follow these instructions carefully.
Remove the Handle
First, you need to take the handle off your toilet. This is usually an easy task. Open the toilet tank lid. Look inside. You will see the back of the toilet flush handle. It connects to a lift chain or rod. You will also see a large nut holding the handle in place.
Different types of toilet handles exist. You might find:
A brass arm with a metal spud and nut.
A plastic arm with a plastic spud and nut.
A plastic cut-to-length arm, plastic spud, and nut.
A brass-plated arm with a plastic spud and nut.
An offset brass arm and plastic spud and nut.
Most often, you just unscrew the nut counter-clockwise. You can use an adjustable wrench or pliers if it’s tight. Once the nut is loose, disconnect the lift chain. Then, pull the handle straight out from the front of the toilet. Put all small parts in a safe place. You don’t want to lose them.
Clean and Degrease Thoroughly
Now, clean your handle very well. This step is super important for good paint adhesion. Use a strong cleaner degreaser. You want to remove all dirt, grime, soap scum, and oils. Products like mineral spirits or a dedicated metal cleaner work great. Wipe the handle down completely. Make sure no residue remains. A clean surface helps the paint stick. It prevents peeling later.
Sand for Adhesion
Sanding creates a surface the paint can grip. Metal surfaces are smooth. Paint needs something to hold onto. Sanding makes tiny scratches. These scratches give the paint molecules anchor points. This is called mechanical bonding. It stops the paint from peeling or chipping. Sanding also removes rust or old paint. These things can block new paint from sticking.
Here’s how to sand your handle for the best results:
Grit Progression: Start with 80-grit sandpaper. Use it to remove any rust or old paint. Then, move to 120-grit sandpaper. This smooths the surface. Finish with 220-grit sandpaper. This creates the perfect texture for paint adhesion.
Sanding Motion: Sand in the direction of the metal grain. Or, use circular motions. This prevents visible scratches from showing through your new paint.
Dust Removal: After sanding, remove all dust. Use a tack cloth. You can also wipe it with mineral spirits. Residual dust causes adhesion failure. It also makes the finish rough.
Surface Profile: Aim for a surface profile depth of 1.5 to 3.0 mils. This is the texture you get with 120-180 grit sandpaper. It gives the paint enough texture to bond.
Consistent Pressure: Keep your pressure and motion consistent. Use overlapping straight lines or gentle circular patterns. This ensures even material removal. It also avoids low spots or heat buildup.
Apply Primer Coats
Priming is a must for metal, especially in a humid bathroom. Primer creates a uniform base. It helps the topcoat stick better. It also offers corrosion protection. For metal fixtures in high-humidity areas, you should apply three primer coats. This gives you maximum corrosion protection and durability. It builds enough film thickness. This protects against damage. It also covers any tiny holes or thin spots.
Hold the spray can 10-12 inches from the handle. Apply a thin, even coat. Don’t try to cover everything in one go. Let the first coat dry for about 10-15 minutes. Then, apply a second thin coat. Repeat for the third coat. Always follow the primer manufacturer’s instructions for drying times between coats.
Paint in Thin Layers
Now it’s time for the color! You want to paint your toilet handle with thin, even layers. This prevents drips and runs. It also gives you a smoother finish. Hold the spray can 10-12 inches from the handle. This distance ensures a thinner coat of paint. It is less prone to dripping. Apply your first thin coat. Let it dry for 30-45 minutes. Then, apply a second thin coat for full coverage. You might need a third coat for some colors. Always let each coat dry to the touch before applying the next. This ensures a strong bond.
Add a Protective Topcoat
A clear topcoat adds extra protection. It makes your painted toilet flush handle more durable. It also protects against corrosion and oxidation. For maximum durability on bathroom fixtures, apply approximately two coats of a 2K PU Topcoat. Apply the second coat after a minimum of 6 hours. Do not wait more than 20 hours after the first coat. This ensures the best bond between coats. The topcoat will make your repaint job last longer. It keeps your handle looking new.
Allow Full Drying Time
Patience is key here! Do not rush this step. The paint might feel dry to the touch quickly. But it needs more time to fully cure and harden. This curing process can take 24-48 hours. Sometimes it takes even longer. Check the paint can for specific cure times. If you reinstall the handle too soon, you risk scratching or damaging the new finish. Let it sit in a clean, dry place.
Reinstall the Handle
Once the handle is completely dry and cured, you can reinstall it. This is easy to install. First, feed the handle shaft through the hole in the toilet tank. Then, reattach the nut on the inside of the tank. Hand-tighten it first. Then, use a wrench to gently snug it up. Do not overtighten. Overtightening can crack the toilet tank or damage the handle. Finally, reattach the lift chain to the handle arm. Make sure the chain has a little slack. This ensures a proper flush. Test the flush a few times. Make sure everything works correctly. You now have a beautifully updated toilet handle! This easy to install project makes a big difference in your bathroom remodel.
Tips for a Durable Finish
You want your newly painted toilet handle to look great for a long time. Follow these tips for a professional and durable finish. These steps help ensure your repaint job lasts.
Work in a Ventilated Area
Safety first! Always work in a well-ventilated area when you use spray paint. You should spray outdoors if possible. If you must spray indoors, open windows and doors. This lets fresh air come in during painting and drying. You should also wear respiratory protection. Painting masks are available at hardware stores. Keep sparks and open flames away from your work area. Do not smoke. Turn off all flames, pilot lights, and heaters. Also, turn off stoves, electric tools, and any other potential ignition sources. Vapors can spread quickly in a small bathroom. They can create an explosive atmosphere if they meet an ignition source.
Apply Even Coats
Applying even coats is very important. It prevents drips and runs. It also gives your toilet handle a smooth, uniform finish. Hold the spray can at the recommended distance. This distance is usually 10-12 inches from the surface. Move the can steadily across the handle. Do not stop in one spot. Overlapping your passes slightly ensures full coverage. Thin, even coats build up the color without creating thick, uneven spots.
Read Product Instructions
Always check the spray paint can label. It contains critical information. The label tells you about dry times and other important instructions. It also tells you the recommended distance to hold the spray paint. Following these specifications minimizes drips and excess paint. It ensures the best results for your toilet. Do not guess. The manufacturer knows best how their product works.
Patience with Drying
Patience is a virtue, especially with paint. Do not rush the drying process. If you apply a new coat before the previous one is dry, problems can happen. Solvents from the first layer need time to evaporate. Rushing can cause bubbling, wrinkling, or an uneven texture. Layers that have not settled properly can trap solvents. This creates a weak bond. Your paint might peel or flake off later. Not allowing proper drying time means each paint layer will not harden to its maximum strength. This reduces the overall durability of your repaint. Give your handle plenty of time to dry completely.
Painting your toilet flush handle is an easy, impactful DIY project. You give your bathroom a fresh look, save money, and feel proud of your accomplishment. This quick toilet upgrade transforms your toilet. You can achieve a professional, durable finish for your toilet flush handle. A well-painted handle, like a quality metal handle, can last many years with proper care, avoiding a costly bathroom remodel. This easy repaint makes a big difference in your bathroom’s aesthetics. Your toilet will look fantastic, and you’ll love the new flush. You avoid a full bathroom remodel, and your toilet’s flush mechanism will feel new.
FAQ
How long will the painted toilet flush handle last?
With proper preparation and a good topcoat, your painted toilet flush handle can last for years. It resists wear and tear. You get a durable finish for your toilet. This helps your toilet flush smoothly.
Can I paint a plastic toilet handle?
Yes, you can! Just make sure you use a primer specifically for plastic. Then, apply your metal paint. This works for any toilet.
What if the paint chips on my handle?
You can easily touch up small chips. Lightly sand the chipped area. Then, reapply primer, paint, and a topcoat. Your handle will look new again. This keeps your toilet looking great.
Do I need special paint for a toilet?
Yes, you do. Use metal-specific spray paint. It needs to withstand humidity. This ensures a long-lasting finish for your toilet. This helps avoid a full bathroom remodel. You will enjoy a perfect flush.
Is painting a handle better than a full bathroom remodel?
Painting your handle is a quick, budget-friendly update. It’s not a full bathroom remodel, but it gives a fresh look. You save money and time.
