You save money with basic household repairs knowledge. This gives you peace of mind. Understanding common issues prevents minor problems from becoming costly repairs. You can view home maintenance as an empowering skill. It builds your confidence and saves you money. This guide helps you with essential DIY home repairs. You will learn many useful DIY fixes for your home. These home projects cover many common tasks. Mastering these repairs makes you a more confident homeowner.
Plumbing Repairs: Leaks and Clogs
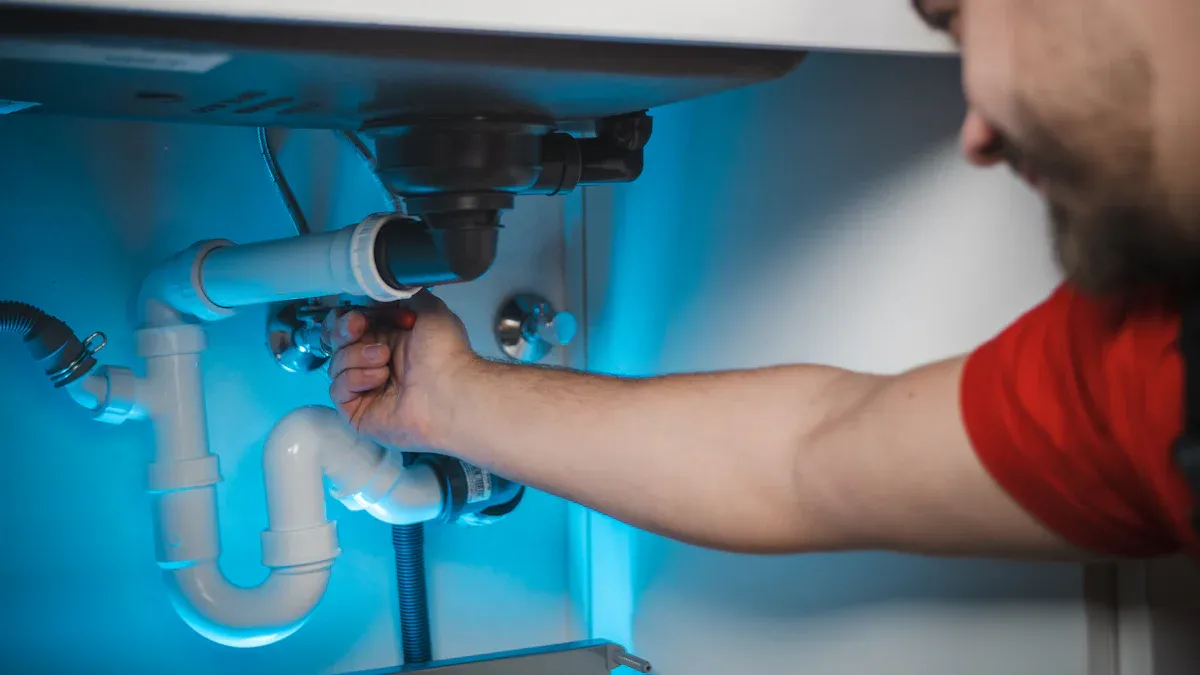
Understanding basic plumbing issues helps you save money. It also prevents small problems from becoming big ones. You can handle many common plumbing issues yourself. This section shows you how.
Spotting Common Leaks
Many leaks go unnoticed. They hide behind walls or under floors. Toilets are a common source of leaks. You might not see them. Hidden leaks can cause big damage. For example, slab leaks happen under your home‘s foundation. These leaks can damage your home’s structure. They can also cause mold. Other common leaks include frozen pipes that burst. These can leak into walls or ceilings. Toilet supply lines can become old and leak. Hot water heaters can corrode and fail. Appliances like dishwashers and refrigerators also have water lines that can leak. Outdoor spigots, called silcocks, can freeze and leak too. You should regularly check for these issues.
Fixing Leaky Faucets and Toilets
You can often fix leaky faucets yourself. A common reason for a dripping faucet is a worn-out washer. This small part allows water to seep through. The valve seat, where the faucet connects to the spout, can also corrode. This causes leaks. A small rubber O-ring inside the faucet can become loose or worn. This creates a leak. The cartridge, which controls water flow, can also wear out. High water pressure can stress your faucet. This leads to constant drips. You can replace these parts to stop the leak. For toilets, a running toilet often means the flapper or fill valve needs replacement. These are simple diy repairs you can do.
Clearing Minor Drain Clogs
You can clear many minor drain clogs without harsh chemicals. One effective method uses baking soda and vinegar. Pour half a cup of baking soda down the drain. Follow it with a cup of white vinegar. Let it sit for at least 30 minutes. Then, flush with hot water. Another trick is the “Half-Glass Trick.” Mix half a glass of salt with hot water and a spoonful of mild dish soap. Pour this slowly into the drain. Let it sit for an hour or overnight. Then, flush with hot water. The salt acts as a gentle abrasive. The dish soap cuts through grease. You can also use a plunger. Make sure the plunger covers the drain opening. Push and pull it firmly. For hair clogs, a wire hanger or a drain snake can physically remove the blockage. Boiling water alone can also dissolve soap scum and grease.
Operating House Valves
Knowing how to operate your house valves is very important for plumbing issues. You should know where your main water shut-off valve is. This valve stops all water flow to your home. Turn it off quickly during a major leak. Most fixtures, like sinks and toilets, also have individual shut-off valves. You can turn these off when you work on that specific fixture. This prevents you from shutting off water to the whole house.
When to Call a Plumber
Sometimes, you need professional help. You should call a plumber for serious repairs. Look for these signs:
Visible flooding, like burst pipes.
Sewage backing up into your fixtures.
No hot water, especially with strange sounds.
A big drop in water pressure throughout your house.
Constant gurgling sounds or bad smells from drains.
A gas odor near gas lines.
Toilets that overflow often or drains that are always slow.
Water stains on walls or ceilings. This means hidden leaks.
Mold growth. This also points to hidden leaks.
Pipes making unusual noises, like banging or clanking.
A sudden, unexplained increase in your water bill. These issues often mean a bigger problem. A professional can diagnose and fix them safely.
Electrical Repairs: Power Basics

You can handle many basic electrical issues in your home. However, you must prioritize safety. Electricity can be dangerous. You should always turn off power at the breaker before working on any electrical device or system. This simple step prevents accidents.
No repair is worth risking your personal safety. When in doubt, consult a professional appliance repair technician who can diagnose and resolve electrical issues safely and effectively.
You should know your limits when it comes to electrical repairs. Simple tasks like changing light bulbs are generally safe. Major electrical work should be left to professionals. This avoids danger and potential code violations. Also, be cautious of hidden wiring during any home improvement projects involving drilling or structural work.
Resetting Tripped Breakers
Circuit breakers protect your home’s electrical system. They trip to prevent damage from overloads or faults. You will find your circuit breaker panel in your basement, garage, or utility closet. When a breaker trips, its switch moves to the “off” or middle position.
Here are common reasons why circuit breakers trip:
Overloaded Circuits: This is the most common cause. Too many appliances operate simultaneously on one circuit. This exceeds its capacity and causes overheating.
Short Circuits: A hot wire touches a neutral wire. This leads to a sudden surge in current flow. This is a serious risk.
Ground Fault Surges: A hot wire contacts a ground wire or grounded part. This creates a dangerous current surge.
Faulty Appliances and Equipment: Old or malfunctioning appliances draw excessive power. This leads to circuit overload.
Worn out Circuit Breakers: Breakers degrade over time. They become overly sensitive and trip frequently without a substantial fault.
To reset a tripped breaker, first, turn off or unplug devices on that circuit. Then, firmly push the breaker switch all the way to the “off” position. Finally, flip it back to the “on” position. If the breaker trips again immediately, you have an underlying problem. You should investigate the cause.
Troubleshooting Outlets
A non-functioning electrical outlet can be frustrating. You can often troubleshoot these issues yourself.
Here are typical causes of non-functioning electrical outlets:
Tripped Circuit Breaker: This is the most common reason. An outlet is overloaded to prevent fire hazards. A loose wire can also be the underlying cause.
Tripped Ground Fault Circuit Interrupter (GFCI): GFCI outlets are common in kitchens and bathrooms. They trip to prevent fire hazards. If one trips, all other outlets in the room may stop working. Resetting the button often resolves the issue.
Loose Electrical Connections: The internal connections within an outlet may not be tight. This can stop it from working.
Burn Out: Outlets can simply burn out. Sometimes this happens with a flash or spark. Warning signs include the outlet staying warm, sparking, or blackening around the plug.
You can check your breaker panel first. Look for a tripped breaker. If it is a GFCI outlet, press the “reset” button. If these simple steps do not work, you might have a loose wire or a faulty outlet. You should turn off the power to that circuit before inspecting the outlet.
Replacing Light Switches
Replacing a light switch is a common diy electrical repair. You can do this with basic tools. Always turn off the power to the switch at the circuit breaker first. Use a voltage tester to confirm the power is off. Unscrew the old switch from the wall box. Carefully disconnect the wires. Note how they connect to the old switch. Connect the new switch using the same wiring configuration. Secure the new switch in the wall box. Then, replace the cover plate. Finally, turn the power back on at the breaker.
When to Call an Electrician
Some electrical problems require professional help. You should call a licensed electrician for specific scenarios.
Here are situations where you need an electrician:
Old or Damaged Wiring: Your home has old or damaged wiring. You see frequent electrical issues, burning smells, or visible wear. An electrician is needed to safely replace it and ensure code compliance.
Frequent Light Bulb Burnouts: Light bulbs burn out quickly. This indicates a poor connection or underlying electrical fault. It needs prompt inspection to prevent overheating and dangerous conditions.
Loose Outlets: Outlets no longer hold plugs securely. This poses a fire hazard due to electrical arcing. An expert should replace them to ensure secure and effective installation.
Unusual Smells, Warm Shocks, or Frayed Wires: These are clear indicators that you need professional assistance for intricate electrical work.
House-wide Flickering Lights, Warm Outlets, and Electrical Shocks: These are critical warning signs of severe electrical hazards. They demand immediate attention and inspection.
Frequent Circuit Breaker Tripping: This indicates a need for immediate attention. It could point to an overloaded circuit or defective device. This poses risks of shocks, fires, or appliance damage. A qualified electrician can accurately identify the underlying issue.
Persistent GFCI Tripping: This may indicate an electrical fault. It requires professional inspection.
Odd Smells from Appliances, Warm Light Switches, Damaged Wires, or Shocks from Appliances: These are essential reasons to contact a licensed electrician.
If you are unsure about any electrical repair, consult a licensed electrician. They ensure your safety and the proper functioning of your electrical system.
General Home Repairs: Doors, Walls, Windows
You can handle many common wear and tear issues around your home. These simple household repairs keep your living space comfortable and looking good. You will find that many of these fixes are easy to do yourself.
Fixing Squeaky Doors and Hinges
Squeaky doors are annoying. Many things cause them. Regular use and age wear down doors and hinges. Moisture can corrode metal parts. Changes in temperature and humidity can warp wooden doors or frames. This causes hinges to misalign and squeak. Sometimes, the space between the door and the frame is too narrow. This causes rubbing. Aged hinges often squeak. Dry hinges lack lubrication. Loose screws can also cause squeaks. Metal parts rubbing together create noise. You can often fix a squeaky hinge with a little lubricant. Tighten any loose screws on the hinges.
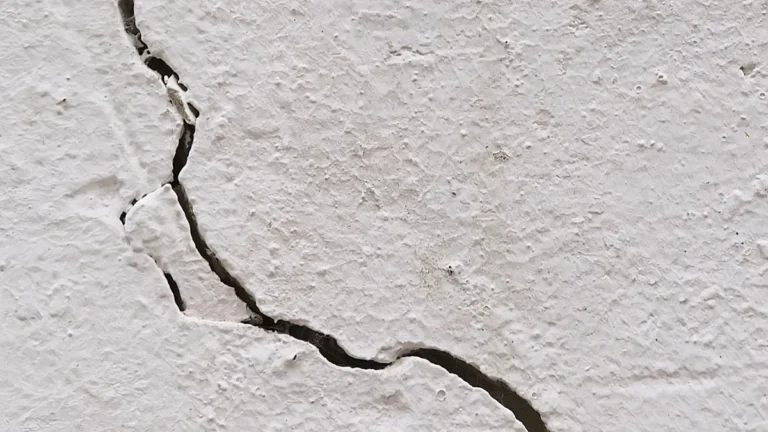
Patching Drywall Holes
You can patch drywall holes. The method depends on the hole size. For holes up to about 1/2 inch, use drywall compound or light-duty spackle. Force the compound into the hole. For holes between 1/2 inch and 6 inches, you need a piece of drywall and drywall compound. You can install a wood backer inside the wall. Then, screw a slightly smaller piece of drywall to the backer. Another method involves trimming a drywall patch. You glue this directly to the existing wall. Square the hole. Prepare a patch with an overhanging paper flange. Glue it with drywall compound. Apply one or two coats of compound. Feather it out for a smooth finish. These are great diy repairs.
Sealing Drafty Windows and Doors
Drafts around windows and doors waste energy. Foundation settling can cause hairline cracks around openings. This lets drafts in. Doors might not close properly. Old or worn-out door sweeps also cause drafts. Deteriorating window frames or old windows are common culprits. Sometimes, drafts you feel near windows come from poor air sealing or insulation in your home. You can seal drafts with weatherstripping or caulk. This improves your home’s energy efficiency.
Replacing Window Screens
Replacing a damaged window screen is a simple task. You can buy a screen repair kit. Remove the old screen and spline. Cut the new screen material to size. Lay it over the frame. Use a screen roller tool to push the new spline into the frame’s groove. Trim any excess screen material.
Basic Caulking and Sealing
Caulking seals gaps and cracks. It prevents water leaks and drafts. You can use caulk around bathtubs, sinks, windows, and doors. Choose the right type of caulk for the job. Cut the tip of the caulk tube at an angle. Apply a steady bead of caulk into the gap. Smooth it with your finger or a caulking tool.
HVAC & Appliance Repairs: Smooth Operation
You can keep your heating, ventilation, and air conditioning (HVAC) systems and appliances running well. Regular maintenance tasks improve their efficiency. These tasks also make them last longer. You can handle many of these simple jobs yourself.
Changing HVAC Filters
Changing your HVAC filters regularly is a simple task. It offers many benefits for your home.
Improved Indoor Air Quality: Clean filters trap dust, pollen, pet dander, and other airborne particles. This reduces allergens and irritants. It is crucial for people with breathing issues.
Increased System Efficiency: Optimized airflow from clean filters means your HVAC system works less. It maintains temperature better. This reduces energy use and lowers utility bills.
Extended Equipment Lifespan: Regular filter changes prevent the system from overworking. This reduces wear and tear. It extends the unit’s life.
Reduced Repair Costs: Clean filters prevent dirt and debris from damaging important parts. This lowers the chance of breakdowns and expensive repairs.
Cleaning Dryer Vents
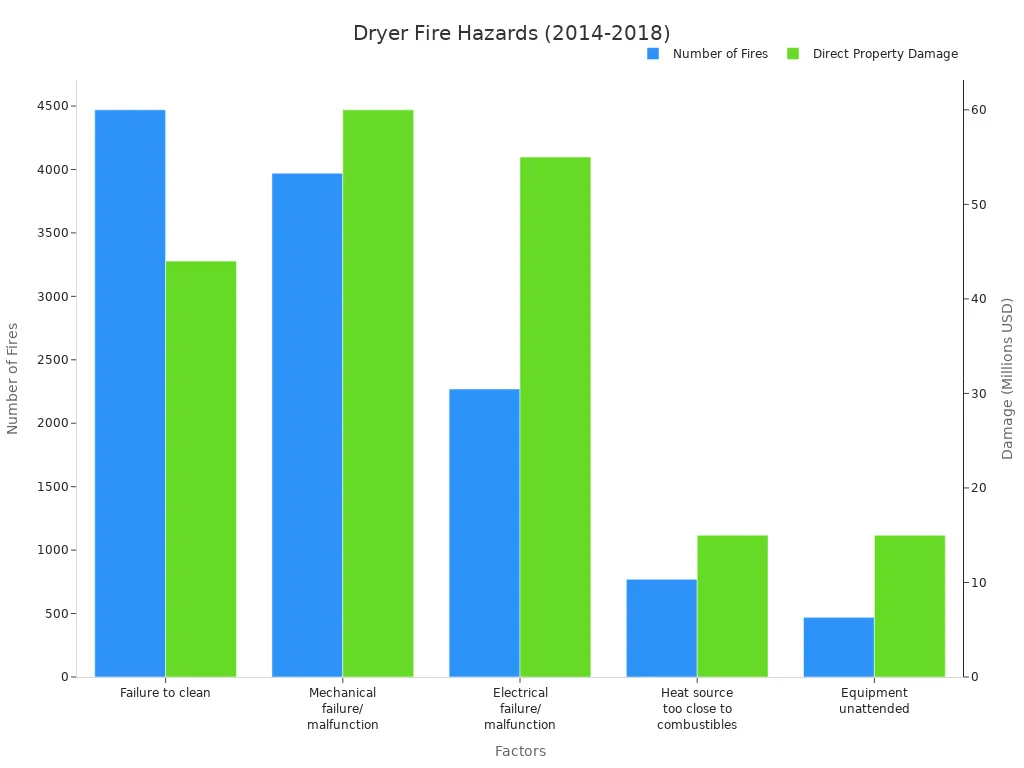
Cleaning your dryer vent is very important. It prevents fire hazards. Lint buildup is highly flammable. It can easily catch fire when exposed to high heat. A clogged dryer vent increases lint buildup. This creates a fire risk. When the vent is blocked, hot air and moisture cannot escape. This causes the dryer to overheat. This can damage parts and increase fire risk. For gas dryers, a clogged vent stops proper ventilation of flammable gases. Any spark can cause an explosion if these gases are trapped.
Factors | Number of Fires (2014-2018) | Direct Property Damage (Millions USD) |
|---|---|---|
Failure to clean | 4,470 | $44 |
Mechanical failure/malfunction | 3,970 | $60 |
Electrical failure/malfunction | 2,270 | $55 |
Heat source too close to combustibles | 770 | $15 |
Equipment unattended | 470 | $15 |
Water Heater Maintenance
You can do some diy tasks to keep your water heater working well.
Regularly Check the Temperature Setting: Adjust it to around 120°F (49°C). This prevents scalding. It reduces energy use. It also minimizes overheating risks.
Inspect the Anode Rod: Check it every few years. Replace it if it is very corroded. This prevents tank corrosion. It extends the lifespan.
Flush the Tank Annually: Remove sediment buildup. Drain the tank until the water runs clear. This keeps it efficient. It makes it last longer.
Test the Pressure Relief Valve: Test this safety feature every year. Lift its lever to ensure it releases water. This prevents too much pressure.
Insulate the Tank and Pipes: Use an insulation blanket for the tank. Avoid the thermostat and burner. Insulate pipes. This improves efficiency and reduces heat loss.
When to Seek Professional Help
Sometimes, you need professional help for hvac repairs or issues with your kitchen and appliances.
Temperature Control Issues: You have inconsistent temperatures. Your thermostat does not respond. The system cycles on and off often. This means your HVAC struggles to keep desired temperatures.
Noise-Related Malfunctions: You hear squealing, grinding, rattling, banging, hissing, or whistling. This suggests problems with belts, bearings, or loose parts.
Utility Bill Increases: Your energy costs rise without explanation. This often means an inefficient HVAC system uses too much power.
Air Quality and Odor Problems: You smell stale, musty, chemical, or burning odors. You see more dust or allergens. This can signal mold, electrical issues, or bad filtration.
System Reliability Concerns: You have frequent breakdowns. The unit is hard to start or stop. It needs more maintenance. These are signs of an aging system. It needs professional attention.
Essential Tool Kit for DIY Home Repairs
Basic Hand Tools
You need the right tools for successful diy home repairs. A well-stocked toolbox makes tasks easier. Start with a 16 oz claw hammer. It drives and pulls nails. A 12-volt to 20-volt cordless drill is essential. It drills holes and drives screws. Get a screwdriver set with flat-head and Phillips screwdrivers. A 25-foot measuring tape ensures accurate measurements. A utility knife cuts various materials.
Beyond these, keep some versatile items. Duct tape fixes tools and stops minor leaks. Electrical tape covers exposed wires. Super glue bonds almost anything. Strong twine rope lashes things down. A 5-gallon bucket catches leaks or hauls debris. A multitool offers quick access in emergencies. A snake auger breaks up drain clogs. Pipe clamps temporarily seal burst water pipes.
Safety Gear Essentials
Safety comes first during any home repairs. Protect yourself from potential hazards. Wear safety goggles to shield your eyes from debris and solvents. Earplugs or earmuffs protect your hearing from loud tools. Look for a high Noise Reduction Rating (NRR). Gloves protect your hands from sharp objects and chemicals. Choose durable work gloves for general tasks. Use nitrile gloves for chemical work. Consider a dust mask for tasks creating dust or fumes. A first aid kit is also essential for minor injuries.
Organizing Your Tools
Organizing your tools saves time and prevents frustration. Store hand tools in a dry place. Hang them on a pegboard or put them in toolboxes. This prevents rust. Keep power tools in their original cases. This protects them from moisture and dust. Use toolboxes with separate compartments for small items. Label these compartments. Mount pegboards on walls for easy access. Arrange tools by how often you use them. Shelving systems work well for larger tools. Clean your tools after each diy use. Sharpen dull blades. Inspect tools regularly for wear. Replace or repair damaged parts promptly. This keeps your home workshop efficient for household repairs.
Home Maintenance Checklist: Seasonal Tasks
You can keep your home in top condition with a structured approach to ongoing care. This home maintenance checklist helps you prevent small issues from becoming major repairs. Regular maintenance protects your investment and saves you money.
Annual Maintenance Tasks
You should perform specific tasks every year to preserve your property value. Schedule a home maintenance inspection to identify potential issues. This ensures compliance with regulations. Flush your water heater to reduce sediment buildup. This prolongs its lifespan and improves efficiency. You must clean gutters and downspouts annually. This prevents water damage and protects your foundation. Inspect your roof and siding for damage from winter weather. Make necessary household repairs. Service your HVAC system professionally before summer. This ensures efficiency and readiness. Clean outdoor spaces like decks and patios. This enhances curb appeal and extends their lifespan. Trim trees and shrubs to prevent storm damage. Check exterior paint and repaint if necessary. This protects wood from moisture. Inspect your home’s foundation for cracks or settling. This prevents costly structural repairs.
Seasonal Home Care
You can adapt your home care tasks to the changing seasons.
Spring Maintenance: You should clean gutters and downspouts. Inspect your roof and siding for winter damage. Wash windows and screens. Service your HVAC system.
Summer Maintenance: Pressure wash and soft wash surfaces like decks, patios, driveways, and siding. Check and seal outdoor decks. Trim trees and shrubs. Inspect for pests around the foundation.
Fall Maintenance: Clear leaves from gutters. Winterize outdoor faucets. Check insulation and weather stripping. Clean windows.
Winter Maintenance: Inspect for ice dams and leaks. Test smoke and carbon monoxide detectors. Monitor for indoor condensation. Plan for spring diy projects.
Monthly Check-ups
You should conduct essential monthly check-ups. This prevents minor issues from escalating. Clean or replace HVAC filters monthly. This ensures optimal airflow and system efficiency. Inspect smoke and carbon monoxide alarms. Test them monthly and replace batteries if weak. Consider replacing units every 5-7 years. Examine gutters and downspouts regularly. Check gutters for clogs and proper drainage. This prevents water damage. Check the roof for damage. Look for missing or damaged shingles. Inspect flashing around chimneys and vents for rust or corrosion. This proactive checklist keeps your home safe and efficient.
You save money and maintain your home’s value with basic household repairs knowledge. Start with small, manageable diy home repairs. This builds your confidence. Ongoing learning and proactive maintenance are important for your home. You become a more self-sufficient and empowered homeowner through diy. These simple repairs protect your investment.