An exterior home inspection involves a thorough review of your home’s outside. This property inspection helps you identify potential issues early. Many homeowners agree proactive maintenance prevents about two-thirds of all repair issues. Regular exterior inspection forms a vital part of this upkeep. It helps you avoid costly repairs and addresses safety hazards. This exterior home inspection guide gives you a full checklist. You will also learn when to perform these checks. A thorough home inspection protects your investment. It ensures fewer necessary repairs later. This exterior property inspection keeps your home safe.
Your Essential Exterior Home Inspection Guide
What an Exterior Inspection Covers
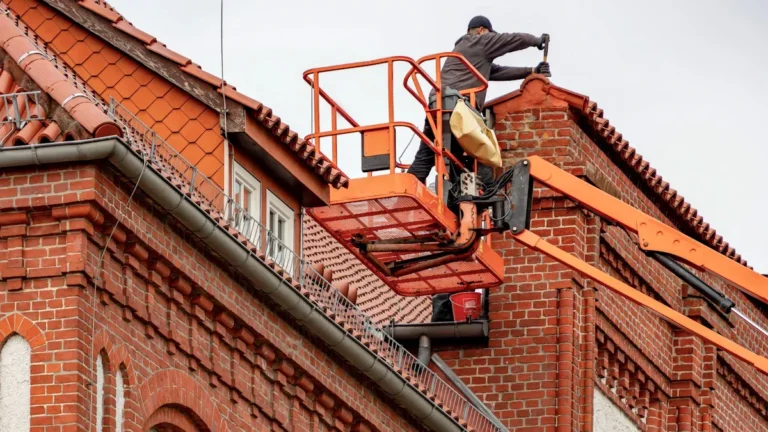
An exterior home inspection is a detailed look at your home’s outside. You assess the building’s outer parts and the areas around it. This includes many key components. You check the siding, trim, and flashing. You also inspect exterior doors and windows. Your home inspection checklist covers driveways, walkways, and front porches. You look at decks, balconies, and patios. You also examine vegetation, grading, drainage, and retaining walls. Do not forget to check fences, hose bibs, and any sheds or outbuildings. For example, you inspect your roof for its integrity and function. You look for curling or missing shingles. You also check for moss, algae, or mold. You examine flashings around chimneys, vents, and skylights. You ensure gutters and downspouts are secure. You also check your foundation for cracks or signs of settling. You look at your exterior windows and doors for damage or gaps. This comprehensive exterior home inspection guide helps you cover all these areas.
Why Regular Inspections Matter
Regular exterior property inspection offers many benefits. You prevent small concerns from becoming big problems. This saves you money in the long run. For example, you can extend your roof’s lifespan with timely maintenance. You address small issues before they lead to expensive repairs. This proactive approach helps you avoid financial stress. It also keeps your home in top condition. Regular home inspection can also boost your property value. A well-maintained home commands better prices. It also sells faster in the market. You identify maintenance issues early. This preserves your property’s value. You achieve long-term cost savings. This essential exterior home inspection checklist helps you protect your investment.
The Ultimate Home Inspection Checklist: Roof
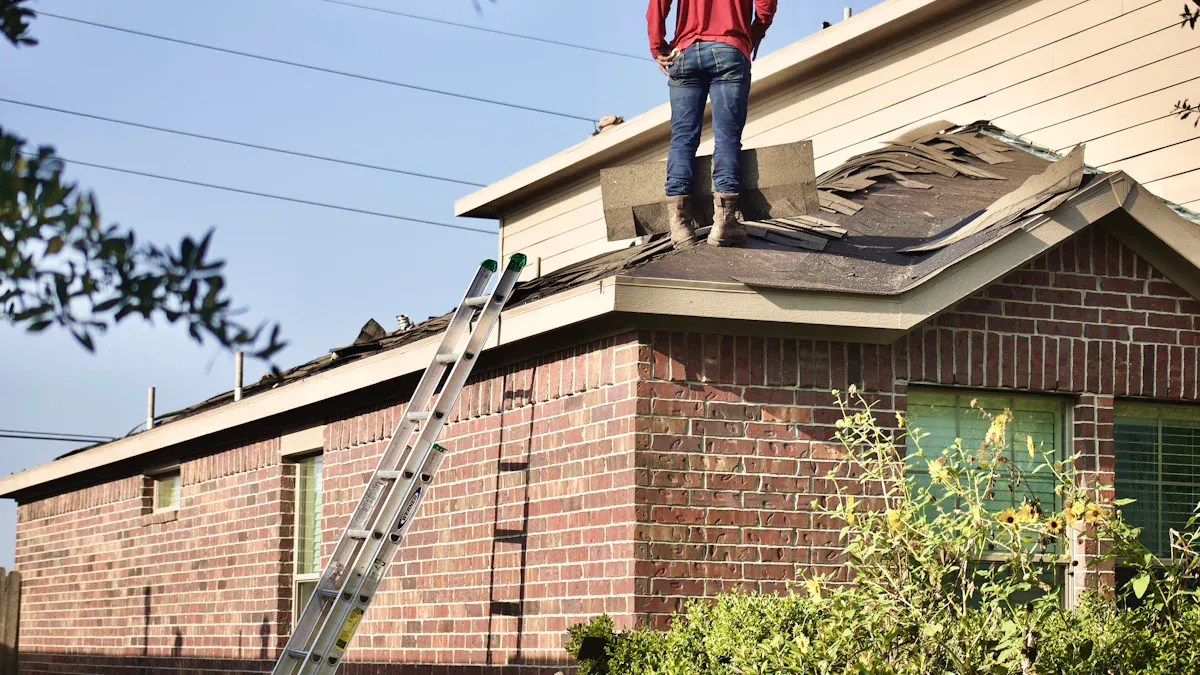
Your roof protects your home. A thorough roof inspection helps you find problems early. This part of your essential exterior home inspection checklist focuses on key roof components.
Roof Shingles and Materials
You must carefully inspect your roof shingles and materials. Look for signs of damage or wear. You might see missing shingles. These create obvious gaps. They expose the underlayment or roof deck. Check for damaged shingles. This includes curling, where edges lift or the center bubbles. Look for buckling, which gives a wavy appearance. Cracking also indicates damage; you will see visible splits. These splits allow water to enter. Granule loss is another sign. Protective granules shed, leaving bare spots. The black asphalt base shows through. Excessive granules in your gutters signal advanced wear. This means your shingles lose their protective capability. Ensure your ridge and fascia board lines are straight.
Flashing and Sealants
Flashing and sealants are critical for preventing leaks. They are found at junction points. These include chimneys, vent penetrations, skyllights, and where roof planes meet. Inspect these areas closely. Poor installation is a common cause of failure. Inexperienced contractors might not install them correctly. Extreme temperature changes also cause problems. They make roofing expand and contract. This pulls flashing away from the roof. Look for signs of material degradation. Galvanized steel flashing can rust. Aluminum flashing can develop holes. All materials degrade from aging and UV exposure. Critical areas like ice dams and dead valleys are prone to failure.
Chimneys and Vents
Inspect your chimneys and roof vents. Look for structural problems. You might see cracked or deteriorating mortar joints. Spalling or damaged bricks are also common. Water infiltration and freeze-thaw cycles cause this damage. A leaning or unstable chimney structure is a serious safety risk. Check for flue and ventilation problems. Look for damaged or missing flue liners. These liners protect against heat and corrosive gases. Blocked or obstructed flues are also issues. Nests, debris, or structural damage can cause blockages. This affects safe operation and ventilation.
Gutters and Downspouts
Your gutters and downspouts manage water runoff. Inspect them for proper function. Look for sagging or uneven gutter sections. They might appear misaligned. They could pull away from the fascia board. This indicates improper sizing or support. Check for an improper slope. This leads to stagnant water or overflowing during rain. Look for leaks or separations at seams. These cause dripping or water stains on walls. You might see erosion around the foundation. Ensure downspout extensions are present and positioned correctly. Missing extensions cause excessive moisture near the foundation. Water overflowing from gutters during heavy rain is a clear sign of clogs. You will often see clumps of leaves and mud. This exterior home inspection checklist helps prevent costly repairs.
Exterior Walls and Siding
Your home’s exterior walls and siding protect it from the elements. A careful inspection of exterior walls helps you find problems early. This prevents bigger issues.
Siding Condition and Materials
You must check your siding for any signs of damage. Look for cracks, dents, or stains. Vinyl siding can show dents easily. You also need to confirm that the sides of your house are not bowing or sagging. This indicates structural problems.
Different siding materials show different damage.
Aluminum Siding: Look for buckled aluminum siding.
Vinyl Siding: Check for buckling from heat, impact damage, or cracking. Early versions often show weathering. Improper installation, like nailing too tightly, also causes buckling.
Steel Siding: Steel siding can rust. It is also heavier and harder to cut than aluminum.
Biological growth like moss or algae can signal siding damage. This often happens in damp, shady areas. If you do not treat it, this growth can permanently discolor or soften siding. It also traps moisture. Loose siding panels are another indicator. Wind stress often causes them. You might hear rattling in the wind. Loose fasteners create gaps. These gaps expose your home to mold growth or pest infestation.
Paint and Finish Integrity
The paint and finish on your exterior walls protect them. You need to check for signs of failure.
Fading or Chalking: Your paint loses color. A fine, powdery substance appears. UV radiation breaks down paint binders.
Cracking and Flaking: The paint film splits. It separates, often along wood grain. This exposes the surface to water damage.
Peeling: Paint lifts and curls away. This shows poor adhesion. Moisture or bad surface preparation often causes it.
Blistering: Bubbles form under the paint film. Liquid moisture or solvent gets trapped underneath.
Mildew and Mold: Dark, spotty growth appears. This signals persistent dampness. It consumes the paint film.
Eroded Caulking: Caulking around windows, doors, and seams wears away. This lets water enter wall cavities. It leads to structural issues and quick paint failure.
Wood Rot and Damage: Water entering through cracks causes wood rot. You may need to replace trim.
Stains and Discoloration: Rust stains from metal or bleed-through from wood knots appear. This means the paint system fails to protect.
Persistent Drywall Issues (Interior): Repeated interior problems like water stains or frequent drywall repairs near exterior walls suggest the exterior paint is not watertight.
Cracks, Gaps, and Holes
You must inspect your exterior walls for cracks, gaps, and holes. Some are cosmetic. Others signal structural issues.
Crack Type | What It Means | Recommended Action |
|---|---|---|
Cracks and gaps | Water and pest entry risk | Seal small gaps or replace boards |
Warping or buckling | Moisture trapped behind siding | Replace affected sections |
Mold or mildew growth | Excess moisture and poor ventilation | Clean and treat, inspect for leaks |
Fading or discoloration | UV damage and aging material | Plan for repainting or replacement |
Loose boards | Compromised protection against weather | Re-secure or replace siding |
Many cracks are just cosmetic. Changes in humidity or temperature cause them. During a home’s first two years, normal settlement occurs. This leads to small cracks. If you repair these, they usually do not reopen. The structure stabilizes after initial settlement.
However, some cracks indicate structural problems.
Cracks appear suddenly or grow over time.
Gaps are wider than 1/4 inch.
You see horizontal breakage.
Zigzag cracks appear in brick walls.
Doors and windows stick or do not close properly.
If you can stick two quarters side-by-side in a crack, and one side has shifted up, it is likely a structural problem. Look for other signs of distress nearby. Watch the crack over time. If it continues to move, this indicates a developing structural defect.
Moisture Stains and Mildew
Moisture stains and mildew on exterior walls point to water problems. You need to identify them.
Rust stains appear around metal fixtures. These are orange or reddish-brown.
Mineral deposits show on surfaces. White, chalky efflorescence appears on basement walls or foundations.
Water stains and discoloration are often the first visible signs.
Peeling or bubbling paint indicates moisture trapped beneath the surface.
Warped or soft drywall suggests water absorption.
Musty or earthy odors in basements or crawl spaces mean excessive moisture.
Excessive interior condensation on windows also points to moisture issues.
Visible growth is a clear sign. Mold appears as black or green patches. Mildew is typically white or gray. Discoloration and stains (black, brown, yellow, or green) on walls indicate mold and water damage. A persistent damp or earthy smell suggests mold spores. Peeling paint, warped walls, and water stains are also indicators. Poor ventilation can cause foggy windows and mold growth. This home inspection helps you find these issues.
Foundation Inspection
Your home’s foundation is its most important part. It supports the entire structure. A thorough foundation inspection helps you find problems early. This prevents major repairs.
Visible Cracks and Settling
You must carefully inspect your foundation for cracks. Look for cracks in the concrete or masonry. Small hairline cracks are often normal. They happen as the house settles. However, larger cracks can signal serious problems. You should worry about cracks wider than 1/4 inch. Also, look for horizontal cracks. These often mean significant pressure on the foundation. Zigzag cracks in brick walls are also a concern. They can show movement in the foundation of building. Check if doors and windows stick. This can be another sign of foundation settling. Uneven floors also point to settling. These signs suggest potential structural issues. You need to address them quickly.
Foundation Vents and Openings
Foundation vents and openings are crucial for your home. They provide ventilation and control moisture in crawl spaces. Flood openings also exist. They let floodwaters flow freely. This reduces pressure on your foundation walls. You need to check several things during your home inspection.
Access Provisions: Look at the size and security of access points.
Exterior Conditions: Check site grading and drainage around the vents.
Ventilation Configuration: Count the vents. Measure them. Ensure they are placed correctly, usually within three feet of corners. Examine their covering materials. Make sure operational louvers work.
Ground Condition: Remove any vegetation or debris near the vents.
Moisture Control: Check vapor retarders. They prevent moisture accumulation.
Flood Resistance: Look for distinct flood openings.
You might find problems with these vents. Poor fit between siding and foundation is common. Shoddy construction can also cause issues. Many vents use plastic or light-grade materials. Rodents can chew through these easily. This allows pests into your crawl space. Obstructed vents are also a problem. Insulation or landscaping can block them. This reduces airflow and can lead to water damage.
Basement and Crawl Space Access
You need to access your basement or crawl space. This allows you to check the foundation from the inside. Look for signs of moisture. This includes damp spots or standing water. Check for mold or mildew growth. These indicate high humidity or leaks. Look for pest activity. Rodents or insects can enter through small cracks. Inspect the support beams and floor joists. Ensure they are sound and free from rot. You should also check for any strange odors. A musty smell often means moisture problems.
Windows and Doors
Your home’s windows and doors are vital. They protect your home from weather. They also impact your home’s energy efficiency. A careful inspection of doors and windows helps you find problems early. This prevents costly repairs.
Window Frames and Sills
You must inspect your window frames and sills closely. Look for visual signs of damage. You might see discoloration, dark stains, or cracks. Crumbling corners also indicate issues. Touch the wood. A soft, spongy feel means rot. You might notice a musty odor. This suggests dampness. Check the paint. Bubbling, peeling, or flaking paint shows moisture problems. Look for peeling or damaged paintwork. Cracked or crumbling concrete sills need attention. Water pooling on the sill is a clear sign of poor drainage. Loose or worn joints also allow water entry. Windows that stick or jam often have swollen wood. Warped frames or broken hardware can also cause this. Gaps between the window sash and frame mean a warped frame. You will feel drafts. This leads to higher energy bills.
Door Frames and Thresholds
Inspect your door frames and thresholds. Look for cracks, warping, or gaps in the door frames. These can let in drafts. They also serve as entry points for pests. Check the weatherstripping around your doors. Ensure it is intact. This helps with maximum energy efficiency. Examine the threshold routinely. Look for signs of wear. This is especially true in areas with moisture or heavy foot traffic. Metal thresholds can rust. Wood thresholds can crack or warp. Check the quality of the seal and finish. Look for dried out or cracked sealant. Reapply caulking or weatherstripping as needed. Periodically check screws or nails. Make sure they are secure. Loose thresholds can cause tripping hazards. They also prevent proper door closure.
Weatherstripping and Seals
Weatherstripping and seals are crucial for your windows and doors. They keep out drafts and moisture. Incorrect measurements lead to an ill-fitting seal. This reduces effectiveness. Not measuring both width and height is a common error. Choosing the wrong type of weatherstripping also causes problems. This results in poor sealing and higher energy bills. Less durable materials need frequent replacements. Improper surface preparation causes inadequate sealing. Skipping surface cleaning is a mistake. Ignoring existing surface damage also causes issues. You must maintain and replace weatherstripping. Ignoring this leads to drafts and moisture damage. It also reduces comfort.
Glass Panes and Screens
Inspect the glass panes in your windows and doors. Look for cracks or chips. Even small cracks can grow. Check for fogginess between double-pane windows. This means the seal has failed. It reduces insulation. Examine your window screens. Look for tears or holes. Screens keep insects out. Ensure they fit snugly in the frames.
Drainage Systems
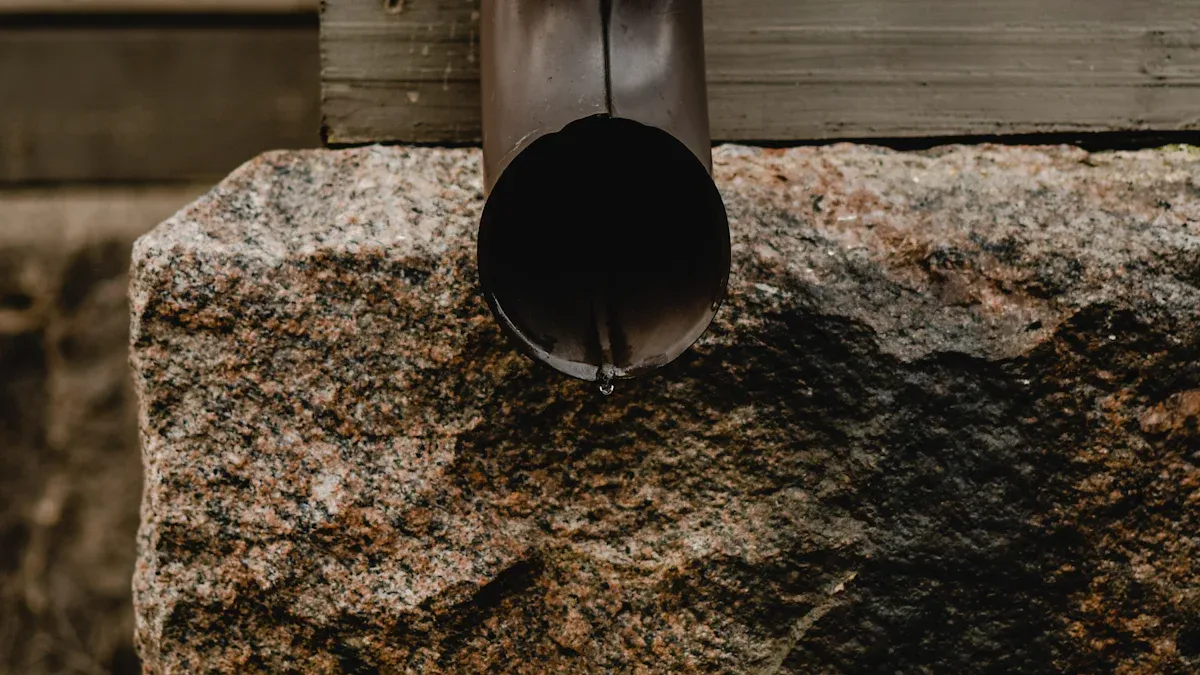
Your home’s drainage system protects its foundation. You must ensure water moves away from your house. This prevents costly repairs and potential water damage.
Gutter Functionality and Clogs
You need to check your gutters and downspouts regularly. Clogged gutters are a common problem. Leaves, pine needles, twigs, and even roofing granules pile up inside them. This happens especially in fall or after heavy storms. These blockages stop water from draining correctly. Water then spills over the sides. It soaks into fascia boards, soffits, siding, or even your basement.
Common causes of clogs include:
Leaves and Tree Debris: These accumulate quickly and block water flow.
Wildlife and Pest Nests: Birds, squirrels, and insects build nests. These obstruct water and can damage the system.
Shingle Granules: Aging shingles shed these. They accumulate and contribute to blockages.
Snow and Ice Dams: These prevent melting snow from draining. Water backs up.
Clogged Downspouts: Objects that pass the gutter can build up. This stops water from exiting efficiently.
Downspout Extensions and Discharge
You must ensure your downspouts direct water far from your foundation. Downspout extensions are crucial. They carry water several feet away from your house. Check that these extensions are securely attached. Make sure they point away from your home. Water should not pool near the foundation after rain.
Proper Grading Around Foundation
The ground around your house needs a specific slope. This directs water away from the foundation. Proper foundation grading requires a minimum slope of 6 inches within the first 10 feet away from the house. This moves water away. The soil elevation directly against the foundation block should ideally be about 6 inches below the bottom of the siding. For general lawn drainage, a 2% slope, or approximately ¼ inch per foot, is ideal. A minimum 2% slope away from the foundation for at least 10 feet in all directions is essential for surface water management. The ground around a foundation should slope away at an angle typically between 5% and 10%. This prevents water from pooling.
Sump Pump Discharge
If you have a sump pump, check its discharge line. The line must direct water far away from your home’s foundation. Ensure the discharge pipe is clear of obstructions. You do not want water to flow back towards your house. This prevents basement flooding.
Landscaping and Grading
Your home’s surrounding landscape plays a big role in its health. Proper landscaping and grading protect your foundation. They also prevent issues like moisture intrusion. You must inspect these areas carefully.
Trees and Shrubs Near House
Trees and shrubs add beauty to your property. However, their roots can cause problems for your foundation. They can also block sunlight, keeping walls damp. This creates conditions for mold or mildew. Falling branches can damage your roof or siding. You should plant trees and shrubs at safe distances from your home.
For small trees (maturing at 25 feet or less), plant them at least 8 to 10 feet from a wall or 6 to 8 feet from a corner.
For medium trees (maturing up to 40 feet), maintain a distance of at least 15 feet from walls and 12 feet from corners.
For large trees (maturing over 40 feet), ensure they are planted at least 20 feet from a wall and 15 feet from any corner.
Regular trimming also helps. This prevents branches from touching your house. It reduces the need for future repairs.
Soil Slope Away from Foundation
The ground around your house must slope away from the foundation. This directs rainwater away. If the soil slopes towards your house, water will collect against the foundation. This can lead to serious water damage in your basement or crawl space. You should check the slope regularly. Ensure no areas allow water to pool near your home. You might need to add soil to improve the grade.
Driveways and Walkways Condition
Your driveways and walkways are important for access and safety. You must inspect them for signs of wear or damage. This is part of a thorough home inspection.
Cracks in the Surface: Look for hairline cracks or wider cracks. Alligator cracking also indicates problems.
Sinking or Settling Sections: Noticeable dips or depressions mean the ground underneath has shifted.
Drainage Problems: Water pooling on the surface or flowing towards your home is a clear sign.
Potholes or Crumbling Edges: These develop from water getting into the material.
Fading, Discoloration, or Surface Deterioration: This shows the protective layers are wearing off.
Age of the Driveway: Older driveways often show more signs of wear.
Safety Hazards: Raised sections or large cracks can cause trips.
Address these issues quickly. They can worsen over time. This can lead to more extensive and costly repairs.
Other Exterior Structures
Your home’s exterior includes more than just the main building. You also have other structures that need your attention. Inspecting these areas helps you keep your entire property safe and well-maintained.
Decks, Patios, and Porches
You must carefully inspect your decks, patios, and porches. Look for signs of damage. Concrete around footings can crack or pull up. This shows movement. Check for insect damage, like from ants or termites. This often affects untreated wood, especially on older decks. You might notice the deck moves when you walk on it. Look for rusted or compromised fasteners, connectors, and joists. These include nails, bolts, and screws. Wood can crack, especially near fasteners or between joists. Watch if these cracks grow.
Test for rotting wood. You can use a ‘pick test’. If the wood bends slowly without splintering, it likely has rot. Ensure railings are sturdy and not loose. Mold and mildew growth, especially fuzzy or mushroom-like types, signal deeper moisture issues. Water damage causes wood to warp and weaken. It can also penetrate cracks in concrete decks. Termite damage and dry rot are serious concerns for wood. Algae and mold create slippery surfaces. Older structures, like wood decks (which last about 10-15 years), are more prone to collapse. This happens due to weakening screws and nails, corroded fasteners, and outdated building codes. Loose connections and popped-up nails or screws are warning signs.
Fences and Gates
Inspect your fences and gates. Check fence posts for looseness. Look for rotting wood on wooden fences. Metal fences can show rust. Replace any broken slats or panels. Test your gates. Make sure hinges work smoothly and latches secure properly. Remove any weeds or vines growing into the fence. These can cause damage over time.
Exterior Lighting and Outlets
Your exterior lighting and outlets need regular checks for safety and function. Look at your service entry. Check for damage to the weatherhead or meter base. Outdoor outlets must have proper covers and GFCI protection. Verify your grounding system. Look for the visible ground rod and its connection. Assess all outdoor light fixtures. Check their function and condition.
You should turn off power at the breaker if you see sparks, smoke, burning smells, or hot spots. Call a licensed electrician immediately. A frequently tripping breaker warns of an overload or short circuit. Check for cracked or discolored faceplates on outlets. Test outlets for power with a plug-in tester. Ensure GFCI outlets are in kitchens, bathrooms, garages, and outdoor areas. Press the “test” and “reset” buttons on GFCIs to confirm they work. Exterior electrical fixtures must be rated for outdoor use. They need protection from the elements. Look for cracked weather covers or broken light fixtures. Ensure outlets have “in-use” weatherproof covers. Confirm all exterior lighting works for safety. This home inspection step prevents electrical hazards and costly repairs.
Sheds and Garages
Do not forget your sheds and garages. Inspect their roofs for missing shingles or leaks. Check the siding for damage or rot. Look at the foundation for cracks or settling. Ensure doors and windows open and close properly. Check their seals. Look for signs of pest intrusion. Assess the overall structural integrity of these buildings.
When to Conduct Your Home Inspection
Knowing when to inspect your home is as important as knowing what to check. Regular checks help you catch problems early. This prevents expensive repairs.
Seasonal Checks (Spring, Fall)
Seasonal checks are crucial for maintaining your home. You prepare your home for changing weather.
Spring Inspection: After winter, inspect your roof for storm damage. Look for missing shingles or flashing deterioration. Clean gutters and downspouts to prevent clogs from spring rains. Check exterior walls for cracks or peeling paint. Inspect the seal on windows and doors. Repair any gaps or damaged weatherstripping. Examine your foundation for cracks. Assess exterior drainage. Ensure downspouts direct water away from your home. You can also wash siding and hardscape. Evaluate sprinklers and irrigation systems for leaks.
Fall Inspection: Prepare your home for winter. Check foundation walls, floors, and masonry for cracks. Inspect chimneys for loose bricks. Look for moisture in your basement or crawl space. Trim tree limbs away from the roof. Check glazing putty on doors and windows. Examine caulking for deterioration. Ensure weatherstripping on doors and windows is intact. Winterize your A/C unit. Clean your fireplace and chimney. Shut off exterior faucets.
Before Buying or Selling
A thorough home inspection is vital when buying or selling a property.
Before Buying: An inspection protects your finances. It identifies deferred maintenance and immediate repair needs. This prevents unexpected large expenses. You can request seller-funded repairs or credits. This reduces your out-of-pocket costs. Inspections also reveal safety hazards. These include electrical dangers, plumbing leaks, or pest infestations. Early identification allows for remediation. A detailed report gives you negotiation leverage. It provides objective evidence for repair requests. Lenders also view inspections as crucial. They assess the property’s condition. This ensures a smoother path to loan approval. This exterior property inspection is a smart investment.
Before Selling: You can address issues proactively. This improves your home’s marketability. It helps you set a realistic price. This property inspection helps you avoid surprises during the buyer’s inspection.
After Severe Weather
Inspect your home immediately after severe weather. Heavy storms or hail can cause significant damage.
Roofing Damage: Look for lost shingles. Check flashing around vents and chimneys. Ensure gutters and downspouts are secure.
Siding Damage: Check for dents or holes from debris. Look for water stains.
Power Lines: Examine power lines carefully for damage. They may still carry live electricity.
Flooding Damage: Assess water intrusion into your home. Look for standing puddles or damp spots. Check for mold growth.
Tree Limbs: Safely remove fallen limbs near buildings.
Wind Damage: Identify uprooted trees or loose shingles.
Hail Damage: Inspect for dings in metal surfaces. Check for cracked windowpanes.
This home inspection helps you prevent further damage. It also helps you file insurance claims promptly.
Annual Preventative Maintenance
Conduct an annual exterior home inspection. This proactive approach helps you maintain your home’s value. It prevents small issues from becoming major repairs. You ensure your home remains safe and sound year after year.
DIY vs. Professional Home Inspector
Benefits of Self-Inspection
You can perform a self-inspection of your home’s exterior. This helps you find potential defects or problem areas. You use a checklist for this. Self-inspection allows you to fix issues before selling your home. It also helps with yearly maintenance. This can save you money on costly repairs. You get an idea of your home’s condition. This helps you avoid surprises from a professional home inspector’s report. However, self-inspection has limits. You are generally not qualified to inspect complex systems. These include electrical, plumbing, or HVAC. Climbing onto a roof without proper gear can lead to severe injuries. Without the right tools and knowledge, you might miss critical areas. This leads to undetected damage. A DIY home inspection cannot replace a professional’s comprehensive job. This is especially true for property sales or purchases.
When to Hire a Professional
You should hire a professional home inspector in specific situations. A professional home inspector focuses on health, safety, and major mechanical issues. They follow standards like the ASHI Standard of Practice. This guides them in conducting thorough home inspections. You need a professional home inspector before listing your home for sale. You also need one before making an offer to buy a home. A professional home inspector reviews many systems. These include the heating and central air conditioning systems. They check interior plumbing and electrical systems. They also inspect the roof and rain gutters. The attic, walls, ceilings, and floors are part of their review. They look at windows, doors, and the foundation. They also check the basement and structural components. A professional home inspector provides a comprehensive property inspection.
What to Expect from a Professional Home Inspector
When you hire a professional home inspector, you expect expertise. A qualified home inspector has extensive training. They complete comprehensive pre-licensing courses. InterNACHI offers a 149-hour course covering many topics. These include roofing, electrical, and exterior inspection. Certifications from organizations like ASHI are important. ASHI certification shows a commitment to excellence. It means the home inspector has technical expertise. They adhere to high industry standards. This ensures they provide thorough, unbiased evaluations.
A professional home inspector’s exterior property inspection is detailed. They inspect your roof for damaged shingles or leaks. They check exterior walls for cracks, holes, or peeling paint. They examine doors and windows for frames, seals, and hardware. The foundation is assessed for cracks and water damage. They inspect the drainage system, including gutters and downspouts. They evaluate your electrical system for safety and function. They also check landscaping. This includes trees near the building and soil grading. This comprehensive home inspection helps you understand your home’s condition. It also helps you improve your home’s energy efficiency.
Regular exterior home inspections protect your investment. This exterior home inspection guide shows you how. You ensure home longevity, safety, and value. Implement a consistent home inspection schedule. This prevents costly necessary repairs. Start your exterior property inspection journey today. Consider scheduling a professional home inspector. A professional home inspector offers expert insights. They identify issues you might miss. Proactive maintenance is key to a healthy home. A thorough property inspection saves you money on future repairs. Trust a home inspector for comprehensive exterior property inspection results.