

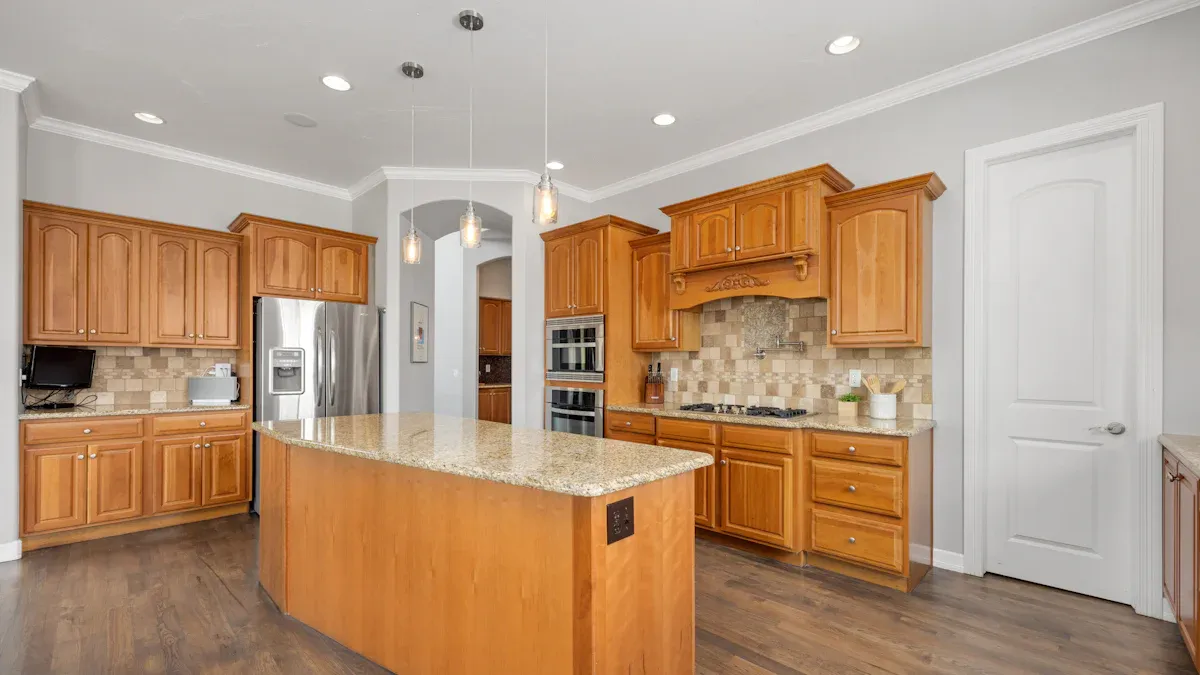
Many homes feature honey oak woodwork. You might find its warm, yellow color feels dated. Homeowners often perceive honey oak as heavy. They seek ways to lighten their spaces. A full home renovation is not always necessary to achieve a modern look. DIY projects offer effective and affordable ideas to update honey oak. You can paint cabinets for a fresh color, or apply a new paint color to trim. New hardware also makes a big difference. These choices transform your home’s color story. You empower yourself to update your space.
Understanding Honey Oak’s Dated Look
Why Honey Oak Appears Outdated
Honey oak often looks dated. Its strong yellow and orange tones clash with current trends. The prominent grain patterns also contribute to this dated feel. Many homes built in the 1980s and 1990s feature this wood. This makes it strongly associated with those past eras. You might find your home feels stuck in time because of it. Current aesthetics favor cleaner lines and neutral color palettes.
Key Areas to Update Honey Oak
You can focus on specific areas to make a big impact. Consider these key areas for an update:
Stained Finish: A darker stain moves away from the light honey color. A matte finish can also mute the shine of stained oak. This gives a fresh feel.
Flat Slab Door Styles: Simple, flat slab doors streamline your cabinetry. This aligns with current kitchen design.
Cabinet Hardware: Incorporate simple hardware. Long, oversized pulls for flat-panel cabinets work well. You can also use push hinges for no hardware. This enhances a contemporary appeal.
Wood Grain Play: Use a horizontal wood grain for cabinet doors. This differentiates your kitchen. It aligns with horizontal lines common in modern interiors.
Surrounding Elements: Choose simple countertops. Basic white or dark options work well. Pair oak with painted cabinets for a two-tone look. Use floating shelves. Avoid busy crown moldings. Flat trim or panels contribute to a fresh aesthetic. These changes help in making honey oak work in your home.
The Potential for Cost-Effective Updates
Updating honey oak does not require a full renovation. DIY projects offer significant cost savings. You can transform your space without spending a lot. These cost-effective updates make a big difference.
Renovation Type | Estimated Cost |
|---|---|
DIY Cabinet Painting (supplies) | $300-$500 |
Professional Cabinet Repainting | $10,000 (or several thousand) |
You save a lot of money by doing the work yourself. For example, painting your honey oak cabinets yourself costs only a few hundred dollars for supplies. Professional repainting of cabinets can cost thousands. These DIY efforts allow you to refresh your home on a budget.
Painting Honey Oak for a Modern Update
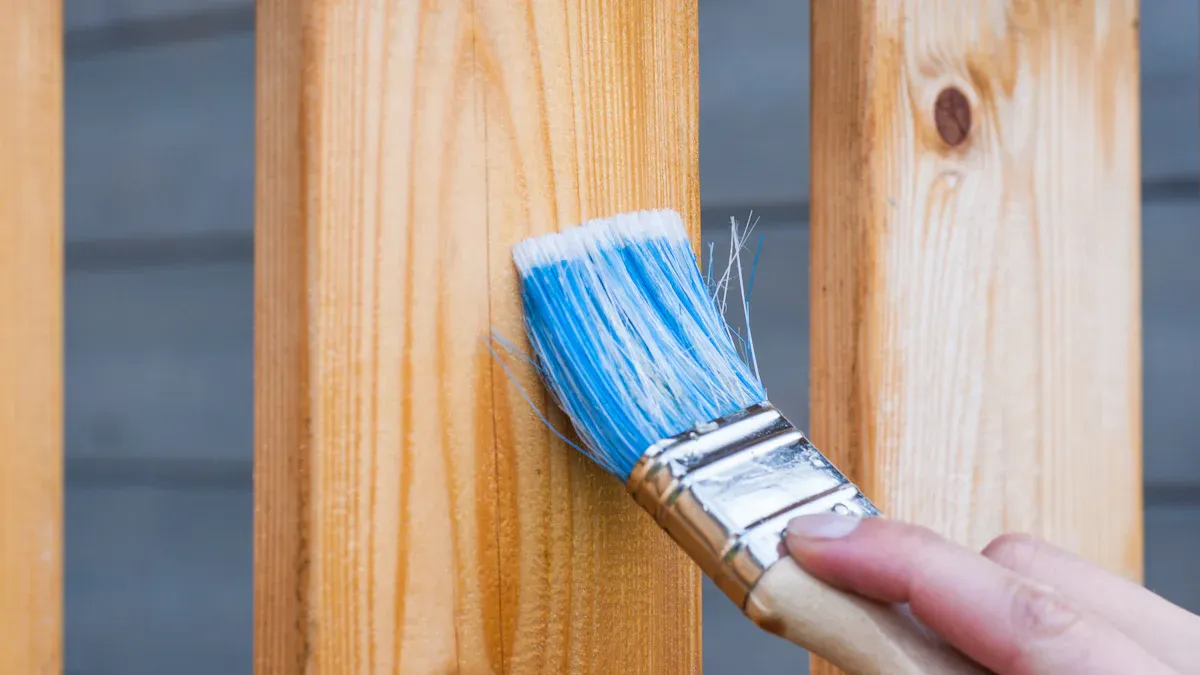
Painting your honey oak cabinets, trim, or doors offers a dramatic transformation. This simple project can instantly update your home. You can completely change the look of your honey oak cabinets with a fresh coat of paint. This section provides you with the knowledge to achieve a smooth, professional finish.
Choosing the Right Paint for Woodwork
Selecting the correct paint is crucial for durability and a beautiful finish. You need a paint that stands up to daily use, especially in a busy kitchen. Water-based alkyd or urethane paints are your best choices. These types of paint offer super durability. They also provide a flawless, smooth finish. You will find them easy to clean. They do not yellow like old oil-based paints. They also self-level, which helps hide brush marks.
Consider these specific products for your project:
Benjamin Moore Advance Interior Paint: This water-based alkyd paint is highly durable. It self-levels well, giving you a smooth, professional look. Many people use it on kitchen cabinets and bathroom vanities. It shows minimal wear even after years. It also has low VOCs and less odor than some other options.
Sherwin Williams Emerald Urethane Trim Enamel: This is another durable urethane paint. It works well for high-traffic areas. You might choose this if you want a specific Sherwin Williams color.
HGTV HOME by Sherwin-Williams Acrylic Interior/Exterior Door and Trim Paint: This option is budget-friendly. It offers similar durability to the Emerald Urethane. You can use it on cabinets or trim.
Sherwin-Williams ProClassic Interior Waterbased Acrylic-Alkyd Enamel: This high-performance paint is great for high-touch areas. It resists chips, scuffs, and stains. It also gives a smooth, self-leveling finish and is easy to clean.
Essential Preparation for Painting Honey Oak
Proper preparation is the most important step for a lasting paint job. Do not skip these steps. They ensure your paint sticks well and looks great.
Clean Thoroughly: First, clean all surfaces. Use a degreaser to remove grease and grime, especially in the kitchen. Rinse well and let it dry completely.
Sanding the Surface: You need to sand the wood to create a surface the paint can grip. For wood you plan to paint, start with 120-grit sandpaper. Then, follow with 150-grit sandpaper. This smooths the surface and helps with adhesion.
Prime for Success: Priming is critical for honey oak. It blocks tannins from bleeding through your new paint color. It also helps the paint adhere better. You must use an oil-based primer for oak cabinets. Water-based primers often lead to problems like peeling or needing touch-ups.
Tip: Oil-based primers have strong odors. Work in a well-ventilated area. Consider wearing a ventilator mask.
Apply at least two coats of a high-quality oil-based primer. Good choices include:
Sherwin Williams ProBlock Oil
Zinsser AllPrime
Zinsser Coverstain
Insl-x Prime Lock
Lightly sand between each primer coat. This removes any drips or uneven spots. Allow each coat to dry for 24 hours. This is longer than some recommendations, but it ensures proper setting. Use a high-density foam roller for flat areas like cabinet frames and fronts. Use a brush for grooves and detailed areas. For the smoothest finish, consider a high-build, professional-grade primer. This helps level the oak grain.
Step-by-Step Painting Techniques
Achieving a smooth, brush-stroke-free finish requires careful technique. Follow these steps for the best results:
Thin Coats are Key: Apply three to four thin coats of paint instead of one or two thick ones. Thin coats reduce brush marks and create a smoother surface.
Water Down Your Paint: You can add about 10% water to your paint (about 1-2 tablespoons per cup). This improves paint flow and helps it self-level. A mister bottle can keep the paint wet and workable.
Sand Between Every Coat: Lightly sand between each paint coat. Use fine-grit sandpaper, like 220-grit, after the primer. Then use 320-grit or even 600-grit between subsequent coats. This smooths the surface without removing too much paint. Wipe away all dust with a microfiber cloth or denatured alcohol.
Use a Paint Additive: Products like Floetrol can help eliminate brush strokes in latex paint. They also extend drying time. Be careful not to add too much, or you might get drips.
Consider a Paint Sprayer: A paint sprayer guarantees no brushstrokes. This gives you the most professional result. However, it requires more cleanup. You might use a spray shelter to prevent overspray.
Quality Tools and Technique:
Microfiber Roller and Laying Off: Use a microfiber roller for thin coats. Then, quickly go over the section with a flat synthetic brush. This “laying off” technique smooths out the roller texture.
Quality Brushes: Use good brushes with synthetic bristles. They help paint lay down smoothly.
Brush with the Grain: Always brush in the direction of the wood grain. This is especially important for heavily grained wood.
Wet-Sanding: For an ultra-smooth final finish, you can wet-sand the last coat.
Modern Color Palettes to Complement or Cover
Choosing paint colors can dramatically change your space. You can neutralize the yellow tones of honey oak or create a harmonious look. Here are some paint color ideas to update your home:
Warm Neutrals: If your honey oak has more orange or red tones than yellow, warm neutrals work well. Look for non-yellow creams and light beiges. Clare’s ‘No Filter’ is a light beige with warm undertones. It can play up the warmth of honey oak, especially in a kitchen with good natural light. Benjamin Moore’s ‘Pale Oak’ and ‘White Dove’ are also warm whites. They create a neutral backdrop.
Greens: Green colors are excellent for working with honey oak. They complement both yellow-toned and red/orange-toned oak. Cooler greens work well with warmer cabinets. Sherwin-Williams’ ‘Pewter Green’ is a specific green with blue undertones. It effectively updates the look.
Cool Neutrals: White, marble, and black elements create a crisp, modern feel. Keep elements above eye level white and airy. Use black to ground your material choices. This creates a striking contrast with your honey oak cabinets.
Blues: Light, dusty blues are very effective. Blues with a slight green tint work especially well with honey oak that has redder undertones. Orange and blue are complementary colors, so they balance each other.
These color ideas help you choose the perfect color to update your space. Choosing paint colors carefully makes a big difference.
Staining or Glazing Honey Oak
You can change the look of your honey oak without covering its natural wood grain. Staining or glazing offers a different approach than paint. This method allows the wood’s texture to show through. You can achieve a richer, deeper color. This helps to update your home.
Darkening Honey Oak with Stain
Staining honey oak can transform its bright, yellow tone into a more sophisticated shade. You can choose a darker stain to achieve this. Gel Stain is very effective for darkening wood. It highlights the natural grain. This product is pigment-rich. You can layer it to get darker colors. Each layer of Gel Stain will further darken your project. Manufacturers originally engineered Gel Stain for raw wood surfaces. It highlights the beauty of the grain. Applying Gel Stain directly to raw wood or over a slip coat of mineral spirits enhances grain visibility. It also requires fewer coats for a dark color. This method gives your cabinets a new color.
You can apply a darker stain over existing finishes. This works if the finish is in good condition. You must prepare the surface properly. This process adds depth and richness. It moves your honey oak away from its dated look. You can choose a rich brown or a deep espresso color. These colors create a modern feel.
Applying Glaze for Subtle Color Shifts
Glazing offers a more subtle change than staining. A glaze is a translucent color medium. You apply it over a base coat of paint or stain. It settles into the wood grain and crevices. This adds depth and dimension. You can use a glaze to soften the honey tone. You can also add a hint of a different color. For example, a dark brown glaze over honey oak can mute the yellow. It gives the wood an aged, antique look.
You can also use a white or gray glaze. This creates a limed or weathered effect. This works well for a farmhouse or coastal style. Glazing is a great way to add character. It does not completely hide the original wood. It allows you to control the final color. This gives you flexibility in your kitchen update.
Preparation and Application Tips
Proper preparation is key for successful staining or glazing. You must clean the surfaces thoroughly. Remove all grease and grime. Use a degreaser. Then, lightly sand the wood. Use fine-grit sandpaper. This creates a surface for the stain or glaze to adhere to. You do not need to sand down to bare wood for most applications. However, a clean, dull surface is essential.
When applying stain:
Apply stain evenly. Use a brush or a rag.
Wipe off excess stain quickly. This prevents blotchiness.
Work in small sections. This ensures even coverage.
Allow each coat to dry completely. Check the product instructions for drying times.
When applying glaze:
Apply glaze over a dry base coat.
Brush the glaze on. Then, wipe it off with a clean rag.
You control the intensity. Wipe more for a subtle effect. Leave more for a stronger color.
Work quickly. Glaze dries faster than stain.
Practice on a scrap piece of wood first. This helps you get the desired color. These tips help you achieve a professional finish.
Protecting the New Finish
After staining or glazing, you must protect your new finish. A durable topcoat is essential. It protects the wood from wear and tear. It also seals in the new color. Typical topcoats include oil-based or water-based varnish or lacquer.
For stained surfaces, you can use:
General Finishes High Performance Water Based Polyurethane Topcoat: This is a recommended option. It offers strong protection.
Gel Satin Oil-Based Topcoat: This is a heavy-bodied, no-drip oil and urethane formula. It gives a hand-rubbed look. It will amber with age. You can brush or wipe it on.
Arm-R-Seal Oil-Based Topcoat: This is a penetrating sealer. It has a high-quality urethane formulation. It offers long-lasting, durable protection. It is suitable for detailed projects. It will amber with age. You can brush or wipe it on.
If you apply a glaze, you must seal it. It is essential to seal the glaze layer with dewaxed shellac. Do this before applying any topcoat. Dewaxed shellac is compatible with any chosen topcoat. This step prevents the glaze from smearing. It also ensures a strong bond with the final protective layer. Apply several thin coats of your chosen topcoat. Lightly sand between coats for a smooth finish. This final step ensures your updated cabinets look beautiful for years.
Hardware Upgrades for Honey Oak
New hardware can instantly update your honey oak cabinets and doors. This simple change makes a big difference in your home’s overall look. You can transform your space with fresh hardware ideas.
Selecting Modern Hardware Styles
You can choose from many modern hardware styles. These styles feature clean lines and simple shapes. They create a minimalist aesthetic. Pulls are often favored over knobs in modern design. They offer a cleaner, more streamlined look. You might also see integrated handles and pulls. These are built into cabinet doors. They give a seamless, uncluttered appearance. Some people choose statement pieces. These are oversized knobs or pulls. They add personality and flair to your cabinets. Hidden hardware solutions also exist. These use push-to-open mechanisms. They keep hardware out of sight. This allows your cabinetry to take center stage.
Choosing Contemporary Finishes
The finish of your hardware greatly impacts your home’s style. Matte black adds a contemporary edge to warm wood tones. It highlights the natural beauty of honey oak. Antique brass harmonizes with lighter wood stains. It creates a softer, more traditional aesthetic. Brushed nickel hardware blends perfectly with honey oak cabinets. Its textured surface contrasts with the flat, golden hues. This achieves balance in your kitchen. You can also mix metals. Combine different finishes like bronze, stainless steel, and black hardware. This creates dynamic and visually interesting modern kitchens.
Updating Complementary Fixtures
You should also consider complementary fixtures. These include faucets and light fixtures. They enhance your updated honey oak. Sleek, brushed nickel or chrome handles and knobs introduce modern elegance. You can pair these with contemporary stainless steel faucets. This ties the look together. Matte black faucets create a striking contrast with honey oak. They offer an upscale look. Replace outdated strip lights with sconces or contemporary overhead fixtures. Modern pendant lighting completes the contemporary styling. Warm LED lights highlight honey undertones. They do not give an overly yellow cast. Maintaining consistency in hardware, faucets, and light fixtures is important. This creates a cohesive design throughout your home. These updates make a significant impact.
Complementary Elements to Modernize Honey Oak
You can transform your home by adding complementary elements. These additions work with your existing honey oak. They help you create a modern space. You can achieve a fresh look without replacing all your woodwork. These ideas help in making honey oak work in your home.
Wall Color Choices to Neutralize or Enhance
The right wall paint can greatly impact your honey oak. You can choose colors that neutralize the yellow tones. You can also pick colors that enhance the wood’s warmth. For a neutral backdrop, consider greige, soft white, muted olive, or mushroom taupe. These colors provide a calm setting. Benjamin Moore’s Simply White, Classic Gray, or Chantilly Lace are excellent white paint color ideas. They offer a clean look. Avoid paint colors with blue undertones. They can clash with the warm oak. Choosing paint colors carefully helps you build a cohesive home color palette. These color choices for your home make a big difference.
Incorporating Modern Textiles and Decor
Modern textiles and decor instantly update your space. You can use styling tips to create a modern space with honey oak. Honey oak provides a neutral base for many styles.
Bohemian Interiors: Layered rugs, colorful poufs, macramé wall hangings, and rattan furniture add eclectic patterns.
Mid-Century Modern: Honey oak complements clean lines. It pairs well with walnut, teak, and rosewood furniture. This enhances warm wood tones.
Transitional Style: This style blends traditional comfort with modern design. It warms up cooler color schemes.
Scandinavian Design: Honey oak adds warmth to Scandinavian minimalism. It creates inviting spaces.
You can also use color contrast. Incorporate black frames for pictures. Use black and white accessories. Add throw pillows in black, deep charcoal, white, and light ivory. A black and white patterned rug or an oversized light-colored rug can ground the room. These ideas add texture and richness.
Strategic Lighting to Brighten Spaces
Strategic lighting brightens your home. It draws attention away from dated oak. You can swap outdated fixtures. Install pendant lights over kitchen islands. Add recessed lighting. Incorporate under-cabinet lighting. This illuminates wood surfaces. It creates a modern space.
Reducing Visible Wood for a Modern Feel
You can reduce the visual impact of extensive honey oak. This creates a modern space with honey oak. For honey oak cabinets, combine them with painted upper cabinets. Soft sage, deep navy, or light greige paint colors work well. This breaks up continuous oak. Update countertops with sleek materials. Quartz, concrete lookalikes, polished stone, or solid surface materials are good choices. Light tones or warm grey complement oak. They reflect light. Consider a hybrid approach for cabinets. Paint some sections, like upper or island cabinets. This introduces color and hides imperfections. Keep other cabinets natural. This preserves wood grain and achieves balance. You can also adjust trim or crown molding. This reduces visual weight.
DIY Success Tips for Updating Honey Oak
You can achieve great results with your diy projects. Following these tips helps you avoid common mistakes. They ensure your updated honey oak looks professional and lasts a long time.
Testing Products in Inconspicuous Areas
Always test your chosen products first. Apply paint, stain, or glaze to a hidden spot. This could be the inside of a cabinet door or a small section of trim. You can see how the color looks. You also check how the product adheres. This step prevents you from making a mistake on a visible surface. It helps you confirm the final color and finish.
Working in Well-Ventilated Spaces
Good ventilation is crucial when you work with paint, stains, and sealants. These products release fumes. These fumes can cause nausea, headaches, or dizziness. They can also slow down drying times. Poor ventilation can lead to lingering odors or uneven paint curing.
You should open windows on opposite sides of your home. This creates cross-ventilation. It dilutes fumes and speeds up drying. Use exhaust fans, like those in kitchens or bathrooms, to pull contaminated air out. Place box fans in windows or doorways facing outward. This directs fumes outside. For larger rooms, use two fans: one to bring fresh air in and one to push stale air out. You can also use air purifiers with HEPA filters, especially if you are sensitive to chemicals. A freshly painted room needs 24 to 48 hours to air out completely. Avoid sleeping in the room until fumes dissipate.
Patience and Proper Drying Times
Do not rush your diy projects. Patience is key for a durable finish. You must allow each coat to dry completely. Primer drying times vary. Some primers are touch dry in 20 minutes. Others take 6-8 hours to fully dry. Latex and shellac primers dry the fastest. Latex primers dry in about an hour. Shellac primers can be ready for a topcoat in as little as half an hour. Oil-based primers take a few hours.
Many factors affect drying time. These include temperature, humidity, and ventilation. Optimal humidity is 40-60%. Avoid humidity above 70%. Thinner coats and spray applications dry faster. Always check product instructions for specific drying times. Applying the next coat too soon can cause peeling or an uneven color.
Budgeting for Materials and Tools
Plan your budget before you start. This helps you manage costs for your home update. You can estimate expenses for materials and tools.
Here are some typical costs for painting kitchen cabinets:
Paint: $50 – $200
Brushes, Rollers, or Sprayers: $20 – $200
Sandpaper and Primer: $30 – $100
Drop Cloths, Tape, and Other Supplies: $50 – $100
You can save money by doing the work yourself. Remember to account for all necessary items. This ensures you have everything you need for your diy projects.
Modernizing honey oak is an achievable DIY endeavor. You can transform your home. DIY projects like painting, staining, or updating hardware offer great results. You can choose a project that fits your skill level. This allows you to update your honey oak. You achieve a modern look without a full renovation. Honey oak is durable. Refreshing it with new paint or finishes extends its life. You save money. You also create a fresh, updated space in your home.
FAQ
Can I paint my honey oak cabinets without sanding?
You can paint honey oak cabinets without heavy sanding. You must clean and degrease them thoroughly. Then, apply a high-quality, oil-based primer. This primer helps the paint stick. It also blocks the wood’s natural color from bleeding through. This method saves you time in your home renovation.
What paint colors work best with honey oak in a kitchen?
For your kitchen, consider warm neutrals like soft whites or light greiges. Greens, especially muted olive or sage, also complement honey oak well. Blues with a slight green tint can create a striking contrast. These color choices help modernize your kitchen design.
How can I make my honey oak kitchen look more modern without painting?
You can update your honey oak kitchen without painting. Change your hardware to modern styles like matte black pulls. Update light fixtures and faucets. Incorporate modern textiles and decor. Reduce visible wood by painting surrounding walls in complementary colors. These changes give your kitchen a fresh, modern feel.
Should I choose stain or paint for my honey oak cabinets?
The choice depends on your desired look. Painting completely covers the wood grain. It offers a fresh, new color. Staining or glazing allows the wood grain to show through. It gives a richer, deeper color. Both options can make your honey oak cabinets look more modern.
What are the best color choices for walls to complement honey oak?
You should choose wall colors that neutralize or enhance the honey oak. Greige, soft white, muted olive, or mushroom taupe are good neutral options. These colors create a calm backdrop. Avoid colors with strong blue undertones, as they can clash with the warm wood.


