
You see more people embracing sustainable living and giving personalized gifts. Why not combine both? You can transform simple paper bags into beautiful, eco-friendly gift wrap. This offers dual benefits: you reduce waste and add a unique, heartfelt touch to every present. Imagine the charm! How easy and rewarding can this diy paper bag wrapping paper diy project be for you?
Why DIY Paper Bag Wrapping Paper?
You might wonder why you should bother with diy paper bag wrapping paper. There are many great reasons! This simple change offers big benefits. You help the planet, save money, and make your gift truly special.
Eco-Friendly Benefits
Think about all the wrapping paper used each year. Millions of tons end up in landfills. Much of it cannot be recycled. Making new paper uses trees, water, and energy. This process can also cause pollution. When you choose zero waste wrapping with paper bags, you reduce waste. You give old bags a new life. This makes your gifting truly eco-friendly. You use recycled materials. This helps save resources and lowers pollution. It is a smart choice for the planet.
Cost-Effective Gifting
Buying traditional wrapping paper can add up. A single roll can cost a few dollars. For example, a Traditional Christmas Wrapping Paper Roll Bundle costs around $29.95. This gives you enough paper for several gifts. But why spend money when you have free options? Paper bags are often free from grocery stores or shops. You already have them at home. This makes your recycled paper wrapping virtually free. You save money for the gift itself!
Unique Personalized Touch
Store-bought wrapping paper looks the same for everyone. When you wrap a gift with a paper bag, you add a personal touch. You show you put thought and effort into it. People love personalized items. Think about a custom recordable teddy bear with a loved one’s voice. Or a custom engraved leather notebook. These items feel more valuable because they are unique. Your handmade wrap gives that same special feeling. It makes your gift stand out.
Rustic Aesthetic Appeal
Paper bags offer a natural, earthy look. This style is very popular right now. It gives your gifts a charming, rustic feel. This look is simple yet elegant. It works well for any occasion. You can easily decorate it to match your style.
Gather Your DIY Supplies
Ready to start your diy project? You need a few simple things to turn those plain paper bags into beautiful gift wrap. Most likely, you already have many of these items at home.
Essential Brown Paper Bags
First, you need brown paper bags. You have many choices! Think about the bags you get from the grocery store. These are perfect. You can also use lunch bags or even large craft paper rolls. If you use a grocery bag, just flip it inside out. This gives you a clean, plain surface. Some great options include S.O.S. bags, which stand alone and come in different colors. Euro Tote bags offer a more refined look, often used by fancy stores. You might also find thick gift paper bags or brown takeaway paper bags. Kraft packaging, made from unbleached pulp, is strong and looks great. These are all excellent choices for your recycled wrapping.
Basic Cutting Tools
Next, grab your cutting tools. You will need a good pair of scissors. A craft knife can also be very helpful for straight lines. Don’t forget a ruler! It helps you get precise measurements and neat edges.
Adhesives and Fasteners
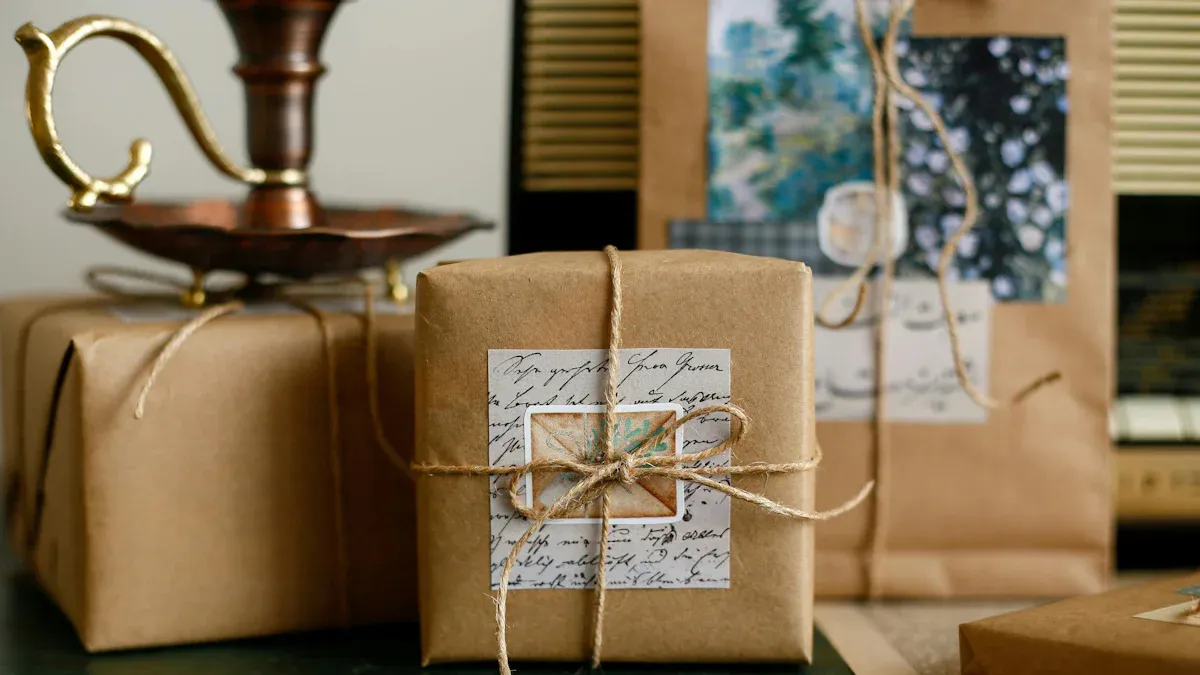
You need things to hold your wrap together. Tape is essential. You can use double-sided tape for a clean look or masking tape for a rustic touch. A glue stick works well for smaller decorations. Twine is also fantastic for securing your gifts and adding a natural feel.
Creative Decoration Elements
Now for the fun part: decorating! You can get really creative here. Try stamps, maybe even homemade potato stamps, or stencils to add patterns. Markers and paint let you draw your own designs. For a natural look, attach leaves, dried flowers, pinecones, or cinnamon sticks. Washi tape can create cool geometric designs. Ribbons and bows add a touch of luxury. You can even use custom stickers or hand-lettering for a personal message. Doilies and lace give a vintage charm.
DIY Paper Bag Wrapping Steps

Now you have all your supplies ready. It is time to turn those plain paper bags into beautiful gift wrap! This part of your diy project is fun and straightforward. You will see how easy it is to create something special.
Preparing the Bag
First, you need to get your paper bag ready. If you use a grocery bag, you will want to flatten it out.
Find the seam: Most paper bags have a glued seam running down one side. Carefully cut along this seam.
Remove the bottom: The bottom of the bag is usually folded and glued. Cut around this folded part to remove it completely.
Flip it inside out: Often, the outside of a grocery bag has logos or writing. Flip the bag inside out. This gives you a clean, plain brown surface to work with. Now you have a flat piece of paper, perfect for your
diy paper bag wrapping paper.
Measuring and Cutting
Next, you need to measure your gift and cut the paper to the right size.
Place your gift: Lay your gift in the center of your flattened paper bag. Make sure the side you want facing up on the gift is facing down on the paper.
Estimate the paper: Bring the long sides of the paper up over the gift. You need enough paper to overlap by about 1-2 inches. For the short sides, you need enough paper to fold down neatly. A good rule of thumb is that the paper should be about 1.5 times the height of your gift on each end.
Cut the excess: Use your scissors to trim any extra paper. You want just enough to cover your gift without too much bulk.
Basic Wrapping Techniques
Now comes the fun part: wrapping your gift! This is where your paper bag truly transforms.
Position your gift: Place your gift in the center of your flattened paper. Make sure the printed side of the paper (if any) faces up, and the top of your gift faces down.
Fold the long sides: Bring one long side of the paper up and over the gift. Then, bring the other long side over, overlapping the first. Secure this seam with a piece of tape.
Work on the ends:
First, fold down the top flap of paper on one end.
Then, fold in the two side flaps, creating neat triangles.
Finally, fold up the bottom flap. It should overlap the triangles. Secure this with tape.
Repeat these steps for the other end of the gift.
Patch up gaps (optional): Sometimes, a gift is too big for one bag. You can tape multiple bags together to make a larger sheet. If you have small gaps, use leftover pieces from the bottom of the bag. Carefully tear away any excess layers or glue, then cut and tape the needed amount to cover the gap.
Decorate: Once your gift is wrapped, you can start decorating! This is where your creativity shines.
Securing Your Wrap
You have wrapped your gift, and now you need to make sure it stays secure.
Tape it down: Clear tape works well for a clean look. Double-sided tape hides the tape completely for a seamless finish. Masking tape can add to the rustic charm if you want it visible.
Tie it up: For an extra touch, use twine or ribbon. Wrap it around the gift once or twice, then tie a simple knot or a bow. This not only secures the paper but also adds a decorative element. You can even use a small piece of twine to hold down a tricky flap if tape is not enough.
Rustic & Eco-Friendly Design Ideas

You have your diy paper bag wrapping paper all cut and ready. Now comes the really fun part: making it look amazing! You can turn plain brown paper into something truly special. These ideas help you create beautiful, eco-friendly designs.
Minimalist Charm
Sometimes, less is more. A minimalist design can look very sophisticated. You can use simple forms like squares or rectangles to show off your style. Think about a shower soap bag with bright images and bold fonts. Or a coconut flour bag that looks clean and modern. Even a pharmacy shopping bag can be fun and stylish with a simple design. A Japanese tea bag package often uses a natural, minimal approach for an organic product. You might also see modern coffee bags with just a logo and simple words.
You can also add purposeful shapes or minimalist illustrations to tell a story. Try using luxury finishes like debossed or embossed textures for a fancy feel. Nature-inspired elements, like a single leaf, bring harmony. You can even personalize your wrap with messages, names, or dates. Geometric shapes give a modern look. For an engaging unboxing, add interactive elements like pop-ups or hidden compartments. Always make sure each element serves a purpose. Minimalist labels and stickers can share important information clearly. You can also design your packaging to be reusable, which is great for sustainability.
Stamped and Stenciled Patterns
Stamps and stencils are fantastic for adding patterns quickly. You can create a repeating design that looks professional. Stamps are often easier and faster than stencils. You can make patterns like circles, branches, or frames. Imagine a beautiful fleur de lis or a rose pattern on your rustic gift wrap. These designs give your gift a unique touch.
Hand-Drawn Designs
Do you love to draw? Then this idea is perfect for you! You can add your own hand-drawn patterns to the paper. It’s best to do this while the paper lies flat, before you wrap the gift. This lets you personalize it easily. You can use a Sharpie felt pen to draw patterns. Then, paint objects with acrylic paint. If you draw things with many lines, they will take longer to paint. For consistency, try an “assembly line” method. For example, draw all the turtle shells first, then all the legs, then heads, eyes, shell patterns, and tails. This helps keep your spacing and size consistent.
Natural Embellishments
Bring the outdoors in with natural embellishments. These add a wonderful rustic feel to your craft project. You can use twigs and greenery like rosemary, cedar, pine, birch, or willow. Eucalyptus sprigs smell amazing. Holly leaves are perfect for holidays. Pressed flowers or leaves add delicate beauty. Dried orange slices look cheerful. Pine cones and cinnamon sticks give a cozy vibe. You can also use herbs like rosemary or thyme. Wood slices and flocked pine branches are other great options. Twine is always a classic choice to tie everything together.
Layered Look
Create depth and interest by layering different materials. You can start with your brown paper bag wrap. Then, add a strip of patterned paper, a piece of lace, or even a doily. Secure these layers with twine or a thin ribbon. This adds texture and makes your gift look more elaborate without being wasteful.
DIY Brown Bag Gift Wrap Tags
Don’t forget the tag! You can make matching tags from brown paper bags too. This really completes your diy brown bag gift wrap. Here’s how you do it:
Cut out two 8 1/2 x 11 pieces of paper from a brown paper bag.
Print any images you want onto these brown paper pieces. You can also create your own design sheet.
Glue the two printed pages together. Make sure the wrong sides face each other. (If your bag has no text, you can print words on the back instead).
Cut out your individual tags.
Trim the corners. You can clip them at an angle or use a corner rounder for a neat finish.
Ink the edges of the tags or draw lines on them for a finished look.
Punch a hole in the top center of each tag.
Loop a piece of twine through the punched holes. Now you have a beautiful, matching tag for your gift!
Tips for a Polished Finish
You have wrapped your gift with care. Now, let’s make it look truly professional. These final touches elevate your wrap from simple to stunning.
Smooth Creases
Crisp folds make a big difference. After you fold the paper, run your finger or a ruler along the crease. This creates a sharp, clean line. For stubborn creases, you can gently press them with a bone folder or the edge of a credit card. This gives your wrap a neat, finished look.
Creative Closures
Beyond basic tape, you have many options to secure your gift.
Twine and Ribbon: Tie a simple bow with natural twine or a colorful ribbon. This adds charm and holds the paper securely.
Wax Seals: For an elegant touch, use a wax seal over a ribbon or directly on the paper.
Stickers: Custom stickers or decorative labels can seal seams and add a personal flair.
Personal Touches
Make your gift unforgettable with thoughtful details.
Custom Tags: Create unique gift tags from paper scraps or scrapbook paper. Write a heartfelt note or the recipient’s name.
Ribbons and Accessories: Use satin or velvet ribbons for elegance. You can add mini ornaments like candy canes for a festive touch. Natural elements such as dried flowers or small pinecones give a rustic vibe.
Stamping and Painting: Decorate with rubber stamps and various ink colors. Hand-paint designs using acrylics, like the recipient’s name or a special message.
3D Elements: Attach small flowers, buttons, beads, or holiday-themed ornaments. Pinecones add tactile and visual appeal.
Recycled Materials: Use old maps, newspaper pages, music sheets, or fabric scraps from old clothes. This creates a unique, rustic, and eco-friendly look.
Theme-Based Designs: Design your bag around specific themes. Think a beach theme with seashell paper and twine, or a baby shower theme with pastel paper and baby-themed stickers.
Upcycling Decorations
Give old items new life by turning them into decorations.
Pompoms: Glue small pompoms onto your plain gift material.
Greeting Cards: Cut and fold old gift bags to create unique greeting cards.
Envelopes: Transform sections of paper gift bags into pouch, taped, or origami envelopes.
Gift Boxes: Repurpose old gift bags or their remnants into small, unique gift boxes.
Name Tags: Cut gift bag paper into shapes like squares or circles. Punch a hole and add ribbon or string for name tags.
Paper Chains: With glue and patience, turn old gift bags into decorative paper chains. Use them for home or tree decoration.
Accordion Medallion Ornaments: Create eco-friendly accordion medallion ornaments for a Christmas tree.
Woven Paper Ball Garlands: Weave non-shiny gift bag paper into paper ball garlands. These work for year-round decoration or special events like birthday parties.
You now see the many benefits of diy paper bag wrapping paper. It is sustainable, saves money, and makes every gift truly special. Embrace your creativity! Experiment with different designs. Share your unique craft creations. Inspire others to try this eco-friendly way to wrap presents.
FAQ
What types of paper bags can you use?
You can use many kinds of paper bags. Grocery bags, lunch bags, or craft paper rolls work well. Just flip grocery bags inside out for a clean surface. Kraft packaging also makes great diy paper bag wrapping paper.
How do you flatten a paper bag for wrapping?
First, cut along the bag’s seam. Then, remove the bottom part. Flip the bag inside out to hide any logos or writing. This gives you a flat, clean piece of paper ready for your diy project.
What if your gift is too large for one bag?
No problem! You can tape multiple flattened paper bags together. This creates a larger sheet of wrapping paper. You can also use leftover pieces to patch any small gaps.
Can you decorate the paper bag wrap?
Absolutely! You can use stamps, stencils, or hand-drawn designs. Add natural items like leaves or pinecones. Ribbons, twine, and custom tags also make your gift look extra special.
Is paper bag wrapping truly eco-friendly?
Yes, it is! You reuse materials, which reduces waste. This saves resources and lowers pollution. It is a great way to practice zero waste wrapping and sustainable gifting.
