
Want to add reliable remote control to any ceiling fan? Pick a direct HD6 drop‑in for UC7078T fans (Hampton Bay/Hunter/Craftmade), a Chelia‑specific remote for the 56″ Hampton Bay, a high‑compatibility receiver kit that fits most fans and adds timers, the Universal 53T wall remote for flexible wall mounting and dimming, or the compact LPHUMEX 3‑in‑1 kit for small canopies. Each option covers different fits and features, and should you keep going you’ll get setup tips and fit checks.
| HD6 Replacement Remote for Hampton Bay Hunter Ceiling Fan |

| Direct Replacement | Remote included: Yes (handheld remote only) | Controls fan speed: Yes (HI, MED, LO, FAN OFF) | Controls light: Yes (light dimmer button; on/off & dim) | VIEW LATEST PRICE | Read Our Analysis |
| Ceiling Fan Remote Control Kit for Hampton Bay |

| Model-Specific Match | Remote included: Yes (handheld remote; battery installed) | Controls fan speed: Yes (factory remote for Chelia 56″ fan speeds) | Controls light: Yes (factory remote controls light) | VIEW LATEST PRICE | Read Our Analysis |
| Ceiling Fan Remote Control and Receiver Kit |

| Universal Conversion Kit | Remote included: Yes (transmitter included) | Controls fan speed: Yes (3 speeds + OFF) | Controls light: Yes (separate light on/off) | VIEW LATEST PRICE | Read Our Analysis |
| Universal 53T Ceiling Fan Wall Remote Control |

| Universal Wall Control | Remote included: Yes (wall remote included) | Controls fan speed: Yes (3-speed fan control) | Controls light: Yes (light dimmer via press-and-hold) | VIEW LATEST PRICE | Read Our Analysis |
| LPHUMEX 3-in-1 Ceiling Fan Remote Control Kit |
| Feature-Rich Timer Pick | Remote included: Yes (handheld remote included) | Controls fan speed: Yes (4 speeds + OFF) | Controls light: Yes (light on/off; no dimming) | VIEW LATEST PRICE | Read Our Analysis |
More Details on Our Top Picks
HD6 Replacement Remote for Hampton Bay Hunter Ceiling Fan
Should you need a direct replacement for a Hampton Bay, Hunter, or Craftmade fan that uses the UC7078T transmitter at 303.9 MHz, the HD6 Replacement Remote is the choice - it’s built specifically to match those models so you won’t have to swap the receiver. You’ll get the remote, wall mount, manual, and two screws; battery isn’t included. It works only with UC7078T-family transmitters (check FCC ID or markings) and uses a 9V battery. Match DIP switch settings from your old transmitter, install the battery, and test. Controls include light dimmer, HI/MED/LO/FAN OFF, and REVERSE.
- Remote included:Yes (handheld remote only)
- Controls fan speed:Yes (HI, MED, LO, FAN OFF)
- Controls light:Yes (light dimmer button; on/off & dim)
- Requires pairing/setup:Yes (DIP switch matching with original)
- Includes wall/holder mount:Yes (wall mount holder included)
- Requires receiver or specific compatibility:Yes (must match specific 303.9 MHz receiver family; remote-only)
- Additional Feature:Uses 9V battery
- Additional Feature:DIP-switch exact-match
- Additional Feature:Reverse function supported
Ceiling Fan Remote Control Kit for Hampton Bay
Should you own a Hampton Bay Chelia 56″ indoor fan and want a direct, drop-in replacement for the factory remote, this SW-T0001-01 kit is the best choice - it comes ready to install with the handheld remote (battery installed), wall bracket, all hardware, and a one-year limited warranty so you can get set up quickly and with confidence. You’ll get a precise-fit remote for the Chelia models listed, batteries included, and Comfort Direct support. Install with power off, power on, then press the learn button in the battery compartment to sync. Verify your fan model before purchasing to confirm compatibility.
- Remote included:Yes (handheld remote; battery installed)
- Controls fan speed:Yes (factory remote for Chelia 56″ fan speeds)
- Controls light:Yes (factory remote controls light)
- Requires pairing/setup:Yes (press learn button in battery compartment to sync)
- Includes wall/holder mount:Yes (wall mount bracket included)
- Requires receiver or specific compatibility:Yes (designed as direct replacement for specific Chelia fan model)
- Additional Feature:Batteries included
- Additional Feature:One-year limited warranty
- Additional Feature:Learn-button quick sync
Ceiling Fan Remote Control and Receiver Kit
Supposing you want to convert a traditional ceiling fan with a light into a remote-controlled unit without removing the blades or light kit, this Ceiling Fan Remote Control and Receiver Kit is a perfect fit-it’s compatible with about 95% of fans, gives separate fan and light control, and adds three fan speeds plus four timer options for convenient hands-off use. You get a transmitter and a compact receiver (4.56 × 2.08 × 1.06 inches). Installation uses a five-wire hookup-loosen the ceiling collar, slide it down, connect two ceiling wires to remote power and three to the fan. Batteries aren’t included; confirm canopy space and expect strong signal with timely tech support.
- Remote included:Yes (transmitter included)
- Controls fan speed:Yes (3 speeds + OFF)
- Controls light:Yes (separate light on/off)
- Requires pairing/setup:Yes (receiver pairs with transmitter during install)
- Includes wall/holder mount:Yes (remote + receiver; remote tray/wall mount implied)
- Requires receiver or specific compatibility:Yes (kit includes receiver; must fit canopy and wiring)
- Additional Feature:4 selectable timers
- Additional Feature:Receiver included (kit)
- Additional Feature:No blade/light removal
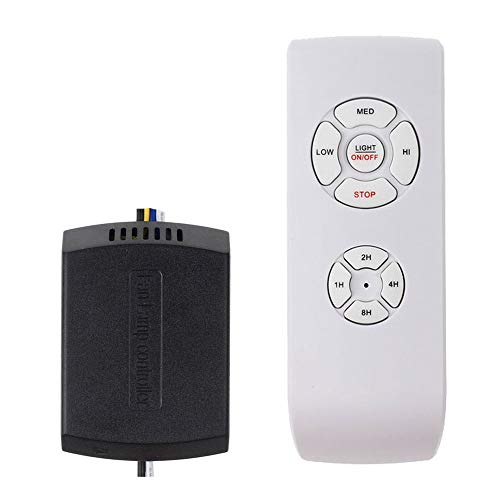
Universal 53T Ceiling Fan Wall Remote Control
Should you want a simple wall-mounted replacement that works with most major fan brands, the Universal 53T Ceiling Fan Wall Remote Control is a good fit - it gives you three-speed fan control and a press-and-hold light dimmer, so you can fine-tune airflow and lighting without pull chains. You’ll mount it on the wall for wireless operation and replace messy chains. Setup is straightforward: use DIP switches to program and sync with compatible fans like Hampton Bay, Harbor Breeze, Hunter, and Home Decorators Collection. The unit offers convenient adjustable performance and ambiance, but notice it’s wall remote only and doesn’t include a receiver or fan.
- Remote included:Yes (wall remote included)
- Controls fan speed:Yes (3-speed fan control)
- Controls light:Yes (light dimmer via press-and-hold)
- Requires pairing/setup:Yes (DIP switch programming to sync)
- Includes wall/holder mount:Yes (designed as wall-mounted remote)
- Requires receiver or specific compatibility:Yes (universal wall remote that must be programmed to fan/receiver)
- Additional Feature:Wall-mounted only design
- Additional Feature:Press-and-hold dimming
- Additional Feature:Universal-brand compatibility
LPHUMEX 3-in-1 Ceiling Fan Remote Control Kit
Should you want a simple, affordable way to add wireless control to an AC-motor ceiling fan, the LPHUMEX 3-in-1 kit delivers-four fan speeds, on/off light control, and four timer options in a compact receiver that fits most standard housings. You’ll get High/Medium/Low/OFF fan buttons, a light on/off switch (no dimming), and 1H/2H/4H/8H timers. It’s compatible with many AC fans like Harbor Breeze, Hunter, and Hampton Bay, but not DC motors. The small 3 x 2.1 x 0.98-inch receiver might not fit Slimline canopies-measure beforehand. Installation is straightforward; remote requires two AAA batteries.
- Remote included:Yes (handheld remote included)
- Controls fan speed:Yes (4 speeds + OFF)
- Controls light:Yes (light on/off; no dimming)
- Requires pairing/setup:Yes (receiver wiring and pairing during install)
- Includes wall/holder mount:Yes (remote tray included for wall mounting)
- Requires receiver or specific compatibility:Yes (kit includes receiver; compatible with AC motor fans; check canopy fit)
- Additional Feature:4 timer options
- Additional Feature:Uses 2 AAA batteries
- Additional Feature:Compact small receiver
Factors to Consider When Choosing Ceiling Fan Remote Controls
At the start of choosing a ceiling fan remote, you’ll want to check receiver compatibility so the unit will pair and fit your fan. Consider which control features you need (speed, light dimming, presets), how the receiver installs and wires, and whether your power source matches the remote’s requirements. Also verify the remote’s size and canopy fit to guarantee a clean, safe installation.
Compatibility With Receiver
Start through matching the remote to your fan’s receiver, since a mismatch in frequency or model coding will keep them from pairing. Confirm the remote’s operating frequency and transmitter/receiver model family match your fan’s receiver. Check whether the receiver uses DIP switches, a learn button, or fixed coding, and buy a remote that supports that pairing method. Confirm the receiver exposes the functions you want-multiple speeds, light dimming, reverse, timers-because the remote can only control what the receiver provides. Measure the fan canopy and compare physical receiver dimensions to guarantee the replacement fits inside the canopy. Should your fan have a DC motor or an integrated smart hub, confirm compatibility specifically for DC or smart systems rather than presuming AC receivers will work.
Control Features Offered
Pick a remote that actually gives you the controls you need rather than settling for basic on/off - check that it has separate fan and light controls, the number of fan speed settings you want (and a clear off or soft-start option), and the kind of light dimming it uses (press-and-hold vs stepped levels). Confirm independent fan and light operation so changing brightness won’t alter airflow. Verify speeds (typically 3–4) and an explicit off or soft-start for smooth progression. Decide between press-and-hold dimming for fine adjustment or stepped levels for predictable increments. Consider extras like reverse motor control for seasonal airflow and programmable timers (1H/2H/4H/8H) for automatic shutoff. Choose a control layout-single-button, multi-button, wall-mounted or handheld-that fits daily use.
Installation And Wiring
Because the receiver has to live inside the fan canopy, check clearance and wiring before you buy so installation doesn’t become a hassle. Measure the canopy-many receivers need about 3–4.5 in × 2–2.5 in × 1–1.1 in-so you don’t end up with a cramped fit. Confirm whether your fan uses an AC or DC motor; DC fans need compatible receivers and wiring. Count and observe the wire colors coming from the fan (neutral, fan hot, light hot, possibly ground and reverse) and match them to the receiver’s five‑wire hookup. Inspect canopy shape and mounting hardware to make certain the receiver sits under the ceiling collar without blocking screws or crowding the junction box. Turn off the breaker and follow the wiring diagram, using proper wire nuts and strain relief.
Power Source Requirements
Whenever you’re choosing a ceiling fan remote, pay close attention to the power sources for both the handheld transmitter and the in‑fan receiver so you don’t end up with compatibility or runtime problems. Check the remote’s battery type and count (9V vs AAA/AA) because size affects runtime, availability, and replacement cost, and confirm whether batteries are included or sold separately so you can use it immediately. Verify the receiver’s voltage, wiring, and whether it needs a neutral to make certain it matches your fan’s supply and canopy wiring. Determine provided the system draws standby power from the fan circuit or runs battery-only, since standby draw impacts energy use and battery life. For wall-mounted units, confirm provided they need constant line voltage or use batteries, as installation access differs.
Size And Canopy Fit
Upon fitting a remote receiver, start from measuring your fan’s canopy diameter and depth and compare those numbers to the receiver’s stated dimensions so you know it will physically fit. Small or slimline canopies often require a compact receiver (roughly under 3 × 2.1 × 1 in); should the receiver exceed canopy depth you’ll need fan modification or a different unit. Check clearance around the mounting bracket and downrod so the receiver and wiring bundle won’t be pinched or interfere with blades or the motor. Were your fan to have an integrated light kit or inline pull chain, verify the receiver’s shape and wiring orientation allow connection without removing the kit. For flush-mount or low ceilings, account for added receiver height and any adapter plate needed for safe clearances.
