

Your bathroom is a high-moisture environment. Planning for moisture, proper bathroom ventilation, and durability is crucial for any bathroom renovation guide. Neglecting these aspects leads to common problems. You can face mold, structural damage, and health issues in your bathroom. Effective ventilation prevents these issues. This guide helps you build a healthy, long-lasting bathroom. You will learn about managing humidity in high-humidity environments. Proper ventilation and good bathroom ventilation ensure your space remains safe.
Why Proper Planning Matters: Risks of Neglect:
The Silent Threat of Moisture Damage:
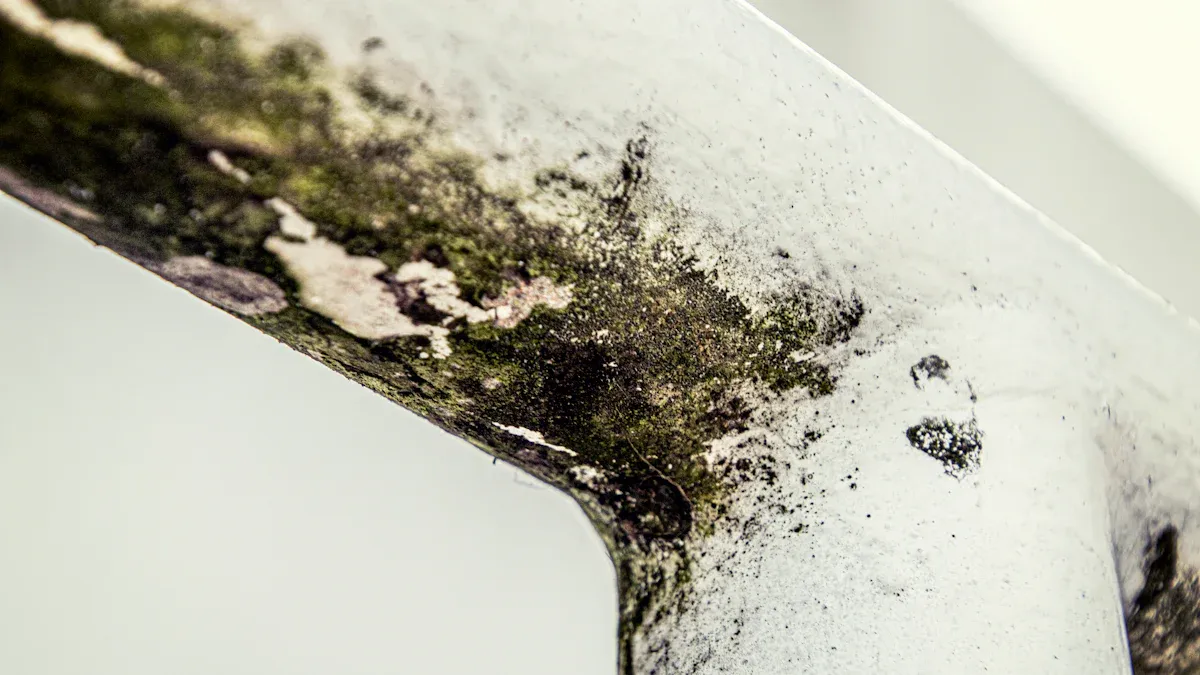
You might think a little water in your bathroom is harmless. However, neglecting proper planning for moisture can lead to significant problems. Inadequate waterproofing and poor bathroom ventilation create a breeding ground for mold. This silent threat can destroy your bathroom’s design. It also leads to costly repairs. For example, mold damage in a bathroom can range from $500 for small jobs to $3,000 for larger infestations. You want to avoid this kind of moisture damage.
Health Impacts of Poor Air Quality:
Beyond visible damage, poor air quality poses serious health risks. When you use cleaning supplies, they release dangerous fumes. These chemicals pollute the air inside your home. This is especially true if you clean in a room with inadequate ventilation. Bathroom cleaners often contain the most dangerous fumes. Mold and mildew also thrive in high humidity. They release spores that cause dangerous respiratory health effects. Molds produce spores that float through the air. They grow on damp surfaces, commonly found in bathrooms. Inhaling or touching molds may cause sneezing, a runny nose, red eyes, or skin rashes. Molds can also trigger asthma attacks. Maintaining good indoor air quality is crucial for your family’s health. Proper ventilation is key to this. You need good air quality in your bathroom.
Structural Damage and Costly Fixes:
Ignoring moisture issues in your bathroom can lead to severe structural damage. This means expensive fixes. Common mistakes in bathroom remodeling often include inadequate bathroom ventilation and using the wrong materials. You might see rotted subfloors or damaged joists. Warped vinyl or laminate flooring can bubble or curl. Tiles might become loose or sound hollow. Cracking, discolored, or missing grout leads to tile installation failure. Persistent leaks can cause sagging bathroom floors due to weakened joists. You might even see cracks in walls or ceilings. Ceiling collapse is a risk from persistent leaks. Water intrusion near wiring also creates electrical hazards. These issues compromise the overall quality and safety of your home. A proper bathroom renovation guide emphasizes preventing these problems.
Essential Bathroom Ventilation:
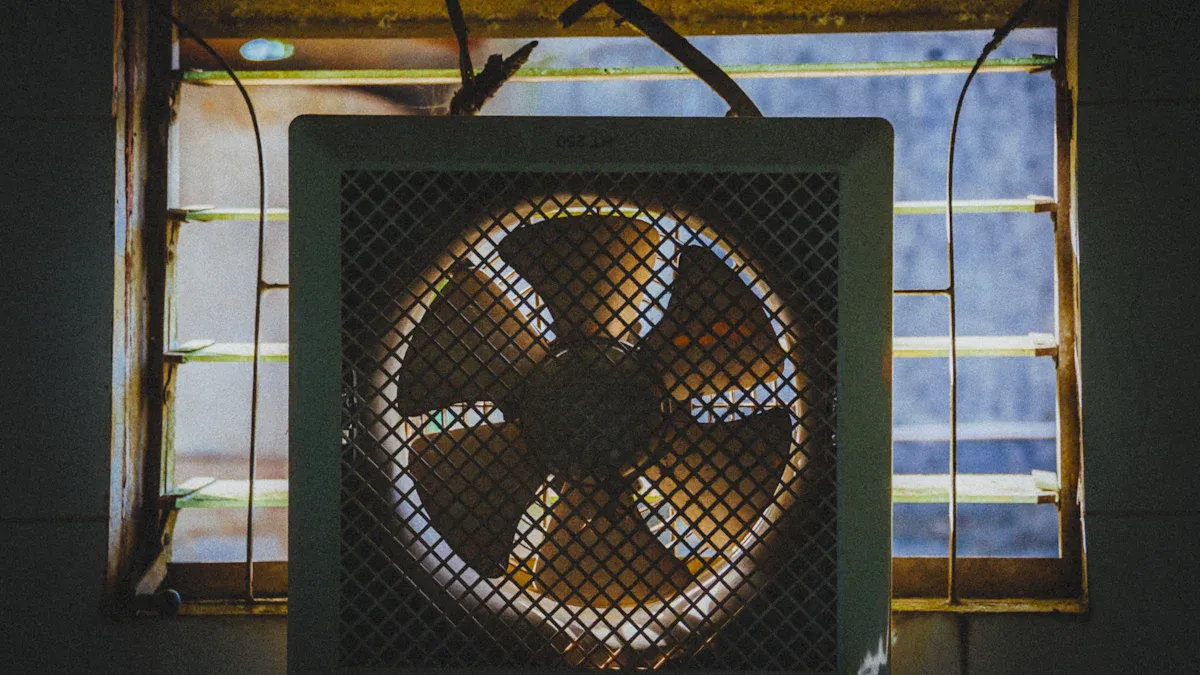
You must prioritize proper bathroom ventilation. It plays a crucial role in removing excess moisture and maintaining healthy humidity levels. This is especially true in newer, tightly-sealed homes. Proper ventilation prevents moisture issues. It keeps humidity in check during and after your bathroom remodel. Good air circulation is vital for your home’s health. This is especially important in high-humidity environments.
Choosing Bathroom Ventilation Systems:
You have several options for bathroom ventilation systems. Each system offers unique benefits for bathroom ventilation.
Ceiling-Mounted Fans: These are the most common. You install them in the ceiling to remove moisture and odors.
Wall-Mounted Fans: Use these when ceiling installation is not possible. They attach to an exterior wall. They vent air directly outside.
Inline Fans: These fans sit within the ductwork. They are not directly in the bathroom. They offer quieter operation and high airflow. Their installation is hidden.
Fans with Built-in Lights: These units combine ventilation with illumination. They offer a clean, modern look.
Combination Fans: These integrate multiple functions. They can include ventilation, lighting, or heating. They maximize functionality and save space. You can also find specialized exhaust fans.
Bluetooth Fans: These let you play music or control light settings. You can adjust brightness, timers, and fan speed via your smartphone.
Fans with Heaters: These provide instant heat to warm the room. They also offer quiet ventilation and a light.
Humidity & Motion Sensing Fans: These are hands-free solutions. They use sensing technology to combat excess humidity.
Decorative Fans: These fan/light combinations blend into the ceiling. Some make a statement with LED lighting.
High Capacity & Commercial Fans: These are low-vibration and low-profile. They are designed for powerful, quiet operation in larger areas. They remove odors, humidity, and pollutants. These are ideal for high-humidity environments.
Sizing Your Fan: CFM Calculations:
Choosing the right size exhaust fan is critical for effective bathroom ventilation. You need to match the fan’s capacity to your bathroom’s size. This ensures proper air quality. Fan capacity is measured in Cubic Feet per Minute (CFM). For bathrooms less than 100 square feet, you calculate the CFM requirement. Multiply the room’s length, width, and ceiling height. Then, multiply by 0.13. Round up to the nearest ten. For example, a 10′ long x 8′ wide x 9′ high room needs 100 CFM (10 x 8 x 9 x 0.13 = 93.6, rounded up). The ‘Area Method’ for residential bathrooms up to 100 sq. ft. recommends an exhaust rate of 1 CFM per square foot. A 6′ x 10′ bathroom (60 sq. ft.) needs a 60 CFM fan (1 CFM x 60 sq. ft.). For larger bathrooms or those with multiple fixtures, you add CFM for each.
Bathroom Size | Minimum Ventilation (CFM) Required |
|---|---|
Less than 50 sq. feet | 50 CFM |
50-100 sq. feet | 1 CFM per square foot of floor space |
More than 100 sq. feet | Add CFM for each fixture: Toilet 50, Shower 50, Bathtub 50, Jetted tub 100 |
Building codes also set ventilation requirements. Current building codes specify a minimum of 50 CFM for fans used occasionally. They require 20 CFM for fans running continuously. For a standard 8’x10′ bathroom, you need at least 80 CFM of airflow. The International Residential Code (IRC) mandates a minimum local exhaust capacity of 50 CFM intermittently. It requires 20 CFM continuously for bathrooms and toilet rooms. The Home Ventilating Institute (HVI) suggests 1 CFM per square foot for bathrooms up to 100 square feet. For bathrooms over 100 square feet, HVI recommends basing ventilation on fixtures. You need 50 CFM for each toilet, shower, and tub. A jetted tub requires 100 CFM. Consider the fan’s energy efficiency. Efficacy (cfm/w) measures how much air it moves per watt of power. Higher efficacy means better efficiency.
This chart shows various exhaust fans. You can compare their efficacy and airflow.
Achieving Proper Bathroom Ventilation:
You must use your exhaust fan correctly to achieve proper bathroom ventilation. Run the fan during every shower. Continue running it for at least 20 minutes afterward. This significantly reduces humidity. It prevents moisture buildup. Proper ventilation supports your comfort. It regulates humidity levels. This is essential for both durability and health. Your bathroom renovation guide should always include this advice. Sometimes, bathroom renovations involve HVAC changes. These changes can improve moisture management throughout your entire house. This contributes to better indoor air quality.
Smart Ventilation Solutions and Controls:
Modern technology offers smart ventilation solutions. These enhance efficiency and convenience. You can find exhaust fans with advanced features.
Humidity Sensors: These automatically detect excess humidity. They activate the ventilation fan. This reduces condensation. It helps reduce mold and mildew.
Timers: Timers ensure the fan runs for an adequate duration. This makes the ventilation effective. These features help reduce energy usage. The fan operates only when necessary. This contributes to overall energy efficiency. Smart solutions are energy-efficient, saving on utility bills. They prevent the growth of mildew, mold, and bacteria. They control moisture. Smart ventilation eliminates unpleasant smells. It helps maintain bathroom furniture. It prevents warping of wood products and peeling paint. These issues come from excess moisture. They provide ease of use through automatic control. You do not need to manually turn the fan on or off. This improves the overall quality of your bathroom environment.
Installation for Effective Ventilation:
Correct installation is crucial for effective ventilation. Poor installation can reduce your fan’s performance. This impacts its efficiency. It can lead to ineffective moisture removal. This causes mold and mildew growth. It shortens fan life. You must follow best practices for ducting.
Use smooth, rigid ducting materials. Galvanized sheet metal or PVC are good choices. Match the duct’s diameter to the fan’s exit diameter.
Keep duct runs as straight as possible. Have at least three feet of straight duct from the fan to the first bend.
If bends are necessary, choose gradual turns. Avoid sharp 90-degree elbows. This maintains airflow and reduces noise.
Support the ducting. This prevents sagging and kinking. Ensure a consistent slope away from the fan. This manages condensation.
Seal all duct joints and seams. Use mastic or UL-approved metal tape.
Insulate the duct. This minimizes condensation.
Vent directly to the outside. Avoid attics or crawlspaces.
Ensure the exterior vent cap includes a damper. Locate it at least 10 feet from mechanical air inlets. Or, place it 3 feet from gravity air inlets. Common mistakes can reduce your fan’s effectiveness.
Opting for the Minimum: Choosing a fan based only on minimum CFM requirements often leads to unmet expectations.
Selecting the Wrong Size: A fan that is too small provides insufficient ventilation. A fan that is too large creates an imbalance. It pulls out too much air. This causes unfiltered outside air to enter the space.
Placing the Fan in the Wrong Location: Placing the fan in the center of the room is a common mistake. This drags moisture across the room. It does not vent it directly out. Place fans in or just outside the shower. This eliminates moisture at the source.
Driving Up Energy Costs with Multiple Fans: Installing multiple fans in large bathrooms increases energy consumption and noise. Consider using a single, remotely located fan for multiple exhaust points instead. Proper installation ensures your bathroom ventilation system works as intended. It protects your bathroom from moisture damage. It maintains good indoor air quality. This ensures a high quality living space and energy efficiency.
Moisture Control: Creating a Waterproof Bathroom:
You must prioritize moisture control in your bathroom renovation. This prevents water damage and ensures a healthy environment. You create a truly waterproof bathroom by selecting the right materials and applying proper techniques. This section of your bathroom renovation guide helps you understand these critical steps.
Selecting Moisture-Resistant Building Materials:
You start building a waterproof bathroom by choosing the right materials. These materials resist moisture and prevent damage.
For your walls, consider these options:
Waterproof Bathroom Wall Panels: These panels stop water from reaching your wall structure. They reduce mold risk and improve aesthetics. You install them faster than tile. They offer modern designs and need little aftercare. Common types include PVC, WPC (Wood-Plastic Composite), composite stone, laminate, and treated wood alternatives. WPC panels are completely waterproof. They handle steam without warping or swelling. You can find options like Matte Black Exterior Slat Wall Panels or Walnut Extra Long Exterior Slat Wall Panels. Peel and Stick Stone Tile, made with real stone surfaces, offers a lightweight and flexible DIY application.
Mold-Resistant Drywall: This drywall is treated to prevent mold and mildew growth. It works reliably in high-humidity environments.
Clay and Lime Plasters: These natural, breathable plasters regulate humidity. They resist mold and mildew.
For your floors, you have excellent choices for humid bathrooms:
Porcelain and Ceramic Tiles: These are dense and water-resistant. They are easy to clean. Porcelain absorbs less water, offering superior waterproof performance.
Luxury Vinyl Plank (LVP): This material mimics wood. It offers superior water resistance. It is easy to maintain and cost-effective.
Sealed Concrete: This material is highly durable. It resists moisture absorption when properly sealed. It provides a cool surface and a modern look.
Engineered Wood Flooring: This offers a warm, natural look. It has real hardwood veneer over a stable, moisture-resistant core. It creates a cozier atmosphere. It is water-resistant but not entirely waterproof. Use it for powder rooms or full bathrooms with strict precautions. You need a high-quality water-resistant sealant. Clean up spills immediately. Choose products rated for moisture resistance. Look for marine-grade plywood core, factory-applied water-resistant finishes, and wider planks with sealed beveled edges.
When choosing materials for your bathroom, consider their properties:
Material | Porosity/Water Resistance | Maintenance | Common Uses (Walls/Floors) |
|---|---|---|---|
Marble | Porous, requires regular sealing | Prone to staining, susceptible to scratches/cracks | Vanities, flooring |
Granite | Less porous than marble, requires periodic sealing | Durable, resistant to heat/scratching | Vanities, flooring |
Quartz | Highly water-resistant, non-porous | No sealing required, easy to maintain | Vanities |
Treated Wood | Water-repellent finishes, naturally moisture-resistant (teak, bamboo) | Proper protection needed | Vanities, shelves, flooring, walls |
For shower walls, you need a robust backer board. Compare cement board and fiberglass-reinforced gypsum board:
Feature | Cement Board | Fiberglass-Reinforced Gypsum Board (Glass Mat Gypsum Board) |
|---|---|---|
Pros | – Good, reliable backer board for walls | – Easier to cut than cement board |
– Mold resistant | – Mold resistant | |
– Works well in wet areas when waterproofed | – Built-in moisture barrier | |
– Easier installation | ||
– Cost-effective | ||
Cons | – Requires a waterproofing membrane in wet areas (e.g., showers) | – Implies less robust than cement board without waterproofing |
Composition | – Water-resistant silicone-treated gypsum, reinforced by fiberglass mats on both sides | |
Ease of Cutting | – Easier to cut | |
Moisture Barrier | Requires external waterproofing | Built-in |
You must select moisture-resistant surfaces to ensure longevity and prevent costly repairs.
Waterproofing Membranes and Sealants:
You need to apply waterproofing membranes and sealants in wet areas like showers. These create an impenetrable barrier against moisture.
You have several types of waterproofing membranes:
Polyurethane Liquid Membranes: These form a seamless, flexible layer. They are ideal for areas with thermal expansion and contraction.
Cementitious Coatings: You use these widely for internal wet areas. Examples include water tanks, basements, and bathrooms. They are easy to apply and bond well with concrete. Look for products like Ardex 8+9, Mapei Planiseal 88, and Laticrete Hydro Ban Cementitious Waterproofing Membrane.
Acrylic and Hybrid Coatings: These are environmentally friendly. They offer UV resistance for new and existing surfaces.
Self-Adhesive Membranes: These come with a pre-applied adhesive layer. They allow for quick and easy installation. They are versatile and suitable for smaller areas. Mapei Planiseal Membrane SA is a recommended self-adhering rubberized asphalt sheet membrane for high-quality waterproofing.
Polyethylene Waterproof Membranes: Install these with mortar for showers, steam rooms, and kitchens.
Liquid Membranes, Foam Wallboards, Foam Shower Bases, and Sheet Membranes: These are other effective options.
Paint-on liquid waterproofing: Brands like Redgard, Hydroban, and AquaDefense offer these.
These membranes are crucial for achieving true waterproof performance. They protect your home’s structure from water damage.
Choosing the Right Paint and Finishes:
You must choose the right paint for your bathroom walls and ceilings. This provides an extra layer of protection against moisture.
“The most effective solution for high-moisture areas such as bathrooms is using moisture-resistant finishes like semi-gloss or satin.” – Home Painting Experts
Consider these moisture-resistant finishes:
Semi-gloss Paint: This paint repels water. It is easy to clean. It is a top choice for bathrooms.
Satin Finish: This offers a subtle sheen. It provides a washable surface. It balances durability with aesthetic appeal. It resists mold and mildew.
Acrylic Paints: Water-based acrylics resist moisture and stains. They are low in VOCs.
Here is a comparison of popular paint finishes:
Paint Type/Finish | Key Benefits | Ideal For |
|---|---|---|
Satin Finish | Moisture-resistant, easy to clean, resists mold | Busy family bathrooms, areas with frequent spills and splashes |
Semi-Gloss | Highly moisture-resistant, durable, reflects light | Bathrooms prone to steam and moisture, small spaces needing an airy feel |
You should also consider mildew-resistant paints. These paints are specially formulated with antimicrobial agents. They inhibit mold and mildew growth. Standard interior paints may contain mildew inhibitors. However, these are less potent than those in dedicated mildew-resistant paints. This is because indoor environments typically have less widespread mold growth conditions.
Feature/Benefit | Mildew-Resistant Paint | Standard Interior Paint |
|---|---|---|
Formulation | Specially formulated with antimicrobial agents to inhibit mold/mildew growth. | Generally lacks specific antimicrobial additives. |
Moisture Resistance | Actively inhibits mold spore growth even when exposed to moisture, condensation, or steam. | Less effective against mold growth in moist environments. |
Durability | Formulated to withstand frequent cleaning, steam, moisture, and temperature changes; resists peeling, bubbling, and fading. | May be more prone to peeling, bubbling, or fading in high-humidity areas. |
Washability | Easily washable without damaging the finishes. | May not withstand frequent washing as well. |
Air Quality | Improves indoor air quality by preventing mold spores, reducing allergens and odors. | Does not actively prevent mold spores or improve air quality in the same way. |
Target Areas | Ideal for high-moisture areas like bathrooms, laundry rooms, and kitchens. | Suitable for general interior use, but less protective in damp areas. |
These moisture-resistant finishes and paints are crucial for maintaining a healthy and attractive bathroom.
Designing for Wet and Dry Zones:
You can enhance moisture control by designing your bathroom with distinct wet and dry zones. This creates a more organized and functional space. It allows you to use suitable materials in wet areas. The dry zone can then focus on storage and lighting.
Consider these design principles:
Partition Walls: Low or high partition walls provide separation and privacy. They work well in larger bathrooms. They can conceal toilets and create a ‘room within a room’. You can use consistent tiles and brassware to unify the space.
Full walls: Install these on both sides of the shower for a luxurious look.
Half-walls: These are ideal if you dislike enclosed spaces.
Half walls with glass: These maximize natural lighting. They prevent the shower from feeling cramped.
Shower Doors & Cubicles: These are effective for limited floor space. Frameless panels create an illusion of more space. Glass coatings can reduce soap scum.
Elevated Wet Zones: Elevating the wet zone creates visual separation. You do not need extensive floor changes. A slightly darker tile color enhances the contrast.
Wet Rooms: This is an open-plan bathroom where the entire space is waterproofed. They are practical for small bathrooms. They maximize floor space and offer a streamlined design. They require extensive remodeling.
Shower Barriers:
Glass Enclosure: Floor-to-ceiling glass doors provide waterproof separation. They suit larger bathrooms.
Partial Partition: Fixed glass panels or half-height walls balance separation and an open feel.
Shower Curtain: This is a budget-friendly option. It requires mildew-resistant fabrics and regular replacement.
Floor & Drainage:
Proper Slope: You need a gentle 1–2° tilt towards a quality drain on the shower floor.
Anti-Slip Surface: Use textured tiles or mat inserts in the shower area to prevent slips.
Ventilation: You need an exhaust fan with high capacity. This removes steam and odors. Operable windows or air-exchange systems maintain freshness. They prevent mildew. This proper ventilation is key to effective moisture control.
You can also use defined bathroom lighting. Brighter lights for vanity areas, softer ambient lighting for bath areas, and focused downlights for showers create distinct moods. Paint tricks can give an area its own identity and create visual depth. These design choices help manage moisture effectively.
Durability: Long-Lasting Materials & Finishes:
You want your bathroom to last. Choosing durable materials and finishes ensures your renovation stands the test of time. Proper ventilation also protects these long-lasting finishes. This section of your bathroom renovation guide focuses on selecting quality products.
Flooring for High-Traffic and Wet Areas:
Your bathroom floor needs to withstand daily use and moisture. You need durable materials.
Tile: Tile resists scratches, stains, and moisture. It is perfect for bathrooms. It is low maintenance and easy to clean. Porcelain tile offers impressive resistance to foot traffic, scratches, and water.
Luxury Vinyl (LVP or LVT): Many luxury vinyl options are 100% waterproof. They are ideal for high-moisture areas. This flooring is durable with a protective wear layer. It resists scratches, dents, and stains. Li Wang, who leads flooring testing at Consumer Reports, notes that “Laminate and vinyl products are generally made of tougher stuff.”
Wall Coverings and Shower Surrounds:
For shower walls, you need materials that handle constant water. Porcelain tile offers superior long-term performance.
Porcelain Tile: It absorbs less than 0.5% water. This makes it nearly waterproof. It resists mold and mildew. Porcelain tile requires minimal maintenance, mainly grout cleaning. Noah Chitty, VP Sustainability & Technical Services at AHF™, states, “Porcelain’s water resistance is unmatched. It stands up to steam, cleaning, and daily use without losing its finish or performance.”
Natural Stone Tile: This option requires ongoing sealing every 1-3 years. Its durability varies by stone type. Some types are more porous and can scratch or stain. Proper ventilation helps preserve these finishes.
Feature | Porcelain Tile | Natural Stone Tile |
|---|---|---|
Maintenance | Minimal (grout cleaning only) | Ongoing sealing (every 1-3 years), immediate cleanup of spills |
Water Absorption | Under 0.5% (nearly waterproof) | Varies by stone type (granite low, marble medium, travertine/limestone high) |
Sealing | Not required | Required periodically (every 1-3 years) |
Durable Countertops and Vanities:
Your vanity countertop needs to be tough. Quartz and granite are top choices for durability.
Quartz: This material is highly resistant to staining, scratching, and moisture damage. It does not require sealing. Quartz is non-porous. It retains its beauty for decades.
Granite: Granite offers similar durability. It has slightly better heat resistance. However, granite needs periodic sealing to prevent discoloration and staining. Both materials can last for decades. Good ventilation protects these finishes.
Material | Durability | Key Features |
|---|---|---|
Quartz | High | Durable, easy to clean, stain-resistant |
Granite | High | Natural look, heat & scratch resistant, needs sealing |
Fixtures, Faucets, and Hardware:
Choose quality fixtures. Many manufacturers offer strong warranties. Moen and Delta Faucet provide a Lifetime Warranty for residential plumbing fixtures. HammerHead Showers also offers a Lifetime Limited Warranty for their all-metal products. Commercial applications usually have shorter warranties, around 5 years. Proper ventilation helps maintain these finishes.
Product Type/Component | Consumer Type | Warranty Period |
|---|---|---|
Delta Faucets (Parts & Finish) | Original consumer purchaser (residential) | Lifetime |
Delta Toilets (Chinaware) | Original consumer purchaser (residential) | Lifetime |
Maintenance for Longevity:
Regular maintenance extends the life of your bathroom finishes.
Grout Cleaning: Clean grout with a paste of baking soda, hydrogen peroxide, and dish soap. Apply it, let it sit, then scrub. You can also use a vinegar and water spray for mild buildup. Seal grout every 1–2 years. Cleen-eez Grout-eez Tile Cleaner is effective for deep cleaning.
Natural Stone Sealing: Reseal natural stone surfaces regularly. The frequency depends on the stone type. Perform a water test annually. If water soaks in, reseal it. Use pH-neutral cleaners. Proper ventilation helps keep these finishes looking new.
Stone Type | Sealing Frequency (Bathrooms) |
|---|---|
Marble | Every 6-12 months |
Granite | Every 1-2 years |
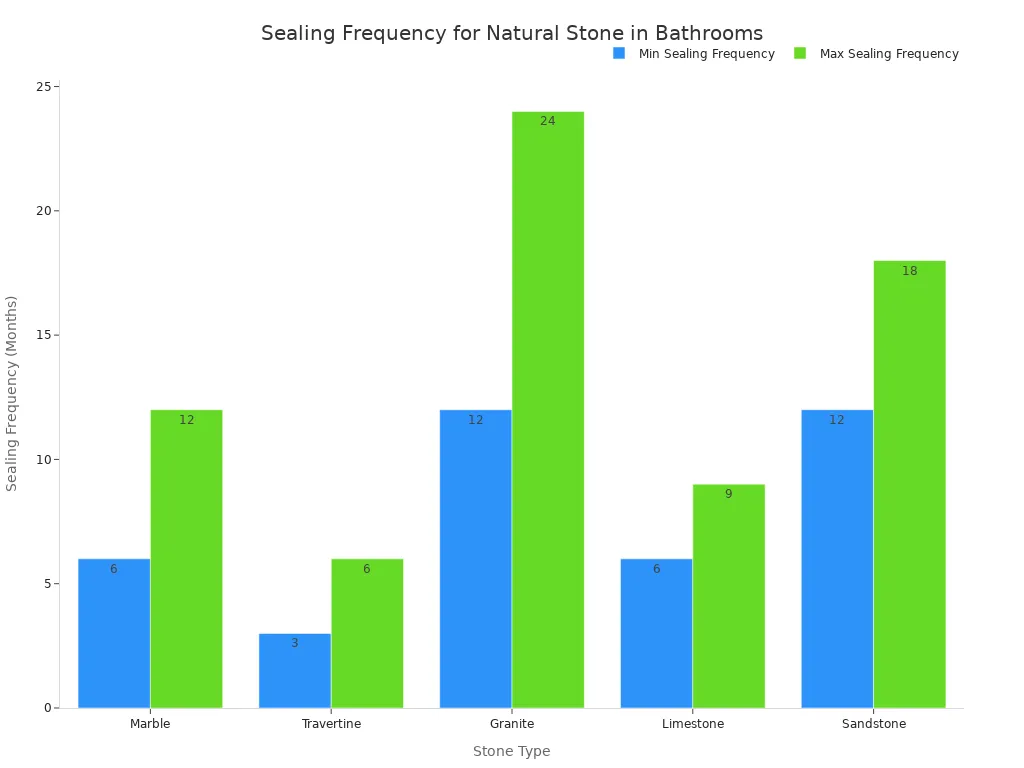
Use penetrating sealants for internal protection. Ensure the stone is clean and dry before applying sealant. Allow it to cure fully. Good ventilation is key to preserving all your bathroom finishes.
You now understand the importance of prioritizing moisture management, proper ventilation, and durable materials in your bathroom renovation. These considerations create a healthier, more comfortable, and longer-lasting bathroom. You will save time and money in the long run. Apply this knowledge to your own bathroom project. Achieve a successful and resilient outcome.
