
You often need extra storage around your home. Finding an affordable solution is a common goal. We offer free, comprehensive diy 10×12 shed plans. These blueprints empower you to build your own storage building. You gain immense satisfaction from completing free diy projects. You also save significant money compared to buying a pre-built shed. This post provides detailed shed plans and a step-by-step guide from planning to completion.
Key Takeaways
Building your own 10×12 shed saves money and gives you a sense of pride.
Always check local rules and permits before you start building your shed.
Choose a good spot for your shed that avoids water and gets enough sunlight.
Use the provided free plans to guide you through each step of building your shed.
Pick the right foundation, walls, and roof to make your shed strong and last a long time.
Why Build a 10×12 Shed
Building your own shed offers many advantages. You gain practical storage and personal satisfaction. You also save money.
Benefits of 10×12 Size
A 10×12 shed provides ample space for many needs. This size gives you about 120 square feet of functional area. You can use it for various purposes. Many people use a 12×10 garden shed for tool storage or garden equipment. You can also store surplus items like seasonal decorations and keepsakes. A 10×12 shed can become a home office, a she shed, or even a man cave. You might even turn it into a tiny cabin or a potting shed. It works well as a pool house too. This size offers enough room for a comfortable office setup. You can also fit a queen-sized bed for guests.
Cost Savings Versus Pre-Built
Building your own shed saves you significant money. Pre-built sheds often cost much more. You pay for materials, labor, and delivery with pre-built options. When you build it yourself, you only pay for materials. You control the budget. You can choose affordable materials or find sales. This approach drastically reduces your overall expense.
Satisfaction of DIY Project
You experience great satisfaction when you build something with your own hands. Completing a project like a shed gives you a sense of accomplishment. You learn new skills. You gain confidence in your abilities. Every time you use your new shed, you will feel proud of your hard work. These diy 10×12 shed plans guide you through each step. You create a valuable addition to your property.
Getting Started with Shed Plans: Planning and Permits
Local Building Codes and Permits
Before you start building, you must understand local rules. Check with your city or county building department. A 10×12 shed, at 120 square feet, often sits at the edge of permit requirements. Some areas exempt sheds under 200 square feet; others set the limit at 120 square feet. You must verify these local zoning and building requirements.
Consider the shed’s height. Sheds over 8 feet may need approval. Setback rules dictate how far your shed must be from property lines. The foundation type also matters. Simple gravel or skid foundations may not need approval, but a permanent concrete slab usually does. Your shed’s intended use is important. Storage sheds are less regulated. If you plan a workshop or home office, a permit is very likely. Adding electrical wiring or plumbing automatically requires inspection and a permit. Also, check your Homeowners’ Association (HOA) rules; HOAs often have stricter limits.
Ignoring these rules carries risks. Local authorities can fine you for unpermitted sheds or order their removal. An unpermitted shed can lower your property value or delay a home sale. Insurance companies may refuse to cover damage, leaving you responsible for repair costs. These free shed plans help you navigate the process.
Choosing the Right Location
Selecting the right spot for your shed is crucial. Avoid low-lying areas where water collects. This prevents rot, mold, and structural damage. Look for naturally elevated spots or gentle slopes. These direct water away from the structure. You can address minor drainage issues with French drains or gravel foundations.
Consider sunlight and weather exposure. Morning sunlight helps evaporate moisture, keeping items dry. For optimal sunlight, choose a location that receives enough sun to prevent mold and mildew. In hot regions, provide shade to prevent overheating. For workshops, natural light improves visibility.
Essential Tools Checklist
You need the right tools to build your shed efficiently. Having them ready saves time and effort. Your shed plans will detail specific tools for each step. Essential power tools include a power screwdriver for framing, a reciprocating hand saw for quick cuts, and a compound miter saw for precise cuts. For roofing, you will need a utility knife for shingles and a roofing nailer for sturdy roofs. Hand tools are also vital. A finishing hammer drives small nails. Tin snips cut metal drip edges. A nail punch set helps set nail heads below the wood surface. An air compressor often powers nailers. This list gives you a good start.
Free DIY 10×12 Shed Plans
You are ready to build your shed. You need good plans. Our free diy 10×12 shed plans give you everything. These plans make your building project easy.
Blueprint Package Overview
A comprehensive blueprint package gives you all the details. These free shed plans include many helpful items. You get printable PDFs. These PDFs show you step-by-step details. You find clear drawings. They show you how parts fit together. Measurements are precise. You get a shopping list. This list helps you buy all materials. A cutting list tells you how to cut each piece of wood. These blueprints help you arrange all necessary items. You can estimate costs before you start.
Your package includes specific material breakdowns. For the floor, you need pressure-treated 2x6s and 4x4s. You also need 3/4″ tongue and groove plywood. Wall frames use various lengths of 2x4s. Roof frames, like rafters and trusses, also use different 2×4 lengths. Siding often uses 5/8″ T1-11 exterior siding. Roof trim uses 2x6s. The roof deck needs 1/2″ plywood. Corner trim uses 1x4s. Hardware includes 3 1/2″ galvanized nails and 2″ deck screws. You also need 2″ galvanized nails and 1 1/4″ galvanized finishing nails. Shingles, roof tacks, roofing felt, staples, and drip edge complete the list.
How to Access and Interpret Plans
You can find many reliable sources for free shed plans. Many websites offer a free pdf download. For example, you can find 10×12 Barn Shed Plans. These plans offer 120 square feet. They have a high roof. This roof is good for a loft. You can also find 10×12 Gambrel Shed Plans. These plans give you ample space. They are ideal for adding a loft and shelves. They also include a free pdf download.
You might prefer a different style. Large 10×12 Lean To Shed Plans are versatile. You can use them for storage, a small office, or a workshop. You can view these online or get a pdf download. Other 10×12 Lean To Shed Plans offer a DIY option. They have a single-slope roof. This roof blends well into many landscapes. They also include a pdf download. The Spruce website highlights a free shed plan. This plan includes a pdf download for a 10×12 ft. shed. It provides ample space for equipment and off-season furniture. This plan starts with a materials list. It includes detailed measurements with illustrations. You follow the clear instructions to build your shed.
Customization Options
Even with free diy 10×12 shed plans, you have many customization options. You can personalize your shed. You can choose different sizes, roof styles, and finishes. These choices match your style and landscape. You can select color options for your siding, trim, and roof. This lets you personalize your shed’s exterior.
Consider radiant barrier insulation. This helps regulate the interior temperature. It makes your shed more comfortable. It also saves you money. You can extend the wall height with raised walls. This increases storage capacity. It does not increase the shed’s footprint. You can add doors and windows. These enhance both the look and how you use the shed. Shutters and flower boxes beautify your shed. They reflect your personal style. You can equip your shed with shelves, ramps, and workbenches. These are essential for various tasks.
You can add a lofted space. This gives you additional storage. Extra windows and doors increase natural light. They also improve air circulation. You have exterior alternatives. A wooden shed offers space with natural light. It has two vents and a double door. An LP SmartSide shed is long-lasting and durable. A metal shed provides increased security. It has strengthened hinges. It also needs less maintenance. A vinyl shed is tough and weather-resistant. It often has one or two windows for light and ventilation.
Step-by-Step Construction Guide
Building your own 10×12 shed involves several key stages. You will move from preparing the ground to adding the final details. Follow these step-by-step instructions carefully.
Foundation Options and Installation
You must start with a strong foundation. This supports your shed and protects it from moisture. Many foundation types work for a 10×12 shed.
On-Grade Foundations (Floating Foundations): These foundations rest directly on the ground. They are good for small to medium sheds.
Solid-concrete block foundations
Skid foundations
Timber-frame foundations
Floating-slab (a type of poured-concrete slab)
Frost-Proof Foundations (Permanent Foundations): These foundations are stronger. They last longer. You dig them below the frost line. This is a good option for colder places.
Concrete pier foundations
Poured-concrete slab (monolithic slab)
Pole-barn foundations
Other foundation types also work for your 10×12 shed:
Plastic shed foundations: You lay down plastic grids. You fill them with gravel. This creates a base, especially for sheds with skids and wood floors.
Helical Piers and Screw Piles: These are steel rods. They have helical blades. You embed them deep into the ground. They support structures and stop settling.
Metal Shed Foundation: This often uses steel joists. You screw a wooden floor onto the metal frame.
You can also consider these options:
Skid Foundation
Metal Kit Foundation
Metal Jacks
Concrete Blocks
Pavers
Plastic Grid (Permeable Pavers)
Deck Blocks
Many builders recommend a gravel pad. You create a lumber perimeter. This makes a stable, well-draining, and affordable base. It is also easy to build.
Floor Framing and Decking
The floor frame provides the base for your shed’s structure. You need specific lumber for this part.
For a typical 10×12 shed floor, you will use:
Floor Joists: You need 9 pieces of 2×6 lumber. Each piece should be 11 feet 9 inches long.
Perimeter Frame: You need 2 pieces of 2×6 lumber. Each piece should be 10 feet 0 inches long.
Skids/Beams: You need 4 pieces of 4×4 lumber. Each piece should be 10 feet long. You place these 48 inches apart.
Joist Spacing: You install seven 2×6 floor joists. Space them 16 inches on center (O.C.). Place joists near the sides at 12 inches O.C.
Plywood Sheathing: You need 23/32 inch tongue and groove plywood. This requires about 4 full sheets (standard 48×96 inches) to cover the 120 square foot floor area.
Another common setup for floor framing includes:
Floor Joists:
2 pieces of 2×6 (pressure treated) lumber, 12 feet long.
10 pieces of 2×6 (pressure treated) lumber, 9 feet 9 inches long.
Skids/Beams:
3 pieces of 4×4 (pressure treated) lumber, 12 feet long.
Plywood Sheathing:
4 sheets of 3/4 inch tongue and groove plywood. Each sheet is 4×8 feet. You cut them to size.
Spacing: You space floor joists 16 inches on center.
To figure out how much plywood you need:
Calculate the Floor Area: For a 10×12 shed, the floor area is 10 feet x 12 feet = 120 square feet.
Determine the Number of Sheets: Standard plywood sheets are 4 feet by 8 feet (32 square feet). Divide the total floor area by the area of one sheet: 120 square feet ÷ 32 square feet/sheet = 3.75 sheets.
Round Up: You cannot buy a fraction of a sheet. You will need 4 sheets of plywood for the floor. It is wise to get one or two extra sheets for adjustments or fixes.
Wall Framing and Sheathing
You build the walls after the floor is complete. Wall framing creates the structure for your shed’s sides.
You will typically use these lumber sizes for wall framing:
2×4 studs @ 24″ on center with single top and bottom plates.
2×6 lumber for walls on 16″ centers.
A detailed material list includes 30 pre-cut 2x4x92 5/8 studs. For double top plates, you need 2x4x12 (2) and 2x4x10 (2).
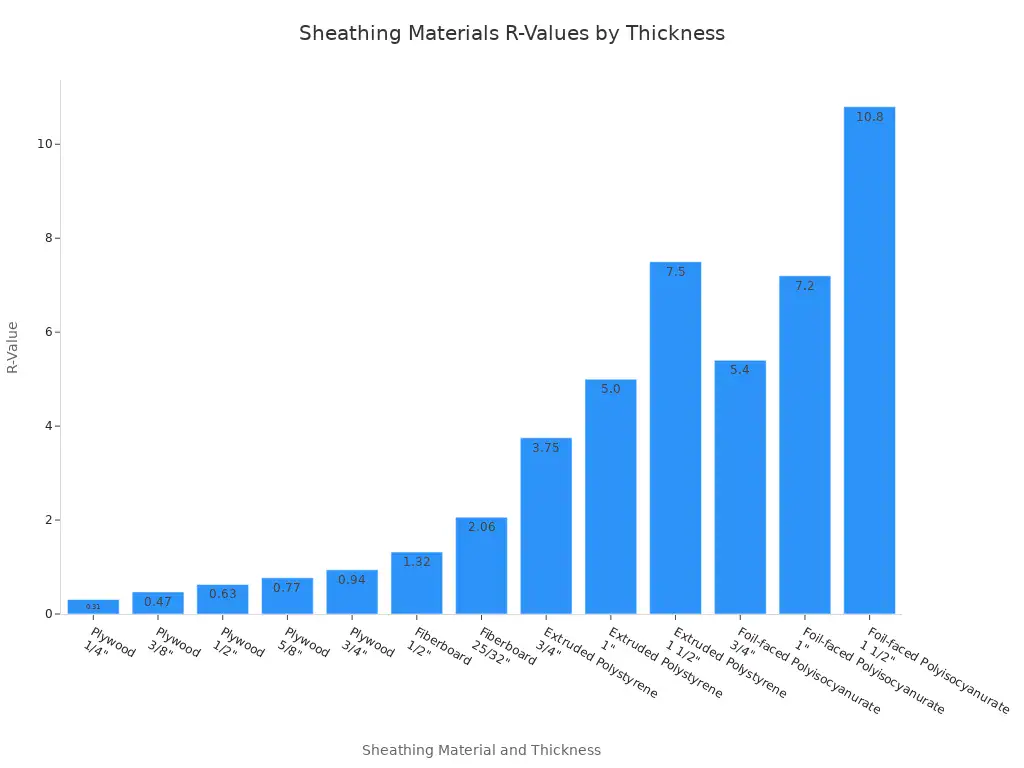
After framing, you apply sheathing to the walls. Sheathing adds strength and a surface for your siding. Different materials offer different insulation values (R-values).
Material Type | Approximate R-Value (per inch) |
|---|---|
Fiberboard Sheathing | ~1.32 |
Expanded Polystyrene | ~5.00 |
Polyurethane Foam | ~6.25 |
Polyisocyanurate Foam | ~7.20 |
Gypsum Wall Board | ~0.45 (1/2″) / ~0.56 (5/8″) |

Foam board is a popular choice for insulation. You can find it as expanded polystyrene (EPS), extruded polystyrene (XPS), polyisocyanurate, or polyurethane. These boards keep heat in during winter. They keep heat out in summer. Polyisocyanurate foam board offers a very high R-value per inch. Foam board works well in both hot and cold places. It is a non-structural sheathing for energy saving. It does not provide fire protection by itself.
Here is a more detailed look at R-values for various sheathing materials and thicknesses:
Sheathing Material | Thickness | R-Value |
|---|---|---|
Plywood | 1/4″ | 0.31 |
3/8″ | 0.47 | |
1/2″ | 0.63 | |
5/8″ | 0.77 | |
3/4″ | 0.94 | |
Fiberboard | 1/2″ | 1.32 |
25/32″ | 2.06 | |
Extruded Polystyrene | 3/4″ | 3.75 |
1″ | 5.00 | |
1 1/2″ | 7.50 | |
Foil-faced Polyisocyanurate | 3/4″ | 5.40 |
1″ | 7.20 | |
1 1/2″ | 10.80 |
Roof Framing and Sheathing
The roof protects your shed from the elements. You can choose from several roof styles. Each style has different framing techniques.
Gable Roof (A-Frame Style): This roof has two sloping sections. They meet at a central ridge. It is the most common design for sheds. You typically use 1×8 lumber for the ridge board and 2×6 for rafters. Pitches usually range from 40 to 45 degrees.
Lean-To Roof (Skillion or Shed Style): This roof slopes in one direction. It is the simplest to build. Many beginners choose this style. It is cost-effective and quick to construct. Pitches typically range between 18 and 33 degrees. You can find many lean to shed plans for this style.
Gambrel Roof (Barn Style): This roof has two distinct slopes on each side. It looks like a barn. It is more complex to frame. It needs more materials than lean-to or gable roofs. It offers ample storage space underneath.
Hip Roof (Four-Sloped Style): This roof has four equal sloping sections on each side. It is sturdy against heavy snow and strong winds. It is one of the most challenging and costly roofs to build. It has an intricate design and needs more rafters.
Saltbox Roof: This roof has two sloping sections. One section is longer than the other. This creates an off-center peak. It typically has a 45-degree pitch. The peak is often closer to the front wall.
For a 10×12 shed, a timber frame shed roof design is available. It uses 6x timbers for lighter, more economical construction. This design measures 10×12 feet from post to post. It provides 120 square feet of interior space. It includes a 2-foot overhang on all sides. It uses a 4:12 roof pitch. The lower eave plate is at 9’9″. The upper eave plate is at 12’11”. This ensures ample headroom. Structural components include 4×6 braces and rafters, 6×6 posts, 6×8 tie beams, and 6×10 plates. This makes it an approachable option for those new to timber framing. You can find specific lean to shed plans or other styles to match your needs.
After framing, you apply roof sheathing. This creates a solid surface for your roofing material.
Use 7/16-inch oriented strand board (OSB) for smaller projects like sheds.
Lay the first sheet of plywood horizontally over the rafters. Start at a corner.
Ensure the edges of the sheathing directly touch the end rafters.
Temporarily secure the first sheet. Hammer nails into the corners.
Cut additional pieces to fill gaps. Minimize the number of pieces you use.
Ensure each cut piece covers half the width of the rafter it rests on. This ensures proper fit and nailing.
Maintain consistent grain patterns for all sheathing pieces.
Fasten the sheathing to the rafters. Use 8D finishing nails. Drive one every six inches.
Work from bottom to top when fastening. Check for looseness.
Fasten sheathing from a ladder as high as possible for safety. Only climb onto the roof once it is secure.
Here are more tips for roof sheathing:
Start the first sheet at the gable where the layout begins. Flop it onto the rafters slightly above the line. Then slide it into place.
Tack one corner. Adjust the sheet for alignment. Then tack other corners.
Ensure the entire first course is straight before starting the next. Deviations will affect subsequent courses.
Hold sheets precisely to snapped lines. Ensure 4-ft. ends run parallel with rafters.
Use the sheathing to straighten rafters. Mark rafter layout on the plywood. Move rafters to their marks before nailing.
Stagger butt seams of plywood sheets between courses for strength. Alternate between full 4×8 sheets and 4×4 half-sheets for the first piece of each course.
Avoid using short pieces of sheathing. Do not let them span only a single rafter bay at the end of a course. Instead, cut back the preceding piece. The last piece should span at least two rafter bays to prevent sagging.
Perform all sheathing cuts on the ground for safety and accuracy. Do not cut on the roof.
Designate a crew member on the ground for cutting. This maintains efficiency, tracks templates, and manages scrap pieces.
Siding Installation Techniques
Siding protects your shed walls and adds to its appearance. You have many options for siding materials.
Siding Option | Key Characteristics | Installation Methods |
|---|---|---|
Wood Siding | ||
Plywood (T1-11) | Affordable, easy to install, rustic look. Can rot and get insect damage without proper care. | Nailed directly to studs or sheathing. Needs careful sealing and painting/staining. |
Cedar | Naturally resists rot and insects, attractive grain, durable. More expensive than plywood. | You can install it as clapboard, shingles, or shakes. Needs proper fastening and sealing. |
Pine | Affordable, easy to work with, takes paint and stain well. Less durable than cedar, needs more care. | Similar to cedar, often installed as clapboard or tongue-and-groove. |
Metal Siding | ||
Steel | Very durable, fire-resistant, insect-resistant, low maintenance. Can be more expensive and dent easily. | Panels are typically screwed or riveted to a subframe or directly to the shed’s structure. |
Aluminum | Lightweight, rust-proof, low maintenance. Can dent easily and may fade over time. | Similar to steel, often installed in interlocking panels. |
Vinyl Siding | Affordable, low maintenance, many colors and styles, resists rot and insects. Can crack in extreme cold, may look less natural. | Interlocking panels are nailed to the shed’s sheathing. This allows for expansion and contraction. |
Fiber Cement Siding | Durable, fire-resistant, insect-resistant, rot-resistant, looks like wood grain, long lifespan. More expensive and heavier than vinyl, needs special tools for cutting. | Nailed to studs or sheathing, often needs pre-drilling. Seams need proper sealing. |
Composite Siding | Made from wood fibers, plastics, and binders. Durable, low maintenance, resists rot and insects, often looks like wood. Can be more expensive than vinyl. | Installed with fasteners, similar to wood or fiber cement, depending on the product. |
OSB (Oriented Strand Board) with Exterior Finish | Affordable, structural sheathing. You can finish it with paint or stucco. Not as durable as dedicated siding materials, needs thorough sealing. | Nailed directly to studs. Needs a weather-resistant barrier and proper finishing. |
SmartSide (Engineered Wood Siding) | Durable, resists rot and insects, comes in various styles, easy to work with. More expensive than plywood, but performs better. | Nailed directly to studs or sheathing, similar to plywood but with enhanced durability. |
Plastic Siding (e.g., PVC) | Lightweight, waterproof, rot-proof, insect-proof, low maintenance. Can look less appealing than other options, may become brittle over time. | Panels are typically fastened with screws or nails, often with interlocking features. |
Stucco | Durable, fire-resistant, good insulation, customizable finish. Can crack, needs skilled application. | Applied in multiple layers over a lath system, typically on a sheathed wall. |
Brick/Stone Veneer | Very durable, looks good, low maintenance, fire-resistant. Most expensive option, needs professional installation. | Thin layers of brick or stone are mortared onto a sheathed wall with a proper foundation. |
Roofing Material Application
The roofing material is the final layer of protection for your shed. You want a durable material that lasts.
Steel roofing: This is the best choice for shed applications. It offers unmatched durability and performance. It can last 40-70 years with minimal maintenance. It resists cracking, shrinking, and erosion from UV rays and temperature changes.
Polycarbonate panels: These offer durability and let light through. They have built-in UV protection. This stops yellowing, cracking, or brittleness. They resist impact from hail and flying debris.
Other durable roofing options include:
PVC-based solutions: These offer superior weather resistance. They have a good price-to-performance ratio for small projects.
PPGI corrugated steel: This provides exceptional durability for larger sheds, especially for farm or industrial use.
Tamko Titan XT Premium Architectural Shingles: These shingles are known for their durability. They resist wind, rain, and hail damage. They provide reliable long-term protection.
Door and Window Installation
Doors and windows allow access and light into your shed. Installing them correctly ensures they function well.
If you are installing a pre-hung shed door, follow these instructions:
Prepare the Door Frame (If Necessary): If you use a pre-hung door, you can skip this step. Otherwise, cut lumber to the correct sizes. Assemble the frame. Make sure it is square.
Position the Door Frame: Carefully place the door frame in the opening. Use shims to make sure it is level and plumb. This is important for the door to open smoothly.
Secure the Frame: Once the frame is level and plumb, secure it to the shed’s studs. Use screws long enough for a firm hold.
Install the Hinges: Place hinges on both the door and the frame. Mark screw holes. Pre-drill to stop the wood from splitting. Then attach the hinges. Ensure they line up correctly.
Hang the Door: Lift the door. Line it up with the hinges. Insert the hinge pins. Test the door’s swing and closure. Adjust hinges or shims if it sticks.
Install the Latch and Handle: Follow the manufacturer’s instructions to install the latch and handle. Make sure the latch lines up with the strike plate. It should close the door securely.
Finishing Touches: Apply weather stripping around the frame. This seals gaps. Caulk seams for moisture protection. Then paint or stain the door to match the shed.
Finishing Touches and Details
Once the main structure is complete, you add finishing touches. These make your shed functional and attractive.
Shed Interior:
Storage Loft: Use the space above ceiling joists. Add plywood flooring. Access it with a stepladder or fold-down staircase.
Storage Racks: Install ventilated-wire racks. Attach them to door backs for lots of storage.
Workbench and Shelves: Build a plywood workbench. Add shelves above it for projects and tool storage.
Pegboard Tool Rack: Mount pegboard. This helps organize tools and accessories.
Shed Furniture: Add functional and attractive items. Consider rustic stools or wicker loveseats.
Inspirational Photos: Decorate with pictures and paintings.
You can also consider these interior details:
Flooring: Options include carpet (soft, comfortable), vinyl (waterproof, versatile), laminate (wide designs, easy install), and rubber mats (cushioning, durable for workshops).
Drywall: This gives a clean, finished look. You can paint and decorate it. Install it like in a house.
Door and Window Options: Add more windows for natural light. Use insulated doors (metal upgrades) for better insulation. Regularly maintain caulking and weatherstripping.
Insulation: This improves energy efficiency. It regulates temperature and soundproofs. Types include fiberglass, foam board, and spray foam.
Ventilation: This stops moisture buildup. It maintains air quality. You can use passive or active vents, like gable vents or ridge vents.
Electrical Packages: These provide lighting, power outlets, heating, or cooling. You can choose pre-determined or custom setups. They need professional installation and must follow codes.
Shed Exterior:
Paint, Stain, or Clear Finish: Paint gives a formal look. Semi-transparent stain shows natural texture. Solid-color stain offers more colors. Clear wood preservatives need low maintenance.
Exhaust Vents: Install louvered gable-end or soffit vents with a ridge vent. These exhaust hot air.
Gutters and Downspouts: Collect and carry rainwater away from the perimeter.
Window Screens: These allow breezes while blocking insects.
Cupola: This adds country elegance. You can add an optional weathervane.
Shutters and Flowerboxes: Dress up windows for country charm. Paint them to match the door.
Door Design: Choose functional and attractive doors. Options include hinged, sliding, or Dutch doors.
Stairs, Ramp, or Deck: These provide easy access, especially if your shed is raised.
A Porch With Patio Furniture: This creates a relaxing and entertaining space.
Appropriate Lighting: For use during cloudy days, early mornings, or evening gatherings.
You can create a Rock Wall Perimeter. Fill the open space around the foundation with natural stone. Dry stack flat stones around the shed. Align them flush with the siding. This makes the space more attractive. You do not need mortar.
Materials and Budgeting
You need to plan your materials and budget carefully. This helps you stay on track. It also helps you save money.
Detailed Material Breakdown
You need a clear list of materials for your 10×12 shed. This helps you buy everything you need. Here is a typical material list:
Foundation: You will use 4×4 skids. These include blocking for anchors and interior skids.
Floor: You need 3/4″ plywood sheeting.
Loft Floor: If you add a loft, you will use 2×6 loft/ceiling joists. You also need 3/4″ plywood for the flooring.
Wall Framing: You will use 2×4 lumber. You space these 16 inches on center. You need one bottom plate and two top wall plates.
Shed Siding: LP Smartside 7/16″ x4’x8′ panels work well.
Roofing: You can choose 3-tab or dimensional shingles. Metal roofing is another good option.
Trim: 1×4 cedar trim looks nice. PVC trim is also a good choice.
Estimating Costs and Saving Money
You can save a lot of money by building your own shed. Material costs for a DIY wooden shed usually range from $2,000 to $3,000. This includes lumber, siding, roofing, nails, screws, and other hardware. A rough estimate for a 10×12 shed is about $2,200. This assumes you use 2×4 wooden studs, a 4×4 wooden post foundation, and shingles for the roof.
You can choose cost-effective materials. Pressure-treated lumber is good for the frame. It resists decay and pests. Plywood panels work for walls and roofing. Exterior-grade plywood is budget-friendly. Galvanized metal roofing is cheaper than other options. It is also durable. Vinyl or styrene windows are economical. They last a long time.
Sourcing Materials Efficiently
You can find materials smartly. This helps you save money. You should find reliable suppliers. Look at their costs, quality, and delivery times. Choose suppliers who offer good prices and service. This ensures you get materials when you need them.
You can also watch your spending. This helps you find ways to save. You can negotiate better deals with vendors. You can also buy materials in bulk. This often gives you better prices per unit. It also reduces shipping costs. Partner with local suppliers. They can offer competitive prices. They also maintain good material quality.
You now have the tools to build your own 10×12 shed. This project offers increased storage, boosts your property value, and brings great personal accomplishment. Our free diy 10×12 shed plans make this goal achievable. You can start this project with careful planning and these detailed instructions. Trust these shed plans. You will find immense reward in creating something useful with your own hands.
FAQ
What is a 10×12 shed good for?
A 10×12 shed offers 120 square feet of space. You can use it for many things. It stores garden tools, lawnmowers, or seasonal items. You can also make it a small office, a craft room, or a workshop. It provides versatile extra space.
What permits do you need for a 10×12 shed?
You must check local building codes. Some areas do not require permits for sheds under 120 or 200 square feet. Other places always need a permit. If you add electricity or plumbing, you will need permits. Always confirm with your local building department.
What foundation types work for a 10×12 shed?
Many foundation types work. You can use a gravel pad with a timber frame. Concrete blocks or pavers also work. A poured concrete slab offers a very strong base. Skid foundations are simple. Choose a foundation that fits your climate and budget.
What is the estimated cost for materials for a 10×12 shed?
Material costs for a DIY 10×12 shed usually range from $2,000 to $3,000. This includes lumber, siding, roofing, and hardware. Your choices for materials will affect the final price. You can save money by finding sales or using cost-effective options.

