
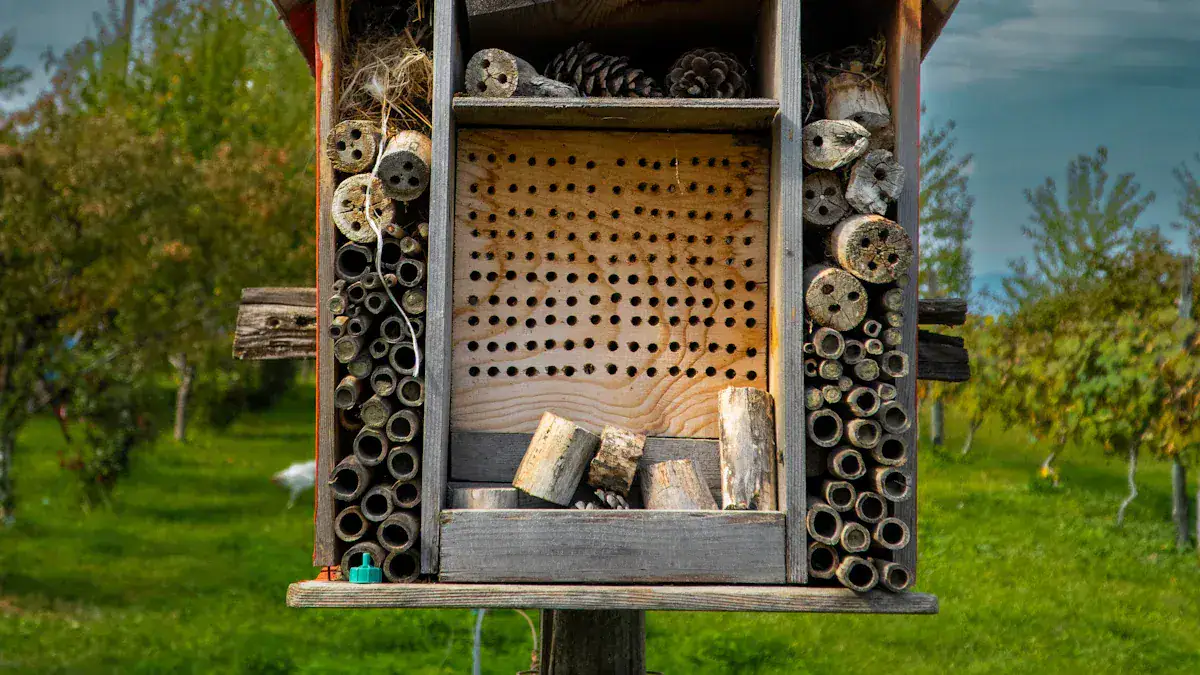
Many people worry about declining bee populations. You can make a difference. Build a solitary bee house. Solitary bees are gentle, non-aggressive pollinators. They are crucial for your garden ecosystem. These bees pollinate diverse plants, increasing your fruit and vegetable yields. For example, mason bees efficiently pollinate spring fruits. This DIY project provides comprehensive diy bee house plans. You will create an effective solitary bee house, also known as a bee hotel. Building a bee house is an easy and rewarding diy task. These plans guide you to support these vital bees.
Key Takeaways
Build a solitary bee house to help bee populations. These bees are gentle and improve your garden’s health.
Use untreated wood like cedar or pine. Choose nesting materials like bamboo or drilled wood blocks. Make sure tunnels are the correct size.
Place your bee house facing south or east. This gives it morning sun. Mount it securely to prevent swaying.
Clean your bee house every year. Do this from October to December. This removes pests and keeps bees healthy.
Avoid treated wood and paint inside tunnels. Do not use incorrect tunnel sizes. Place the house where bees can find it easily.
Why Build a Solitary Bee House
Understanding Solitary Bees
Solitary bees differ from honey bees. Each female builds her own nest. She provides food for her offspring. She lays eggs in individual cells. The mother bee dies before her offspring hatch. The young bees then leave to build their own homes. This solitary life is common among bees. For example, a carpenter bee may lay only 8 to 10 eggs in its lifetime. Honey bee queens lay many more. Many solitary bee species use a bee house. Mason bees and leafcutter bees are common visitors. These bees belong to the Megachilidae family. Other bees like Hylaeus and Colletes also use bee nests in these structures.
Garden Benefits of Solitary Bees
Solitary bees are excellent pollinators for your garden. They visit about 95% of the flowers they encounter. Honey bees visit only about 5%. This high efficiency can double or triple your garden harvest. You get heartier fruits and vegetables. Mason bees are great for fruit trees like apples and cherries. Leafcutter bees pollinate many garden vegetables. Solitary bees are more efficient at pollinating squash than honey bees. They spend more time gathering pollen for their young. They also stay close to their nests, usually within a few hundred yards. This makes them perfect for your garden. For example, one study showed that Osmia bicornis increased strawberry commercial value by over 50%. Solitary bees have a 71.3% likelihood of transferring pollen to a stigma. Honey bees have a 34% likelihood.
Bee Population Decline
Bee populations are declining globally. This is a serious problem. Habitat loss is a major cause. Urban development removes natural areas. This reduces floral diversity. It also takes away nesting habitat. Pesticide use also harms bees. Competition from managed bees, like honey bees, can also affect native bee populations. Poor nutrition from monoculture farming reduces the variety of plants bees need. When bees lose their habitat, they lose food sources. They become more prone to disease. They cannot reproduce as well. They also lose safe places to nest and overwinter. Building a bee house helps provide crucial nesting habitat.
Essential Materials for Your Bee House
Building a sturdy home for solitary bees starts with selecting the right materials. You need durable, untreated components. These choices ensure your bee house lasts many seasons. They also keep the bees safe.
Choosing Wood
You need the right wood for your bee house plans. Untreated, durable wood is best. Cedar and pine are excellent choices. They offer great strength for their weight. These woods also resist rot naturally. This means your bee house will last for many years. Cedar has a beautiful glow. Kiln drying ensures consistent moisture levels. This minimizes warping and cracking. A well-cared-for cedar bee house can last decades. Pine is also a good option. It is very stable with few knots. Pine is strong and durable. It provides great insulation for bees. Pine resists warping and shrinking. You can process pine beautifully with machines. It has minimal tearing or cracking. Pine is also inexpensive. It grows quickly and is easy to cut. These woods help you build a sturdy nesting structure for your bees.
Selecting Nesting Materials
After choosing your wood, select the nesting materials. These are crucial for attracting solitary bees. You have several options for creating tunnels.
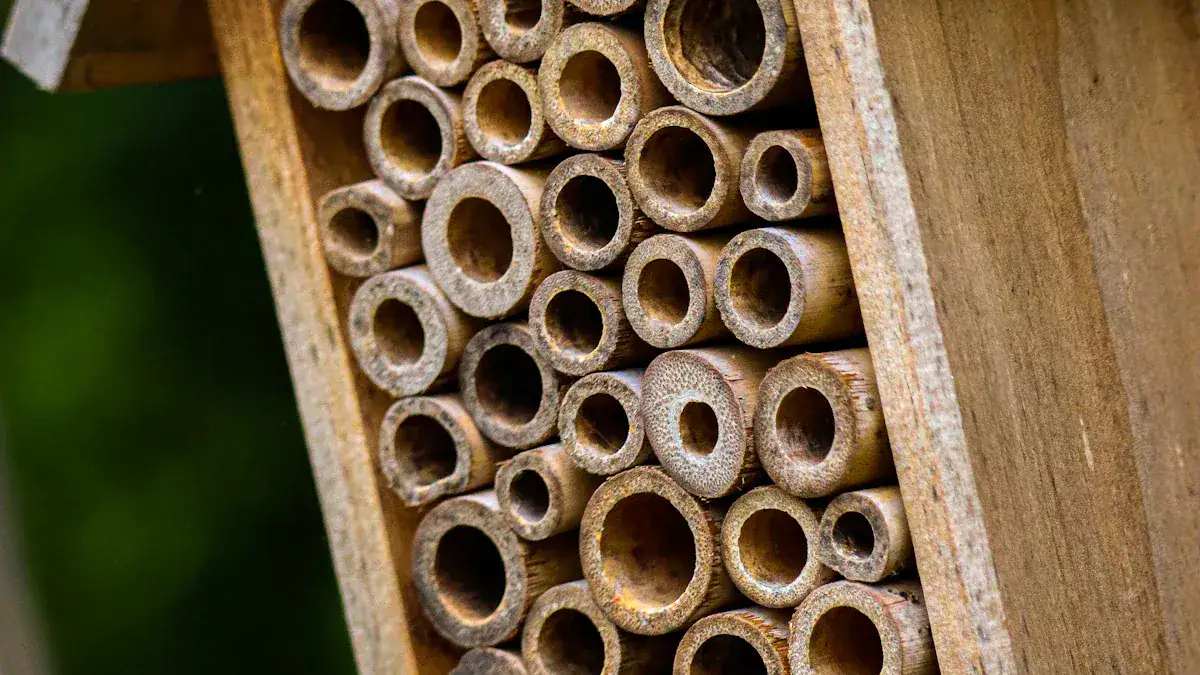
Bamboo or Reeds: Cut these materials to specific lengths. Nesting materials should be about 6 inches (152 mm) long. This length attracts female bees. It also helps produce more female offspring. Shorter tubes lead to more male offspring. They also result in fewer total offspring. Phragmite reed tubes are highly recommended. They naturally vary in size. Bees prefer this variety. Bamboo tubes also attract bees. They have a natural composition. Mason bees need tubes about 7 inches long. Their diameter should be up to 3/8 inch. Leafcutter bees need tubes about 1/4 inch in diameter. Tubes should generally be 5 inches or more in length. Shorter lengths may result in only male offspring.
Drilled Wood Blocks: You can drill holes into solid wood blocks. This creates excellent nesting tunnels. The holes should range from 3/32″ to 3/8″ in diameter. For holes less than 1/4″, make them more than 3 inches deep. For holes 1/4″ or larger, make them more than 6 inches deep. You can use various diameters: 1/16″, 3/32″, 1/8″, 11/64″, 7/32″, and 1/4″. A 1/4-inch hole needs about 7 inches of depth. Narrower holes, like 4 to 5 inches deep, are sufficient.
Hole Diameter Range | Recommended Depth |
|---|---|
3/32″ to 3/8″ | N/A |
Less than 1/4″ | More than 3 inches |
1/4″ or larger | More than 6 inches |
Paper Inserts: Use paper straws or liners inside drilled holes or tubes. Paper straws allow easy removal. You can unwrap them to check pupae. This helps remove mites and flies.
Routered Nesting Trays: These are also called bee condos. They provide easy access to cocoons. You can unstack the trays. This lets you remove cocoons easily. You can also scrape out debris and mites. Routered wood trays allow you to observe bees. Seal them with Plexiglas for viewing. These options create a safe nesting habitat. They help you manage your bee house effectively. These bee-safe nesting materials ensure healthy nests for your solitary bee population.
Tools You’ll Need
Building your bee house requires specific tools. These tools help you cut wood and drill holes accurately.
Drills and Drill Bits: You will need a drill. Long drill bits are recommended. They create deeper holes, which some bee species prefer. A good quality, sharp brad-point drill bit is best. It drills clean holes in wood. It minimizes wood fibers wrapping sideways. Foerstner drill bits are an alternative. They create cleaner holes. They can be more expensive. They might not be long enough for very deep holes, like 5 inches. A drill press offers more stability and precision. Use it for multiple holes or harder wood.
Saws: A miter saw helps you cut wood pieces accurately. You can cut roof sections at specific angles, like 22.5° bevels. A slide saw is good for cutting split logs. Use a chop saw for larger diameter logs. A jigsaw helps you cut branches into equal length pieces.
These tools ensure your bee house plans come to life with precision, creating ideal nesting sites for your bees.
Step-by-Step Solitary Bee House Construction

You are ready to build your solitary bee hotel. Follow these steps carefully. You will create a welcoming home for your garden’s pollinators.
Prepare the Structure
You begin your diy bee house plans by preparing the outer structure. First, cut your chosen wood to size. A general guideline for a bee house frame is at least 6 inches deep by 10 inches wide. For a medium-sized bee house, aim for a frame 6–7 inches deep, 12 inches high, and 12 inches wide. This design features an open front and a covered back.
Many people construct bee boxes using only parallel/square corners. You do not need complex finger or box joints.
A common and easy-to-construct design is a rectangle about the size of a typical birdhouse, roughly 8 inches by 12 inches. The frame should be approximately 6 to 8 inches deep.
Next, assemble the frame. Use galvanized screws or nails for fastening. Screws generally offer a better hold than nails. They reduce the risk of the hive coming apart. Screws should be at least 1.25 inches long for better grip. Apply non-toxic wood glue to reinforce joints. This adds extra strength and ensures durability. The glue should be approved for outdoor use and safe for bees. Align edges correctly. Secure side pieces using screws. Attach the bottom piece inside the box. Secure it with screws. Ensure that the corners are square. This guarantees a sturdy structure. Use clamps to hold pieces together during assembly. This maintains stability as glue sets or screws are driven in. This forms the robust shell for your solitary bee nests.
Create Nesting Tunnels
Now, create the crucial nesting tunnels for your bee house. You have two main options: drilled wood blocks or cut tubes.
If you use wood blocks, drill holes into them. Use specific drill bits like Brad Point, Downcut, Compression, or Straight Flute bits. These bits prevent splintering. Employ a backing board to support the wood. This prevents blow-out as the drill exits. Control drilling speed, especially when nearing breakthrough. Utilize multiple, lighter passes (3 or 4) instead of a single deep cut. Prepare the wood surface by scoring it with a sharp knife. You can also apply masking tape to areas prone to chipping. Apply a coat of finish (poly, varnish, shellac, paint) to reduce chipping. Ensure your bits are sharp and made of carbide. HSS bits dull too quickly. These techniques create smooth, safe nesting holes.
If you use bamboo or reeds, cut them to the correct lengths. Initial planing of bamboo strips is done in a straight 60-degree form. Use a block plane to create long, un-tapered equilateral triangles. Specialized planing forms guide the planing process. A Stanley 9.5 block plane is recommended. Its adjustable throat helps control tearing of the bamboo. Meticulous sharpening of plane irons is critical. Aim for a consistent mirror edge. Bamboo’s silica content quickly dulls blades. Sharpening methods include powered leather strops with diamond paste, Japanese water stones, or progressively finer grits of sandpaper on plate glass. Bamboo (Aodake type) is split and peeled progressively from a whole chunk into narrow higo strips. These strips are then cut to size for reeds. Each individual reed is approximately 9 cm long, 4 mm wide, and 0.4 mm thick. The strips receive beveled edges. This ensures consistency in width and thickness. Before cutting, the bamboo undergoes extensive preparation. This includes months of drying, curing over a fire to release oils, and further drying. These careful steps create perfect nesting tubes.
Assemble Your Bee House
Now, assemble your bee house. Insert the prepared nesting materials into the frame. You can arrange the drilled wood blocks, bamboo, or paper tubes tightly together. Ensure they fit snugly. This prevents them from falling out. You want a dense collection of nesting sites. This attracts more bee species. You can use a small amount of non-toxic glue on the outer edges of some tubes. This helps secure them. Do not glue the inside of the tubes. The bees need clear access. This step completes the interior of your bee house.
Add a Protective Roof
Finally, add a protective roof to your bee house. This roof shields the nesting tunnels from rain and direct sunlight. Cut a piece of wood for the roof. Angle it for drainage. A 22.5° bevel on the roof sections works well. The roof edges should extend 2–3 inches beyond the frame of the bee house. This overhang provides crucial protection. Secure the roof firmly to the top of the frame. Use screws or nails. This completes your diy project. Your solitary bee hotel is now ready for its new residents.
Placement and Bee House Care
Ideal Location
You need to choose the right spot for your bee house. Face your bee house south or east. This gives it optimal morning sun exposure. Morning sun helps bees start their day earlier. It also increases their productivity. A southeast orientation is generally advised. This protects the structure from harsh prevailing winds. In many regions, winds come from the northwest. Placing the house on the east side of a north-south fence provides morning sun. It also gives afternoon shade. Too much sun can harm bee larvae. This location creates ideal nesting conditions for your bees.
Mounting Your Bee House
Mount your bee house securely. It needs a steady surface. Use a fence, wall, post, or tree trunk. This prevents swaying or falling. Unstable mounts are not good. They can cause the structure to sway in the wind. For mason bee houses, mount them 6 to 7 feet high. You can use ratchet straps to secure the structure to a stand. This is good during storm seasons. You can also use a long threaded rod. Attach it to the cover with a wing nut. This secures the nesting sites firmly.
Annual Maintenance
Clean your bee house every year. This is crucial. It prevents disease and parasites. You should clean it from October through December. Solitary bees are fully developed in their cocoons then. They are less likely to get damaged. This annual cleaning helps manage chalkbrood and pollen mites. It also removes fly larvae. If you find chalkbrood, disinfect tools carefully. This prevents spread. You should remove old nesting materials. Use a small, soft brush. Remove all dead bees and debris. This includes empty cocoons. Avoid soap or chemical cleaners. They can harm bees. Let the structure dry in the sun. Then use a small vacuum for a final clean. This ensures it is ready for new bee guests.
Common Mistakes to Avoid
Building a bee house is rewarding. However, you can make common mistakes. These errors can make your bee house less effective. They can even harm the bees. Learn to avoid these pitfalls.
Using Harmful Materials
You must avoid certain materials when building your bee house. Never use treated wood. Treated wood contains chemicals. These chemicals are toxic to bees. Do not use paints, varnishes, or stains inside the nesting tunnels. These substances can harm developing bee larvae. Choose only natural, untreated wood. Use non-toxic glues if you need them. Ensure all materials are safe for insects. Your goal is to create a healthy home for solitary bees.
Incorrect Nesting Tunnel Sizes
Correct tunnel sizes are very important. Bees will not use tunnels that are too big or too small. Tunnels that are too short can lead to more male bees. They can also result in fewer total offspring. Remember, mason bees prefer tunnels up to 3/8 inch in diameter. They need them about 7 inches long. Leafcutter bees like tunnels around 1/4 inch in diameter. These tunnels should be at least 5 inches long. Providing the right sizes ensures successful nesting.
Poor Placement
Where you place your bee house matters greatly. Poor placement can deter solitary bees from using it. They need abundant pollen and nectar nearby. They forage within 300 feet of their home. A lack of diverse, blooming plants close by means fewer visitors. Your house needs protection from wind and rain. Solitary bees prefer a sturdy house. It shields them from bad weather. Incorrect orientation is another mistake. These insects are cold-blooded. They need morning sun. In cooler places (below 60°F/16°C), all-day sun helps. In hot places (above 70°F/21°C for mason bees, above 90°F/32°C for leafcutter bees), afternoon shade is crucial. This prevents overheating. Avoid placing the house in windy areas. They may not build nests there. Make sure the house is visible. If it is hidden behind branches, they cannot find their nesting sites easily. This impacts successful nesting.
You now understand the positive impact of building a solitary bee house. Your efforts boost local ecosystems and improve your garden health. Share your diy bee house plans and observations with others. You will find great satisfaction contributing to pollinator conservation. These diy bee house plans offer a simple way to help. Start your own bee hotel project today. Your garden and the bees will thank you for these plans.
FAQ
When should I put out my bee house?
Place your bee house in early spring. This is when solitary bees emerge. They look for nesting sites. Early placement ensures bees find your house. They will use it for the entire season.
Will solitary bees sting me?
Solitary bees are very gentle. They rarely sting. They do not defend a hive like honey bees. You can observe them safely. They only sting if you squeeze them.
How do I attract bees to my new house?
Plant native flowers nearby. Bees need pollen and nectar. Ensure your house faces south or east. This provides morning sun. Proper placement and food sources attract bees.
What should I do if I see pests in my bee house?
Annual cleaning helps prevent pests. Remove old nesting materials in fall. Inspect cocoons for mites or chalkbrood. Discard infected cocoons. Clean your house thoroughly each year.

