
Building your own diy rabbit hutch plans offers many rewards. You save money and create a custom home. This ensures your rabbit’s safety and well-being. Generic store-bought options, like a poorly designed cage, often lack space. This leads to health problems for your bunny, including muscle atrophy or stress. You can instead build a humane home perfectly suited to your bunny’s needs. This project provides a truly safe and comfortable space for your bunny to thrive.
Key Takeaways
Building your own rabbit hutch saves money and lets you create a custom home for your bunny.
A DIY hutch allows you to control safety, use strong materials, and protect your rabbit from predators and bad weather.
Design your hutch to be spacious, with enough room for your rabbit to move, hop, and stand up comfortably.
Always use non-toxic materials like safe woods and paints, as rabbits chew on everything.
Regular cleaning, checking for damage, and adjusting the hutch for different seasons keep your rabbit healthy and safe.
Why Build Your Own DIY Rabbit Hutch:
Cost Savings and Customization
You save money when you build your own diy rabbit hutch plans. Store-bought options often cost more. You also get to design a unique space. This means you can create a natural design. Your rabbit’s living space will look better. You move away from dull wooden cages. You can make a home that truly fits your style and your bunny’s needs.
Ensuring Safety and Quality Control
Building your own hutch lets you control safety. Many commercial hutches have safety flaws. They often lack good predator-proofing. You might need to add concrete-set posts or secure locks. Predators can even scare rabbits to death without touching them. Commercial hutches also struggle with weather. They do not insulate well against heat, cold, moisture, or wind. Insect-proofing is also a problem. Insects can cause health issues for your pet. When you build, you choose strong materials. You ensure every part is secure. This gives you peace of mind.
Meeting Your Rabbit’s Specific Needs
You can create a perfect home for your rabbit. Commercial cages are often too small. Even large ones might not give enough space. A rabbit needs room to hop, run, and stand up. The House Rabbit Society of Chicago suggests a minimum of 10ft x 6ft for a pair of rabbits. Rabbit.org recommends enclosures be at least 30 x 36 x 18 inches. They also say enclosures need solid bottoms to prevent sore hocks. You can build a spacious rabbit condo. This ensures your pet has plenty of room. Your custom condo will be a safe and happy home. This condo will meet all their needs. You create a true rabbit condo, not just a small enclosure. This spacious condo provides comfort.
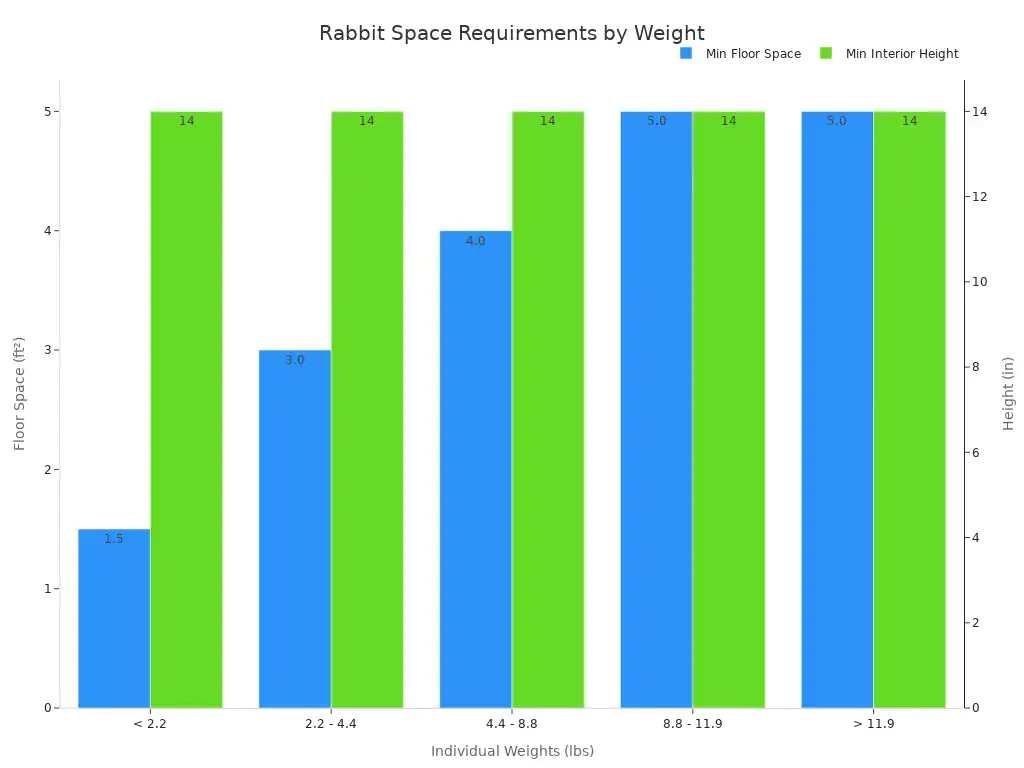
Individual weights (lbs) | Minimum floor space (ft²) | Minimum interior height (in) |
|---|---|---|
< 2.2 | 1.5 | 14 |
2.2 – 4.4 | 3.0 | 14 |
4.4 – 8.8 | 4.0 | 14 |
8.8 – 11.9 | 5.0 | 14 |
> 11.9 | 5.0 | 14 |
Essential Safety for Your DIY Hutch:
Building a safe home for your bunny means thinking about many things. You must protect your rabbit from dangers. These dangers include predators, bad weather, and toxic materials. You also need to prevent escapes.
Predator Protection
Your DIY rabbit condo needs strong defenses. Predators like raccoons, foxes, and even neighborhood dogs pose a big threat. You must use secure latches on all doors. These latches need to be very tight.
One user reported having to make their latches so secure that they now struggle to open them themselves, following an incident where a raccoon successfully opened cages and released junior animals.
This shows how smart and determined predators can be. Use strong wire mesh, like 16-gauge or stronger. Choose mesh with small openings, such as 1×1/2 inch or 1×1 inch. This stops predators from reaching in. For the bottom of your rabbit condo, use 2×4 mesh. This prevents predators from digging under and keeps your rabbit safe inside.
Weather Protection
Protecting your rabbit condo from the elements is vital. Your hutch needs a roof that can handle rain, snow, and sun.
Sturdy plywood works well for the roof.
Shingling the roof adds extra weather resistance.
Tin roofs are durable. You can hose them down to help cool the hutch in summer.
UV-protected and reflective roofing materials also help.
Agricultural roofing steel is another good choice for shed-style roofs.
Design your roof with an overhang. This gives better protection against rain and wind.
Good weather protection keeps your bunny dry and comfortable.
Ventilation
Good airflow keeps your rabbit condo fresh. Proper ventilation is key to preventing respiratory problems in rabbits.
You must maintain good ventilation at all times. Poor air circulation, like in an aquarium, makes it unsuitable housing for rabbits. Also, remove manure often. This stops ammonia from building up. Ammonia can cause breathing issues for your rabbit, especially if you keep your bunny indoors.
Non-Toxic Materials
Choose safe materials for your rabbit condo. Rabbits chew on everything. You must use non-toxic wood, paints, and adhesives.
Safe woods include apple, ash, berry brambles, birch, hawthorn, hazel, juniper, maple, pear, poplar, spruce, and willow. Aspen and oak (not red oak) are also safe.
Avoid these woods: cedar and pine. They contain phenols. These chemicals can cause liver disease and breathing problems. Also, avoid any wood from stone fruit trees, like cherry or apricot.
Do not use treated wood or plywood where your rabbit can reach it. These often have harmful chemicals. If you use pine or cedar for framing, ensure excellent ventilation. This helps prevent oil buildup.
When painting or sealing your hutch, choose safe options.
ECOS Pet Dwelling Paint is a 0-VOC acrylic paint. It is waterproof and exterior grade. Apply it only to outside surfaces your rabbit cannot chew. Ingesting acrylic paint can cause digestive blockages.
Milk Paint + Tung Oil is all-natural and VOC-free. It works well for raw wood. Tung Oil makes it durable for outdoor use. Some “Toy Safe” colors are safer. Iron oxide pigments are generally safer, but large amounts can cause iron toxicity. Tung Oil and Citrus Solvent are food-safe and pet-safe once cured. Keep rabbits away from freshly oiled areas until they are fully cured and aired out.
Tung Oil (alone) is a very safe clear wood sealant once cured. It darkens the wood naturally.
Rubio Monocoat Hybrid Exterior Wood Protector is a non-toxic linseed oil-based product. It is Toy Safe EN-71. Use this only on the outside of the hutch. Some unknown ingredients could pose risks if ingested.
Escape Prevention
Your rabbit is a master of escape. You must build your rabbit condo to prevent any breakouts. Ensure all wire mesh is securely fastened. Check for any gaps or loose spots. Rabbits can squeeze through surprisingly small spaces. Use the same secure latches you use for predator protection. These latches will also keep your rabbit safely inside its home. This prevents your rabbit from getting lost or hurt.
Planning Your DIY Rabbit Hutch Plans:
Planning is the first step to building a successful rabbit condo. You must consider several factors. These include size, materials, tools, and location. Careful planning ensures your rabbit’s safety and comfort.
Size Requirements
You must carefully plan the size of your rabbit’s home. Your rabbit needs ample space. This space allows for movement. It also provides separate areas. These areas include sleeping, eating, and litter. A good rabbit condo offers enough room for your bunny to hop, stretch, and stand fully upright.
Consider modular designs. For example, some plans use “4 – KW Cages 72×30 (double cage) modular design.” These specific cages measure “72 x 30 x 18.” They are “2x Babysaver Modular Rabbit Cage.” This gives you a good starting point for dimensions.
Horizontal space is more important than vertical space. It impacts your rabbit’s health and happiness. For a single small breed rabbit or a pair, aim for about 4 x 6 feet of floor room. Add 2 to 4 feet of space for each extra rabbit. Larger breeds, like commercial breeds or Flemish Giants, need much more room. They might need the size of a small room. These are guidelines. Smaller enclosures are acceptable if your rabbits get daily free-range time.
For grow-out hutches, avoid shelves. Shelves add unnecessary wire. Urine can drip on rabbits below. Enclose the bottom area of the cage. This protects against predators like dogs. When you build, seal the bottom half of legs. This prevents rot from wet ground and urine. Do not use treated wood where rabbits can chew. Separate enclosed areas offer a retreat for timid bunnies. They also help with catching. However, they reduce overall movement space. If you include them, ensure extra feeders and waterers are available inside. This prevents resource guarding.
An example of a grow-out hutch uses wire shelving. Its dimensions are 96” x 32” x 16”. The frame uses 1.5” PVC. It is painted for sun protection. The sides use 16-inch wide standard closet wire. The bottom uses two panels of 16” “close mesh” pantry wire. Rebar ties and chain link hog ties secure the assembly. You can use multiple J feeders or one or two long feeders. A steel bucket holds water. This is better than plastic in harsh climates. It has fill and dispense spigots. A removable divider can separate males from females. It uses 12” wire shelf with a cage wire topper. Ensure it is high enough. Rabbits should not get over or under it. Portable dog fencing around the bottom stops other animals.
For predator protection, 1×1 wire mesh may not be enough. Small predators like ermine, rats, or snakes can get through. Use 1″ x 1/2″ or even 1/2″ x 1/2″ wire mesh. Ensure strong support for long spans of wire flooring. This prevents sagging. It is especially important with multiple large rabbits.
Material Checklist
You need the right materials for your diy rabbit hutch plans. Choose them carefully.
Lumber: Select safe wood types. Untreated pine, oak plywood (for floors and back), birch plywood, aspen, and poplar are good choices. Avoid cedar, redwood, chemically treated wood, and pressure-treated lumber. These woods contain toxic substances. To prevent your rabbit from chewing the structural wood, build with wire on the inside.
Hardware Cloth: Use strong, galvanized hardware cloth. Choose 16-gauge or stronger. Mesh sizes like 1×1/2 inch or 1×1 inch are good for sides. Use 2×4 mesh for the bottom.
Roofing Material: Options include shingles, corrugated plastic, or tin. Consider UV-protected and reflective materials. Agricultural roofing steel is also a good choice.
Fasteners: You will need screws, nails, and staples. Use galvanized or stainless steel to prevent rust.
Hinges and Latches: Choose heavy-duty, secure hinges and latches. These keep your rabbit safe and prevent escapes.
Other: Consider a nesting box, ramps, and shelves.
Tools Needed
Gather your tools before you start. This makes construction smoother.
Measuring Tools: A tape measure, ruler, and pencil are essential.
Cutting Tools: You will need a saw. A circular saw or miter saw works well for lumber. Wire cutters are necessary for hardware cloth.
Drilling Tools: A drill is a required tool. Use it with appropriate drill bits for pre-drilling screws.
Fastening Tools: A screwdriver or impact driver helps with screws. A staple gun secures wire mesh.
Safety Gear: Always wear safety glasses, gloves, and hearing protection.
Finishing Tools: A Dremel tool is recommended. It smooths sharp edges of cut wire mesh. This is more efficient than a metal file.
Choosing a Location
The location of your rabbit condo is very important. It affects your rabbit’s health and comfort.
Environmental Factors: Avoid drafty, damp areas like basements. Do not place the rabbit condo in direct sunlight. Ensure adequate ventilation. Rabbits can overheat easily. They lack sweat glands. Maintain an ideal temperature between 60-75 degrees Fahrenheit.
Outdoor Placement: If your rabbit condo is outdoors, provide shelter. Protect it from extreme heat and cold. Place outdoor hutches in the shade. Avoid morning or afternoon sun. Elevate hutches several feet off the ground. This helps with drainage and predator protection. Protect your rabbit from outdoor predators. Coyotes and raccoons are a threat. A fence around the hutch helps. Provide ample straw bedding for insulation in winter. Bring rabbits indoors if temperatures fall below 40°F or rise above 75°F.
Air Quality: Consider airborne contaminants. Proper husbandry and ventilation are key. An air handling system with a high air-change rate helps. It keeps particulates, endotoxin, ammonia, and carbon dioxide low. Design facilities to minimize allergen levels. Maintain good air quality. Effective engineering controls achieve this. They are better than just frequent cage changes.
DIY Hutch Construction Steps:
## DIY Hutch Construction Steps:

Building your own rabbit hutch involves several key steps. You will create a safe and comfortable home for your bunny. Follow these instructions carefully.

### Step 1: Build Base Frame

You start by creating a sturdy foundation. This base frame supports the entire hutch. You will use 2x4s to construct a simple frame. Match this frame to your hutch's planned length and width. Cover the top of this frame with plywood. Attach legs that are 2 feet tall to the frame. You can use either screws or nails to secure the pieces of the frame together. Use scrap wood to level the base as needed. This ensures your hutch stands evenly.

### Step 2: Construct Walls and Supports

Now, you will build the walls. This step gives your hutch its structural integrity. You need to focus on frame building for the walls. This creates the main support for the sides. A strong floor frame assembly provides a stable base for these wall frames. Add cross-supports every 16 inches to the floor frame. This enhances overall stability.

You can use specific types of wood for strength. Fir, especially Douglas fir, is known for its strength and weather resistance. It handles heavy loads and resists splitting. Cedar and pine are also recommended for their properties. Use galvanized screws and nails. These fasteners securely join the wooden components. This ensures the structural integrity of your hutch walls. You can also use 1x2 trim board for support beams.

### Step 3: Install Wire Mesh

Next, you will install the wire mesh. This forms the sides and bottom of your hutch. Secure the wire mesh panels to the posts. Use an industrial-grade staple gun. Space the staples 5 or 6 inches apart. If you use a single roll of galvanized wire mesh, you might need a stretcher bar. This keeps the mesh taut while you unroll and attach it to the frame. Ensure all mesh is tight and secure. This prevents escapes and protects your rabbit from predators.

### Step 4: Build and Attach Roof

You need to build a roof that protects your rabbit from weather. A minimum roof pitch of 2:1 is recommended. This ensures proper water runoff. Even a small pitch helps with drainage. Flat roofs are more problematic for water management. A pitched roof is an important protective element. It helps run off precipitation and snow. This prevents water puddles, especially near doors. For snowy climates, a 'flat pitched roof' can direct snow away from the entrance. This reduces the need for shoveling. Attach the finished roof securely to the hutch frame.

### Step 5: Add Doors and Latches

Install doors and secure latches. These allow you access to your hutch. They also keep your rabbit safe inside. Build door frames from sturdy wood. Cover them with wire mesh. Attach the doors using strong hinges. Choose secure latches that predators cannot easily open. Double-check all doors and latches for tightness.

### Step 6: Create Interior Features

Now, you can add interior features. These make your hutch more comfortable and stimulating.

*   **Shelves**: Shelves are beneficial for rabbits. They can rest away from their young or use them for exercise. Rabbits enjoy multiple levels of shelves. You can incorporate these into tall cages. This allows for stretching. It also provides a surface off the wire flooring. In Sweden, every rabbit hutch must include a shelf or box for jumping.
*   **Ramps**: You can add ramps if your hutch has multiple levels. However, plastic ramps should be removed. Rabbits can easily hop between levels. This provides better exercise. They also tend to chew through ramps quickly.
*   **Nesting Boxes**: Nesting boxes offer a private hideaway for pets. A semi-enclosed upper story is also a favored feature for rabbits. It provides them with privacy.

Consider your flooring carefully. If you use solid, slick plastic flooring, cover it with a towel or grass mats. This prevents slipperiness. Here are some flooring options:


| Material | Safety/Comfort Aspects |
|---|---|
| **Linoleum/Tile** | Affordable, easy to clean, versatile (can be cut), provides grip if textured. Best for litter-trained rabbits. |
| **Rugs/Mats (Horse stall mats, carpet, foam puzzle mats)** | Easy to clean, comfortable for rabbits, easy on feet. Not ideal for destructive or non-litter-trained rabbits. |
| **Plastic (Store-bought cage bottoms)** | Affordable, commonly available, easy to clean. Can be slippery (add bedding/mats), can be chewed through by destructive rabbits. |
| **Wire** | Easy to clean for non-litter-trained rabbits. Less comfortable, can cause sore hocks. Requires at least 50% coverage with other materials (cardboard, fleece) for comfort. |
| **Carpet (Royal Interlocking Carpet Tile)** | Comfortable, provides traction, warmer than wire, cushioning and insulation from foam backing, waterproof, odor-proof, stain-resistant, fibers won't unravel if chewed. |
| **Rubber (Rubber Utility Tile)** | Durable, easy to clean, won't soak up moisture/urine, non-slip surface, provides maximum durability. Caution: ensure interlocks are secure to prevent chewing and potential blockage if swallowed. |
| **PVC Plastic (SupraTile Hidden Slate Floor Tiles)** | Highly durable, higher cushioning than rubber, resistant to scratching/chewing, waterproof (tile not damaged by water), non-slippery texture even when wet. |

These features help you create a stimulating multi-level condo for your rabbit.

### Step 7: Finish and Safety Check

Finally, you will finish your hutch and perform a safety check. Sand all rough edges. This prevents injuries to your rabbit. Seal any exposed wood with non-toxic sealants. This protects the wood from moisture. Perform a final inspection for any hazards. Check for sharp wire edges. Look for loose fasteners. Ensure all parts are secure. This final check guarantees a safe and comfortable home for your rabbit.
Hutch Maintenance for Safety:
Maintaining your rabbit’s hutch keeps your pet safe and healthy. Regular care prevents problems. You ensure a clean and secure home for your bunny.
Regular Cleaning
Cleanliness is very important for your rabbit’s health. You should follow a regular cleaning schedule.
Daily Checks: Check cages and litterboxes every day. If a litterbox is not too dirty, refresh it. Top it off with hay. Make sure the surface hay for eating is clean and dry.
Litterbox Cleaning: Collect dirty litterboxes and soiled linens. Dump soiled litter into plastic-lined trash barrels. Wash litterboxes with vinegar. Scrub them if needed. Rinse them well and let them air-dry.
Habitat Cleanup Steps:
Let your rabbit out of the hutch.
Shake out the sitting rug. If it is wet or soiled, put it in a plastic bag.
Sweep the habitat floor. Dump sweepings into dirty litterboxes.
Remove soiled litterboxes.
Spot clean stains with vinegar spray. Dry them with paper towels.
Replace soiled rugs.
Dump, rinse, and refill water bowls.
You can feed your rabbit at this time.
Consider using two litterboxes for each rabbit space. You can replace a used box with a fresh one on alternating days. Prepare clean litterboxes with a thin layer of litter. Cover this with one inch of grass hay. If you have sick rabbits, clean healthy rabbits’ spaces first. Dump sick rabbits’ litterboxes in a different room. Mop the floor after dust settles. Wear an apron. Keep separate cleaning items for the sick room. Use disinfectant and hand sanitizer often.
Inspect for Wear and Tear
You must regularly check your hutch for damage. Look for chewed wood. Check for loose wire mesh. Rust on metal parts can also be a problem. These issues can create sharp edges. They can also weaken the hutch. Repair any damage quickly. This prevents injuries and escapes.
Pest Control
Pests can harm your rabbit. You need safe ways to control them.
Natural Repellents: Use diluted lavender, eucalyptus, and tea tree oils. Cucumber peels can repel ants.
Ant Control: Place ant bait in areas your rabbit cannot reach. Soapy water kills ants on sight. You can also place bay leaves, cinnamon, cayenne, baby powder, garlic, or crushed mint in their path.
Dust Mites: A cold diluted tea spray can help with dust mites.
Crawling Insects: Use physical barriers like glueboards or tangle foot spread on cardboard.
Fleas: Place dishes of soapy water under warm lights to trap fleas. Sprinkle salt on carpets and vacuum daily to prevent infestations.
If you need stronger pest control, use products safe for horses. You can also consult an exterminator. Make sure they use pet-safe products. Your rabbit should not be in the room during application. Allow time for the product to dissipate.
Seasonal Adjustments
Adjust your hutch for different seasons. In summer, ensure plenty of shade. Provide good ventilation. You can use frozen water bottles for cooling. In winter, add extra bedding for warmth. Block drafts. You might need to bring your rabbit indoors if temperatures are extreme. These adjustments keep your rabbit comfortable all year.
Building your own diy rabbit hutch plans offers great rewards. You ensure a safe and functional home for your pet. Careful planning, material selection, and attention to detail create a secure, comfortable cage. This custom cage provides a thriving space for your bunny. This project gives you immense satisfaction. Your bunny will love its new home, a truly safe and happy environment.
FAQ
What is the ideal size for a DIY rabbit hutch?
Your hutch needs ample space. It allows your rabbit to hop, stretch, and stand. Aim for at least 4×6 feet of floor space for one or two rabbits. Add more room for extra bunnies.
What materials are safe for building a rabbit hutch?
Use untreated pine, oak plywood, or birch. Avoid cedar and pressure-treated wood. They contain toxic chemicals. Use galvanized hardware cloth (16-gauge, 1×1/2 inch mesh). Choose non-toxic paints or sealants for exterior parts.
What kind of predator protection does my hutch need?
Install secure latches on all doors. Use strong 16-gauge wire mesh. Choose 1×1/2 inch or 1×1 inch openings. Use 2×4 mesh on the bottom. This prevents digging.
What is important about hutch ventilation?
Good airflow prevents respiratory problems. Ensure constant air circulation. Remove manure often. This stops ammonia buildup. Poor ventilation makes your rabbit sick.
