
Do you dream of a fresh kitchen update without a huge bill or hiring pros? A diy kitchen backsplash makeover is your answer! You can easily transform your space. It’s a rewarding and easy diy project for anyone, no matter your experience. We focus on genuinely easy and affordable ideas here. Discover how simple it is to upgrade your kitchen backsplash on a budget. These budget-friendly kitchen updates prove you don’t need a massive budget for big impact. Get ready to give your kitchen a fantastic new look!
Benefits of a DIY Backsplash
Cost Savings for Your Budget
You want a fresh look for your kitchen. A DIY backsplash saves you a lot of money. You skip expensive labor costs. Professionals charge a lot for installation. You only pay for materials. This keeps your overall kitchen budget low. You can achieve a high-end look without the high cost. This makes a DIY backsplash a smart choice for your budget. It’s a great way to manage your renovation cost.
Personalizing Your Kitchen Style
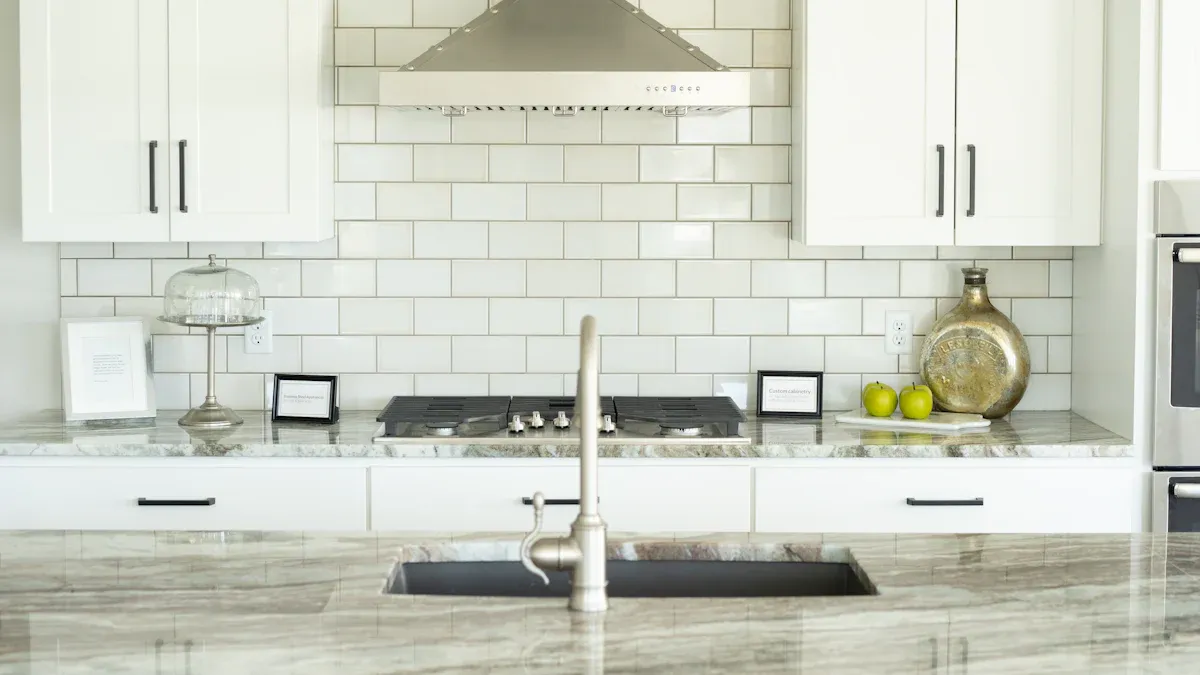
Your kitchen should reflect you. A DIY backsplash lets you show off your unique taste. You pick every detail. You can choose bold patterns or subtle textures. For example, some people use vinyl wallpaper. It looks like Moroccan tiles. This makes a small bathroom feel grand. Others prefer peel and stick subway tile. They use it in a laundry room. It gives a modern, clean look. You might even like a painted shiplap backsplash. It offers a rustic charm. This is cheaper than ceramic tile. You create a space that truly feels like yours. This personal touch makes your backsplash special.
The Satisfaction of DIY Projects
There’s a special feeling when you finish a DIY project. You feel proud. A survey showed that 73% of people felt better mentally after home upgrades. Even small projects boost your energy. They relieve stress. They improve your focus. You get a sense of accomplishment. Working with your hands brings happiness. It releases stress. You see clear progress from start to finish. This feeling often beats routine tasks. A diy kitchen backsplash makeover gives you this joy. You create a unique space. You have more control over your home. This can even be a fun family activity. You make lasting memories together.
Easy & Affordable Backsplash Ideas
You want to update your kitchen without spending a fortune. Many creative kitchen backsplash ideas exist. You can transform your space with these options. They are genuinely easy and affordable.
Peel & Stick Backsplash Tiles
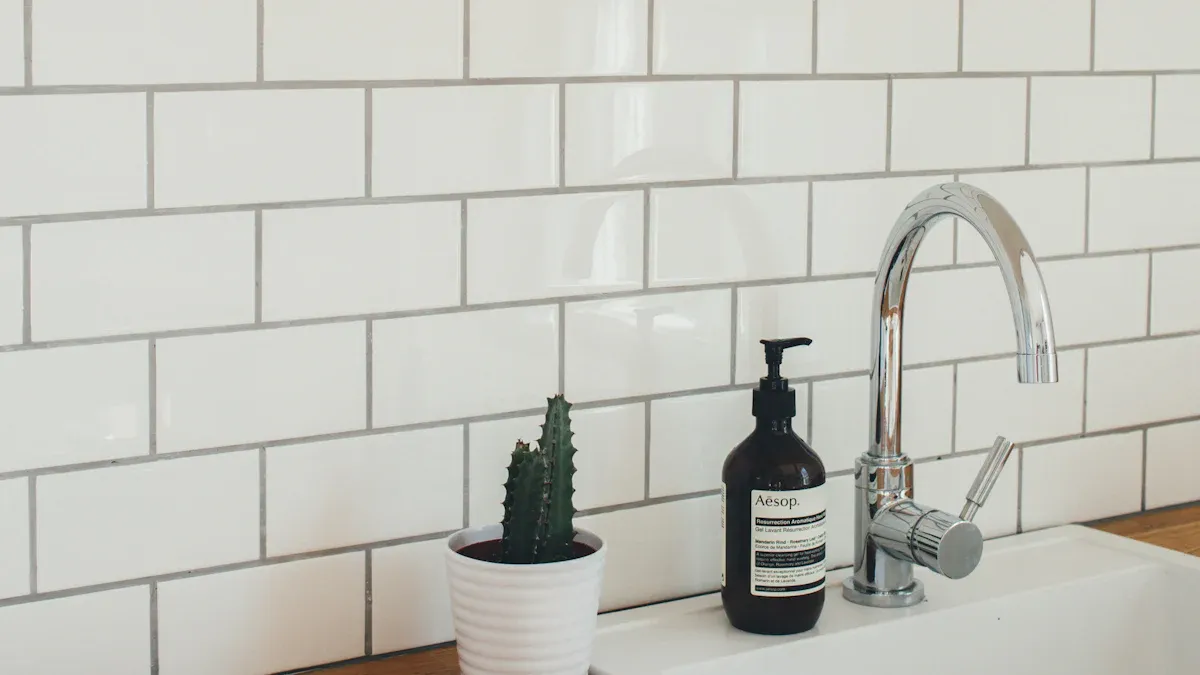
Peel-and-stick backsplash tiles offer a quick and simple way to update your kitchen. You just peel off the backing and stick them to your wall. This makes them a fantastic choice for a cheap DIY backsplash. You find many styles and materials.
For example, you can choose:
Yellow and Brown Marble Peel and Stick Backsplash Tiles: These give your kitchen an elegant look. They create a striking contrast.
3D Wood Shiplap Peel and Stick Kitchen Backsplash Tiles: You get natural beauty with these. They have vibrant colors and textured patterns.
3D Brick Backsplash Peel and Stick: This mimics real brick. It is perfect for a rustic feel.
Pink Fish Scale Tile Backsplash: This offers a unique touch.
3D Elongated Hexagon Peel and Stick Tile: This is a modern and stylish option.
Thicker Black Hexagon Peel and Stick Tile: You get a durable and contemporary look with this.
These tiles come in different materials too.
Category | Material | Style Focus | Best For |
|---|---|---|---|
Durability Champion | PVC & Vinyl Composite | Classic & Modern | High-traffic kitchens, behind stoves |
Style Icon | Gel & Faux Stone | Luxury & Mosaic | Statement backsplashes, low-splatter areas |
Budget Hero | Thin Vinyl | Subway & Geometric | Quick refreshes, rental kitchens |
Eco-Warrior | Recycled Materials | Natural & Textured | Environmentally conscious homeowners |
You can find 3D Vinyl Composite Tiles. They look like real ceramic. Faux Marble Gel Mosaic tiles give you a luxurious look. Classic Vinyl Subway Tiles are very affordable. Recycled Material Tiles offer unique, earthy textures. You can also find modern farmhouse styles or marble-inspired designs. These include large-format sheets that mimic Calacatta or Carrara marble. You can even find self-adhesive mosaic tile backsplash options with metallic accents.
Popular shapes include Mid-Subway, Subway Sleek, Metro Squares, and Honeycomb Chic. You can also find collections like Moroccan Tiles and Herringbone Tiles.
The cost for peel-and-stick backsplash materials varies. You can find options for almost any budget.
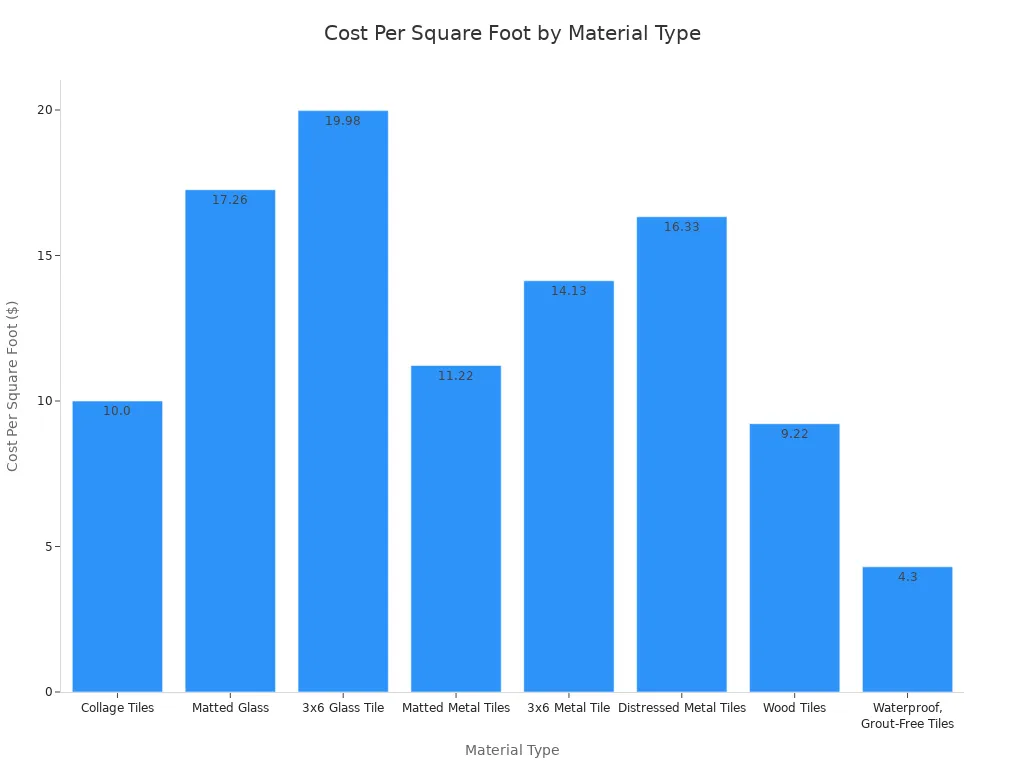
You can see that waterproof, grout-free tiles are very affordable at $4.30 per square foot. Collage tiles are around $10.00. Matted glass can be about $17.26. This shows you have many choices for your budget.
Painted & Stenciled Backsplash
You can give your kitchen a fresh look with paint and stencils. This is one of the most creative kitchen backsplash ideas. You can stencil over existing tiles. You can also spray paint them. Some people use chalkboard paint for a unique, interactive surface. Clay-based paint works well for adhesion.
You need durable paint for your backsplash. Water-based enamel paint works great. Choose a satin or semi-gloss finish. This creates a hard, washable surface. For maximum toughness, consider epoxy-based or specialized tile paints. Some can handle heat up to 400°F. This makes them perfect for behind your stove. Oil-based paints are very durable. They are easy to clean. Just remember they have strong fumes. They also take longer to dry. Avoid standard latex wall paint. It chips and peels quickly on tile. Also, avoid chalk paint unless you seal it with a very durable topcoat. Otherwise, it will stain easily.
You have many stencil patterns to choose from.
Tile Stencils: These mimic the look of real tiles.
Farmhouse / Cottage Stencils: You get a cozy, rustic feel.
Moroccan Stencils / Indian Designs: These add exotic flair.
Modern Geometric Stencils: You create a contemporary look.
Floral Stencils: These bring nature indoors.
Other popular patterns include Damask, Chinoiserie, and Tribal designs. You can find Allover patterns that look like wallpaper. Mandala stencils and Star stencils are also popular. You can truly personalize your backsplash with paint and stencils.
Panel & Cover-Up Backsplash Options
You can cover your old backsplash without demolition. Panel and cover-up options are excellent cheap backsplash ideas. They offer a fresh look quickly. You can use materials like beadboard, wainscoting, plywood, or MDF panels. Laminate, artificial stone, and faux brick are also great choices.
Common materials for these options include:
Wainscoting Panel
Brick Panels (Faux Brick)
Metal Tile Backsplash (Tin, Copper, Stainless Steel, Aluminum)
PVC Wall Panels
Beadboard
Faux Stone Wall Panels
3D Wall Tile (Seamless, MirroFlex)
Wall Wood Paneling (Faux Wood)
Let’s look at installing a budget shiplap backsplash using beadboard.
You measure the area. Include the space from your counter to the cabinets.
You measure for trim. Think about where you want it.
You buy beadboard. You can have it cut to size at the store.
You cut the beadboard to fit. Make openings for outlets. Use a circular saw and jigsaw.
You secure the beadboard to the wall. Use a nail gun or liquid nails adhesive.
You cut and install trim. Use a miter saw for this.
You caulk and paint the beadboard and trim. This gives it a finished look.
For outlets, you can use a clever trick:
Place blue painter’s tape over the outlet.
Lay another piece of tape sticky-side down. Roll the ends back to make handles. Make it the length of the outlet.
Place the rolled tape on the outlet. The sticky side faces out.
Position the beadboard where it will go. Press it firmly against the tape. Then pull it back.
The tape transfers to the beadboard. This marks the exact spot for your cut.
Use a level and pencil to mark the outlines. Double-check your measurements.
Cut along the pencil marks. Flip the board and remove the center.
Double-check the cut by placing it against the outlet. Do this before you proceed.
Apply liquid nails to the back of the beadboard. This ensures even adhesion.
Lean the board close to the wall. Do not touch it or the outlet yet.
You can also find affordable glass tile backsplash options in panel form. These give you a sleek, modern look without the individual tile installation.
Removable & Renter-Friendly Backsplash
You might live in a rental. Or you just like to change your decor often. Removable backsplash options are perfect for you. These are unique kitchen backsplash ideas. They let you personalize your space without permanent changes.
You can use wallpaper for your kitchen backsplash. Wallpaper kitchen backsplash options are very popular. You can also use tile decals or plastic rubber mats.
Many removable options are highly decorative. They often have 3D textures. These add depth and create eye-catching effects. They are versatile for different home styles. You can achieve Scandinavian, rustic, or farmhouse looks. These tiles are durable. They are made from vinyl. They can handle heat, moisture, and spills. They resist fading and staining. They are easy to clean. You can install and remove them easily. They leave no damage or stains on your walls.
Consider these removable options:
Green Ceramic Removable Backsplash: This adds a bright touch to laundry rooms. It has a 3D square texture.
Textured Tan Brick Removable Tile Backsplash: This creates an earthy, cozy feel. Its warm color makes small spaces look larger.
Straight Linear Shaped Removable Tile Backsplash: This adds a pop of color. It makes rooms look brighter.
Exposed Red Ceramic Brick Removable Peel and Stick Tiles: You get an industrial-chic look. These are durable and easy to remove.
Dark Gray Bold Color and Patterned Subway Removable Backsplash Tiles: These transform bathrooms with sleek lines.
Thicker White Hexagonal Removable Backsplash Tiles: These create an elegant French Country style.
Blue Green Horizontal Wooden Removable Wall Tile: This brings a natural feel to living rooms.
Tile decals are another great choice. They are easy to remove. They do not cause damage. This makes them ideal for temporary changes. They have a self-adhesive backing. This means extremely easy application. You need no extra glue or tools. Kitchen tile stickers are budget-friendly. They are much cheaper than traditional tile. They have no extra installation costs. They are waterproof, scratch-resistant, and oil-resistant. They maintain their vibrant appearance. They are also heat-resistant. They handle warmth from cooking and baking. This keeps their integrity and color. Some decals are made from high-quality vinyl. They use GREENGUARD Gold Certified ink. This makes them fade and stain resistant. They are a healthy and sustainable option.
DIY Kitchen Backsplash Installation
You’ve picked your perfect materials. Now, you’re ready to install your new backsplash! This part might seem daunting, but with good preparation and the right techniques, you’ll find it very manageable. Let’s get your diy kitchen backsplash makeover started.
Essential Preparation Steps
Before you even think about sticking or tiling, you need to prepare your wall surface. Proper preparation makes all the difference for a lasting and beautiful backsplash. You want your new backsplash to stick well, right?
Here’s how you prepare your walls:
Clean your walls thoroughly. Use a sponge and a mix of water and mild dish soap. This removes any stains. Pay extra attention to greasy spots, especially behind your stove.
Tackle stubborn stains. If you have tougher grime, apply a paint deglosser with a lint-free cloth. This helps cut through grease and residue.
Remove old wallpaper. If you have wallpaper, take it off. Moisture from mortar and grout can loosen its adhesive. This could cause your new tiles to fall off later. You don’t want that!
Smooth out your surface. Cover small dings and scratches with mastic. For larger uneven spots, patch them up. You need a flat surface for your backsplash to look its best.
Lightly sand painted walls. This creates a rough surface. It helps the adhesive bond better. Be careful not to sand through the paint.
Clean up all dust. After sanding and patching, remove all dust. Then, let your walls dry completely before you start installing.
General Installation Techniques
Now that your walls are ready, you can begin installing your backsplash. The tools you use depend on your material, but some are universally helpful.
You’ll need the right tools for accurate cuts. Consider these:
Manual Tile Cutter: This tool is cost-effective. It works well for straight and diagonal cuts. However, it won’t do curves or bevels. You score the tile, then snap it along the line.
Tile Nipper: This is perfect for intricate work. Use it for curves, narrow corners, or notches in smaller tiles. You score the tile first, then nip away small pieces.
Watersaw (Wetsaw): This is a more expensive option, but it’s very user-friendly. It has an electric motor and a diamond blade with a water pump. This gives you clean and sharp cuts. It works for many tile types and sizes.
Rubbing Stone: Use this to smooth down any rough edges after you cut your tiles.
When it comes to applying adhesive, the method varies. For peel-and-stick backsplash tiles, the adhesive is already on the back. This makes installation super quick and easy. If you’re installing on textured walls, you might want extra adhesive. You can use something like Liquid Nails glue to help the sticky backing hold firm. For traditional tiles, you’ll spread thin-set mortar with a notched trowel. You apply it to the wall, then press your tiles into place. Make sure you use spacers to keep your grout lines even.
Finishing Touches & Sealing
You’ve installed your beautiful new backsplash! Now, you need to finish it properly. This protects your investment and makes it last.
First, you’ll grout your tiles if you used traditional ones. After the grout dries, you need to seal your backsplash. Sealing is crucial, especially in a busy kitchen. It protects against moisture and stains.
You have great options for sealants. DAP Silicone Max Premium Kitchen and Bath Sealant is a top choice. It’s 100% silicone. It creates a waterproof seal. It’s even shower-ready in just 30 minutes! Its shrink and crack-proof formula ensures excellent surface adhesion. Plus, it comes with a 20-year mold and mildew-free guarantee. That’s peace of mind for your kitchen.
You can also choose between different types of sealers:
Surface Sealers: You can use these for backsplashes. They come in matte or glossy finishes. They can make your tile look enhanced, almost like it’s wet.
Impregnating Sealers: These are also good for backsplashes. They don’t change the appearance of the stone.
Pay close attention to drying times. Grout needs to be completely dry before you apply sealer. This usually takes at least 48 hours after you clean it. After you apply the sealer, let it cure. This can take 24 to 72 hours. Always follow the manufacturer’s instructions for curing times. During this curing period, avoid walking on the sealed area or exposing it to water. You want that seal to set perfectly!
Tools, Materials & Troubleshooting
You’ve planned your dream kitchen backsplash. Now, let’s talk about getting it done! Having the right tools and knowing what materials to use makes all the difference. You also want to know how to fix things if they go a little sideways.
Must-Have DIY Backsplash Tools
You need the right gear to make your DIY backsplash project smooth. Don’t worry, you probably have some of these already! Here are some essential tools you’ll want on hand:
Measuring Tape: For accurate measurements.
Level: To keep everything straight.
Tile Spacers: These give you consistent grout lines.
Tile Cutting Device: A snap cutter or wet saw helps you get clean cuts.
Notched Trowel: You use this to spread adhesive evenly.
Grout Float: For applying grout.
Sponge: Essential for cleaning up excess grout.
Painter’s Tape: Protects surfaces and holds things in place.
Utility Knife: Handy for many tasks, like cutting peel-and-stick materials.
Caulk Gun: For sealing edges.
For removing old tile, you might need a flat putty knife and a hammer. A laser level is also highly recommended for keeping your backsplash perfectly straight.
Smart Material Choices
Choosing the right materials is key for a lasting backsplash. Think about where your backsplash goes and what it needs to handle. For adhesives, you have a few good options:
Mastic adhesive: This works great for kitchens. It grabs fast, which is good for vertical surfaces. Just remember, it’s not ideal for very wet areas.
Thinset mortar: This is a good, inexpensive choice. It takes longer to set, so it’s less ideal for vertical applications where you need things to hold quickly.
Epoxy: This is the strongest adhesive. It resists moisture, water, and most chemicals. You can use it on many surfaces, and it doesn’t need extra additives.
Adhesive tile mats: These are easy to use and less messy. They work for ceramic tile. However, they don’t hold heavy tiles or many mosaic sheets well.
Always pick materials that suit your specific backsplash type and kitchen environment.
Common DIY Challenges & Solutions
Even with careful planning, you might hit a snag. One common challenge is misaligned backsplash tiles. You can avoid this with meticulous planning.
Measure your backsplash area carefully.
Sketch out different tile layouts on graph paper. This helps you visualize straight lines.
Plan for evenly spaced grout lines.
Balance your tile cuts for a harmonious look.
If you find your wall is uneven, you can still get a great result. Clean and dry the wall first. Use a leveling compound to fill any low spots. Choose an adhesive made for uneven surfaces. Start tiling from the center and work outwards. Regularly check your alignment with a level. Smaller tiles can also adapt better to irregular surfaces.
You now see a stunning diy kitchen backsplash makeover is totally within your reach. We explored many easy and affordable ideas. You can choose peel-and-stick tiles, paint, or cover-up options. These creative ideas offer a fantastic kitchen update on any budget. You can achieve a high-end look on a small budget. Pick the backsplash that fits your style. Start your project with confidence. You will love the satisfaction and value of your personalized kitchen.
FAQ
How long does a DIY backsplash last?
Your DIY backsplash can last many years! It depends on the materials you choose and how well you install it. High-quality peel-and-stick tiles or properly sealed painted backsplashes offer great longevity. Regular cleaning also helps extend its life. ✨
Can I install a DIY backsplash over existing tiles?
Yes, you often can! Many DIY options, like peel-and-stick tiles or paneling, work well over old tiles. Make sure your existing surface is clean, dry, and smooth first. This ensures good adhesion for your new backsplash. 👍
Are peel-and-stick backsplashes truly durable?
Absolutely! Modern peel-and-stick backsplashes are quite durable. They resist heat, moisture, and splashes. Look for options made from PVC or vinyl composite for the best performance. They are easy to clean and maintain. 🧼
What if I mess up during installation?
Don’t worry, mistakes happen! For peel-and-stick, you can often reposition tiles if you act quickly. For painted backsplashes, you can usually paint over errors. Take your time, measure twice, and remember it’s a DIY project – a little imperfection adds character! 😊

