
Welcome to the rewarding world of DIY! You are in good company; nearly 7 in 10 Americans completed a DIY project last year. Over half of homeowners even finished a DIY project in the past 90 days! Today, you can discover the satisfaction of creating your own wall storage. These simple DIY projects focus on easy diy shelves. They are affordable, need minimal tools, and save you money. Think about it: professional services often cost $150-$250 per hour. Building your own shelves adds personality and solves common storage dilemmas without breaking the bank.
You can transform any space with beautiful wall shelves. If you want extra storage or just a new look, these diy wall shelf ideas are perfect. You don’t need advanced skills for these simple shelves. This is your perfect starting point for DIY!
Getting Started: Essential DIY Shelves Tools and Materials
Ready to build your first set of diy shelves? You might think you need a workshop full of tools. Not true! For these simple projects, you only need a few basic items. You probably have some of these around your house already.
Basic Hand Tools
To build your first diy wall shelf, you will find these tools very helpful:
A measuring tape helps you get the right size for your shelf.
A pencil marks where to cut or drill.
A saw cuts wood. Don’t worry, a hand saw works great for small projects.
A drill makes holes for screws.
Sandpaper smooths rough edges on your wood.
A hammer helps with nails.
A woodworking square ensures straight lines.
These tools are your best friends for building your first wall storage.
Common Shelf Materials
Now, what will your shelves be made of? You want materials that are easy to find and won’t cost a lot. Wooden planks are a top choice for building shelves. You can cut and customize them easily. Reclaimed wood is even better; it’s often free and adds character! Think outside the box too. You can use:
Crates
Vintage cabinets
Ladders with added planks
Baskets
Old drawers from dressers
These options make unique shelves and save money.
Simple Safety Tips
Safety first, always! DIY is fun, but you need to be careful. These tips keep you safe while you build your diy shelves:
Wear eye protection. Always put on safety glasses. This protects your eyes from dust or flying bits.
Use the right tool for the job. Don’t force a tool if it doesn’t feel right.
Keep your workspace clean. Clutter can cause accidents.
Secure your work. Use clamps to hold wood steady. This stops it from moving while you cut or drill.
Cut away from yourself. This prevents accidental cuts.
Following these simple rules makes your diy project safe and enjoyable.
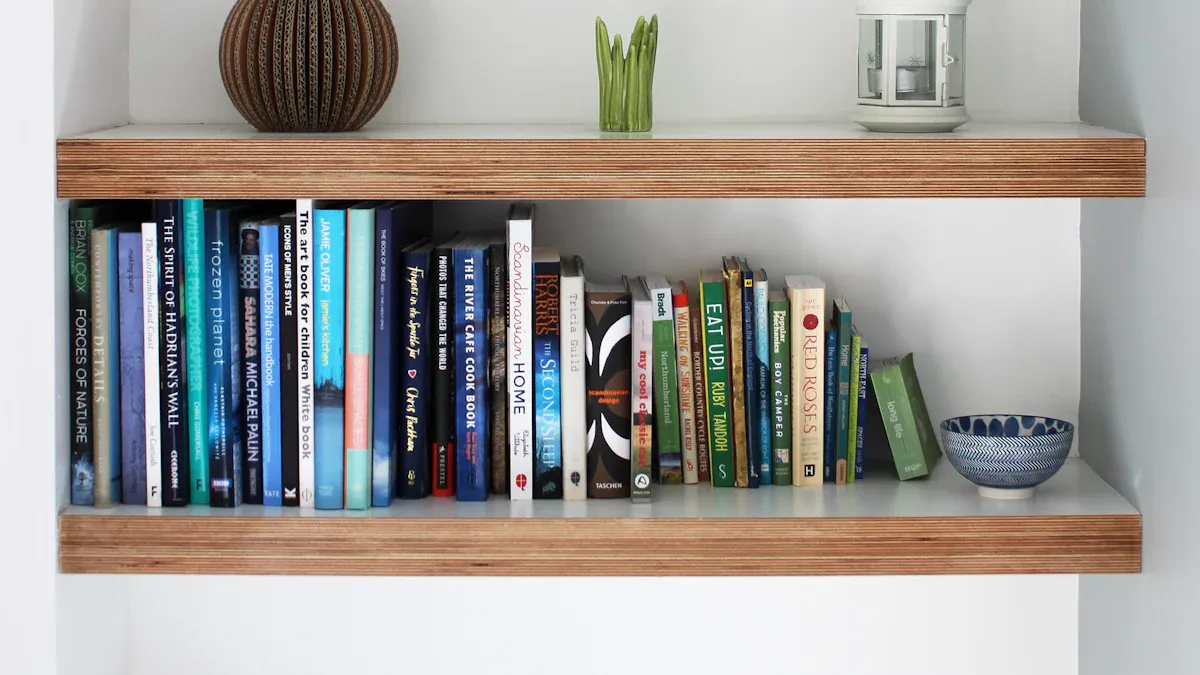
Project 1: Floating Ledge DIY Shelf
Beginner Appeal
You want a sleek, modern look for your home? Floating shelves are perfect! They seem to float on your wall, giving a clean and minimalist feel. This project is a fantastic starting point for your DIY journey. It looks impressive, but it is surprisingly simple to build. You can use these floating shelves to display photos, small plants, or your favorite books. It adds style and storage without taking up floor space. This is a great first diy shelf tutorial for anyone new to home projects.
Floating Ledge Materials
You need just a few things for this simple shelf. First, pick your wood. Pine is a good, affordable choice you can easily paint or stain. Oak is strong and looks great, while maple offers a smooth, light finish. Birch plywood is also a budget-friendly option with a nice grain.
Here is what you will need:
A wood board of your chosen type and size.
2-4 hanger bolts (like 1/4in-20 x 4 inches), depending on how long your shelf is. These are key for making your shelf “float.”
A drill and drill bits.
A level.
A pencil.
Optional: Wood glue for extra strength.
Optional: Wood filler, sandpaper, and paint or stain for finishing. You can use beeswax for a matte finish that brings out the wood grain, or lacquer for a shiny, protective topcoat.
Step-by-Step Floating Ledge
Ready to build your first floating shelf? Follow this easy step by step tutorial:
Cut your wood: Decide how long you want your shelf. Cut your wood board to that length. Sand any rough edges smooth.
Mark your spots: Hold your board against the wall where you want it. Use a level to make sure it is straight. Mark the spots on the wall where your hanger bolts will go. You will also mark matching spots on the back edge of your wood board.
Drill holes: Drill pilot holes into the wall marks. Make sure these holes are slightly smaller than your hanger bolts. Drill matching holes into the back of your wood board.
Install hanger bolts: Screw the hanger bolts into the wall. Leave about an inch sticking out.
Mount your shelf: Carefully line up the holes in your wood board with the hanger bolts on the wall. Push the board onto the bolts. You can add a little liquid adhesive into the board’s holes before mounting for a stronger hold.
Finish it: If you want, fill any small gaps with wood filler. Then, paint or stain your new diy shelf to match your room. Now you have beautiful, custom diy shelves!
Project 2: Simple Crate Shelves
Crate Shelf Charm
Do you want a rustic, charming look for your home? Simple crate shelves offer just that! They bring a cozy, farmhouse feel to any room. You can arrange these versatile shelves in many ways. Stack them tall for a bookshelf or spread them out for unique wall storage. Crate shelves are perfect for displaying books, plants, or craft supplies. They add character and function to your space. This project is super easy and lets you create custom storage with minimal effort.
Crate Shelf Materials
You need a few basic items to build your crate shelf. The main stars are wooden crates! You can find these at craft stores, flea markets, or even online. For a truly unique look, consider reclaimed wood crates.
Here is what you will need:
Wooden crates (two small CD crates and four large crates are a good start, or use pallet wood to build your own)
Measuring tape
Pencil
Wood glue
Finishing nails or wood screws
Hammer or drill with screwdriver bit
Sandpaper (fine grit and extra fine grit)
Optional: Palm sander for smoother finish
Optional: FolkArt® Home Decor™ Chalk paint (colors like Cobblestone, Metallic Gold, Maui Sand, Turkish Tile, English Lavender, or Maroon acrylic colors)
Optional: Large brush and soft cotton rag for applying finishes
Optional: Varnish or finishing wax for protection
Assembling Crate Shelves
Ready to put your crate shelves together? This is a fun and straightforward diy project. Follow this simple step by step tutorial:
Prepare your crates: First, sand any rough spots on your wooden crates. This makes them smooth and ready for finishing. If you want to stain or paint your crates, do it now. Apply your chosen finish with a rag or brush. Let it dry completely.
Plan your layout: Arrange your crates on the floor in the shape you want your shelf to take. Experiment with different stacks until you find a design you love.
Connect the crates: Stack two crates together so their edges line up. Drill small pilot holes in all four corners where the crates meet. This prevents the wood from splitting when you add screws.
Secure them: Use wood screws to tighten the crates together. The screw length depends on how you connect them. For slat-to-slat connections, use 3/4-inch screws. For side-to-slat, use 1-inch screws. For side-to-side, use 1 1/2-inch screws. Tighten them until they are snug.
Repeat and finish: Continue adding one crate at a time, drilling pilot holes and securing with screws, until all your crates are connected. If you want, apply finishing wax or varnish. This protects the wood and gives it a nice look. You now have fantastic new shelves!
Project 3: Plank and Bracket Shelf
Classic Sturdy Design
You want a shelf that is both strong and timeless? The plank and bracket shelf is a fantastic choice. This classic design offers incredible stability and a clean, traditional look that fits almost any decor. You can use these sturdy shelves in your kitchen for cookbooks, in your living room for decor, or even in a garage for heavy tools. They are incredibly versatile. This type of shelf gives you reliable storage and adds a touch of classic style to your home. It is a straightforward diy project that delivers big results.
Plank and Bracket Materials
To build your own plank and bracket shelf, you will need some basic materials. You can start with a 1×10″ or 1×12″ pine board. This is a common and easy-to-work-with wood. If you have other scrap pieces of wood, you can use those too! You will also need wood glue for strong joints. For fastening, grab some finish nails or wood screws. These materials are readily available and won’t break your budget. For the brackets themselves, you can choose decorative metal ones or simple L-shaped supports, depending on the look you want for your diy shelves.
Building Plank Shelves
Ready to build your diy wood shelves? Here is how you can create a sturdy plank shelf for your wall:
Measure and Cut: First, decide how long you want your shelf. For example, if you want a 3-foot shelf, cut your top and bottom pieces from your 1×12 pine. Remember to account for the thickness of your side pieces. Cut your front and side pieces as well. You can cut the front piece at a 45-degree angle for a neat corner. Also, cut small spacers from leftover pine; these will match your mounting bracket rods.
Assemble the Shelf Box: Apply wood glue to all the places where pieces meet. Nail the front piece to the top, making sure the edges are flush. Do the same for the side piece. Now, turn the shelf bottom-side up. Glue your spacers in place on each end. Put the bottom of the shelf on top of these spacers, add glue, and nail it into the spacers, front, and side. This creates a hollow box, leaving a gap for your bracket rods.
Finish: Let the glue dry for a few hours. Then, sand all the edges smooth. Fill any nail holes with wood putty. You can stain your shelf (a mix of Red Oak and Classic Gray looks great!) and then apply two coats of polyurethane for protection.
Install Brackets: While your shelf dries, install your brackets. Use a stud finder to locate and mark the wall studs. Secure your brackets to these studs with long wood screws. Once your shelf is dry, slide it onto the bracket rods for a snug fit. You now have a beautiful and strong diy storage solution!
Project 4: Repurposed Book Shelves
Creative Upcycling
Do you have old books gathering dust? Don’t throw them away! You can give them a new life as unique and charming shelves. This project is all about creative upcycling. It transforms forgotten items into functional art. Repurposed book shelves add a quirky, literary touch to any room. They are perfect for small decorative items, lightweight plants, or even more books! This diy project is a fantastic way to show off your personality and commitment to sustainability. You will love how these one-of-a-kind shelves look on your wall.
Book Shelf Materials
To create these clever book shelves, you will need a few specific items. You can start with some old books, of course! For the actual construction, gather these materials:
An old damp cloth for cleaning.
A coarse sanding sponge to smooth surfaces.
Water-based white primer paint.
Resene “Sourdough” in semi-gloss water-based paint (or any color you like!).
A cutting-in brush and a microfibre roller kit for painting.
A canvas drop sheet or an old sheet to protect your workspace.
“Pika” cabinetry knobs for a decorative touch.
Glass cut to size for the shelf surface.
Translucent silicone glazing sealant.
A screwdriver.
A paint scraper and paint tape.
A rebate power tool might also be helpful for precise cuts.
These materials help you build sturdy and attractive shelves.
Turning Books into Shelves
Ready to turn those old books into amazing diy shelves? Follow these simple steps:
First, mark spots on your books for drilling. Make sure these marks are at least 1 centimeter from the spine or edge.
Next, securely clamp or grasp each book. Let the corner you plan to drill hang off your work surface. Use an electric drill to create holes in all four corners of each book.
Wrap paper around each book. Trace its cover outline onto the paper.
Cut out the paper cover. Apply a thin layer of Mod Podge to its non-decorative side. Glue it onto the book. Let it dry completely.
Poke holes through the paper. These holes should align with the pre-drilled holes in the books.
Measure and mark your twine. You want the books to rest at specific intervals, like 9 inches apart. Also, decide the overall hanging length from the ceiling.
Tie four knots at the lowest mark on the twine. Then, string the first book through. Continue knotting and stringing the remaining books. Adjust knots as needed to ensure they hang evenly.
Finally, secure the top of the twine to one or two hooks or screws. Fasten them securely to your ceiling. Now you have unique hanging shelves!
Project 5: Rope Hanging Shelves
Bohemian Aesthetic
Do you love a relaxed, natural look? Rope hanging shelves bring a beautiful bohemian vibe to your home. These shelves look light and airy. They add a touch of handmade charm to any room. You can use them to display small plants, unique trinkets, or your favorite books. They are perfect for adding personality without making your space feel heavy. This diy project is simple, but it makes a big style statement.
Rope Shelf Materials
You need just a few things to create these lovely shelves. First, choose your wood. Pine boards work well, or you can use reclaimed wood for extra character. You also need strong nylon rope. Make sure it is thick enough to hold your items.
Here is what you will need:
Pine boards (for your shelf pieces and a top support)
Nylon rope (about 8mm thick)
A drill and drill bits (slightly larger than your rope)
A measuring tape and pencil
Sandpaper (medium grit)
Wood screws (if using a top support)
Optional: Paint or stain for finishing your wood.
Crafting Rope Shelves
Ready to make your own rope shelves? Follow these easy steps for a beautiful result:
Measure and Cut: First, decide how many shelves you want and their sizes. Cut your wood boards to these lengths.
Drill Rope Holes: Drill holes for your ropes in each shelf board. Place these holes about 1 1/2 inches in from the edges. Make sure the drill bit is a little bigger than your rope so the rope slides through easily.
Smooth Edges: Use sandpaper to smooth all the edges of each shelf. This makes them look nice and prevents splinters.
Cut Rope: Cut your rope into four equal lengths. These will be the hangers for your shelves.
Bind Rope Ends: Wrap scotch or masking tape around both ends of each rope length. This stops the rope from fraying and makes it easier to thread.
Tie Top Knots: Thread one end of a rope length up through a hole in your top support shelf. Tie a simple, tight knot. Do this for all four rope lengths.
Add More Shelves: Thread the rope ends through the holes of your next shelf from the top. Slide the shelf up. Tie a knot in each rope just above where you want this shelf to sit. Make sure all four knots are at the same level.
Level and Adjust: Gently lower the shelf onto the knots. Adjust the knots until the shelf is perfectly level. Pull down on the shelf ends to tighten the knots.
Repeat: Continue adding your remaining shelves in the same way.
Hang Your Creation: Once all your shelves are in place, you can hang your diy shelves on your wall. You can use large screw hooks for this. Load them up with your favorite items!
Project 6: Picture Ledge Shelves
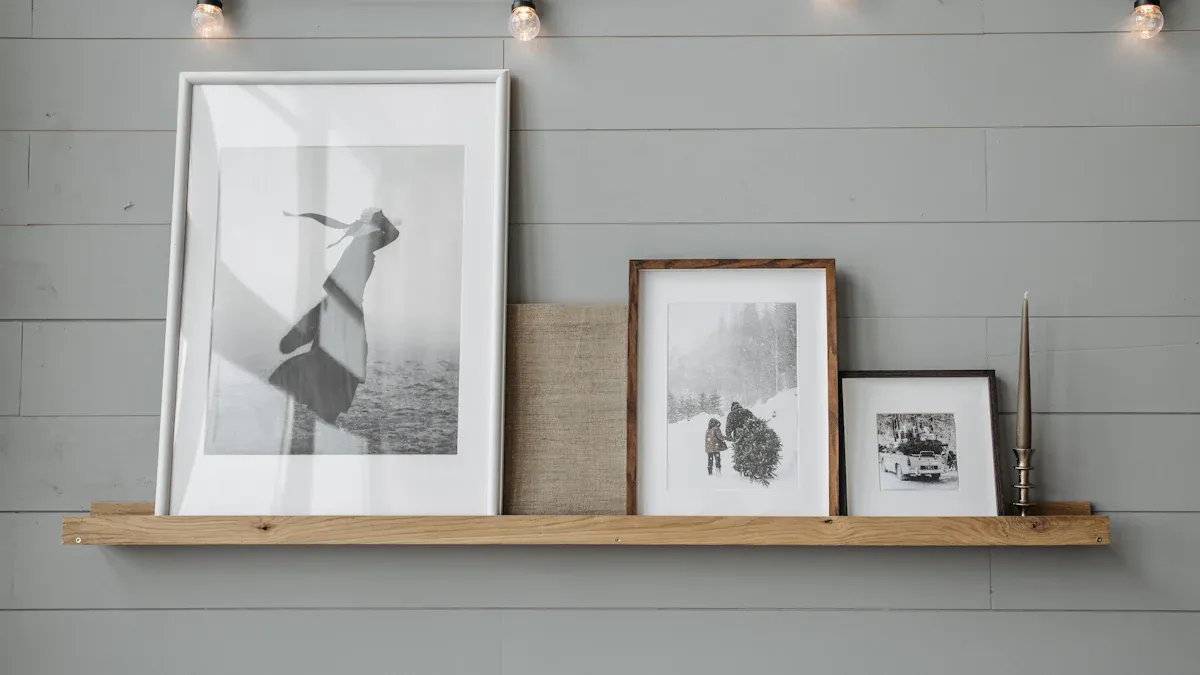
Displaying Art Easily
Do you want to show off your favorite photos, artwork, or small decorative items? Picture ledge shelves offer a stylish and flexible solution. These narrow shelves let you easily change your display without putting new holes in your wall. You can create a dynamic gallery wall or a simple, elegant display. Picture ledges add a modern touch to any room. This diy project is perfect for beginners. It gives you a clean look and great functionality.
Picture Ledge Materials
You need a few simple items for your picture ledge shelf. You will primarily use wood boards. Many people choose pine boards. You can use 1×4, 1×3, and 1×2 stock. For example, you might need one 1×4 board for the bottom, one 1×2 board for the front lip, and another 1×4 board for the back mount. You also need wood glue for strong joints. Grab some 1 1/4″ pocket hole screws or 2″ finish nails. Don’t forget wood stain or paint for finishing. You will also need sandpaper (80 and 150 grit) for smooth edges. Wall anchors and 1.5″ or 2.5″ wood screws help you secure the shelf to the wall. A drill, miter saw, and level are also very helpful tools for this diy task.
Installing Picture Ledges
Ready to install your new picture ledge shelves? Follow these easy steps. First, cut your wood pieces to size. You will typically cut a wider board for the base and a narrower board for the front lip. You can also cut a back piece. Use wood glue to attach the front lip to the base. Clamp it and let the glue get tacky. Then, secure it with a nail gun or finish nails. Fill any nail holes with wood filler. Sand everything smooth. Next, prime and paint or stain your ledges. Apply two to three coats. Allow drying time between each coat. Now, find your wall studs. Mark their positions. Drill pilot holes in the back panel of your ledge. Use a level to make sure your ledge is straight. Then, drill screws into the wall studs. This secures your shelf firmly. You now have beautiful diy shelves for your art!
Project 7: PVC Pipe Shelves
Modern Industrial Look
Do you want a unique, modern look for your home? PVC pipe shelves offer a cool industrial vibe. These shelves are strong and look great in a workshop, a kid’s room, or even a modern living space. You can customize them to fit any area. They give you plenty of storage without a high cost. This diy project is surprisingly simple. It lets you create functional and stylish shelves that stand out.
PVC Pipe Materials
You need specific items to build these sturdy shelves. Here is what you will need for your PVC pipe shelf project:
Five 10-foot lengths of 1/2″ PVC pipe
Ten 1/2″ furniture-grade PVC tee joints
Eighteen 1/2″ furniture-grade PVC 4-way elbow joints
Four 1/2″ furniture-grade PVC end caps
Three 9.25″ x 24″ x 3/4″ choice wood boards
Twelve #6 3/4″ wood screws
PVC primer and cement
Clear coat (matte, aerosol)
Spray paint
These materials help you build durable and attractive diy shelves.
Assembling PVC Shelves
Ready to put your PVC pipe shelves together? This diy project is quick and easy. You can assemble these shelves in minutes. No hassle, tools, or complicated steps are required. Simply snap the components together to get organized fast.
Here is how you do it:
Cut your pipes: First, cut your PVC pipes into the lengths you need for your design. You will have vertical and horizontal pieces.
Prime and paint: Apply PVC primer to all pipe ends. Then, use PVC cement to join the pieces. Let it dry. Spray paint your PVC frame the color you want. Apply a clear coat for protection.
Connect the joints: Start building your frame. Use the tee joints, 4-way elbow joints, and end caps to create the structure. They simply snap together.
Add the wood boards: Place your wood boards onto the PVC frame. These will be your actual shelves.
Secure the boards: Use wood screws to attach the wood boards to the PVC frame. This makes your shelf stable.
Your new diy shelves are now ready to use!
Project 8: Pallet Wood Shelves
Rustic Eco-Friendly Option
Do you love a rustic look for your home? Pallet wood shelves offer a charming, eco-friendly solution. You can transform discarded pallets into beautiful, functional storage. This project gives you a unique, reclaimed aesthetic. It also helps the environment by repurposing wood. Pallet wood shelves are perfect for a farmhouse kitchen, a cozy living room, or even a rugged garage. They add character and a story to your wall. This diy project is budget-friendly and lets you create custom pieces.
Pallet Wood Materials
You need a few key items to build your pallet wood shelf. The main material is, of course, pallets! Look for free ones at local businesses.
Here is what you will need:
A few pallets (one with long spacer bars works well)
Reclaimed wood cedar planks for sides (e.g., 5.5″ w x 59″ long)
Reclaimed wood cedar fence planks for shelves (e.g., 5.75″ x 38″ long)
Miter saw
Cordless drill, drill bits, and screws
Palm sander
Construction square
Construction measuring tape
PVA glue
Sandpaper
Varnish
Screw storage cubbies (optional)
Small wood crate that fits the bins (optional, or build one)
Nail gun (optional)
Creating Pallet Shelves
Ready to build your own pallet wood shelves? This diy project is rewarding. You can create a simple, sturdy shelf with these steps:
Place the pallet on the ground. Remove your chosen boards.
Sand around any nail holes if splinters are present.
Hammer in any nails that stick out.
Apply wood stain. Follow the manufacturer’s instructions. Use a brush and a cloth.
Let the stain dry completely.
Optionally, coat the pallet with clear lacquer. This seals the finish. It also protects your wall from color transfer.
You now have a unique, rustic shelf for your home!
Project 9: Corner Floating Shelves
Maximizing Unused Space
Do you have awkward, empty corners in your home? Corner floating shelves are a smart solution! They turn those often-wasted spaces into valuable storage and display areas. You can add visual interest to a room while gaining extra room for your things. These shelves are perfect for small apartments or any area where you need more storage. They make your space feel larger and more organized. This diy project helps you utilize every inch of your wall.
Corner Shelf Materials
You need specific items to build these clever shelves. You can start with six 2x4s for the frame. You also need two 1x8x12 kiln-dried cedar boards for the actual shelf surfaces. Grab one 1/4″ x 4′ x 8′ plywood sheet for additional support. For assembly, you will use 1 1/4″ wood screws and heavy-duty fasteners. Don’t forget spackle, paint, and caulk for a smooth finish. Wood glue provides extra strength. Alternatively, you can use general wood planks like pine or oak, along with brackets or hidden supports, and wall anchors with screws.
Installing Corner Shelves
Ready to install your new corner shelves? Follow these easy steps:
Plan and Measure: First, measure where you want your shelf. Use a stud finder to locate wall studs. These give you strong anchor points. If you install multiple shelves, leave 12-15 inches between them.
Mark Wall Placement: Use a pencil to draw light lines where your brackets will go. Use a level to make sure these lines are straight.
Insert Hardware: Drill pilot holes into wall studs. Or, if you have drywall, drill holes and insert wall anchors.
Install Shelf Bracket: Align each bracket with the holes or anchors. Secure them with screws. Make sure they are level before you tighten them completely.
Mount Corner Shelves: Carefully slide your floating shelves onto the brackets. Secure them with screws or fasteners if needed. Ensure no gaps show against the corner wall.
Double-Check Your Work: Before you put items on your new diy shelves, check that each shelf is level and secure. Test its stability by placing a few items on it. This ensures no wobble.
Decorate Your Corner Shelves: Arrange practical and decorative items. Vary their height and size for a balanced look. Avoid overcrowding your new storage.
Project 10: Simple Box Shelves
Versatile Clean Design
Do you want a clean, modern look for your home? Simple box shelves offer incredible versatility. You can arrange these shelves in many ways. Stack them, stagger them, or hang them individually. They fit perfectly in any room. Use them to display books, plants, or cherished keepsakes. This shelf design is straightforward, yet it adds a sophisticated touch to your space. It is a fantastic diy project for beginners. You get great storage and a stylish look.
Box Shelf Materials
You need a few key items to build your own box shelf. You can find these materials easily at a hardware store.
Here is what you will need:
One 2″ x 8″ x 8′ Spruce board (or similar wood like pine)
Painter’s Tape
Acrylic Primer
Latex Paint (your chosen color)
Synthetic Paintbrush
Wood Glue
150-Grit Sandpaper
220-Grit Sandpaper
Drop Cloth
Eight 3″ Star Head Screws
120-grit sandpaper (for finishing)
Polyurethane (for protection)
Screw hole buttons (for a neat finish)
Wood stain (if you prefer a natural wood look)
Building Box Shelves
Ready to build your simple box shelves? This diy project is very rewarding.
Gather Materials! Collect your wood, glue, nails, and stain. Get your tools ready: a miter saw, table saw (or circular saw), brad nailer, orbital sander, square, level, and clamps.
Take Note of the Material: Look at your wood’s size. Plan your cuts to get the number and size of shelves you want.
Cutting / Ripping:
Version A (Miter and Table Saw): Cut 11.5-inch pieces with a miter saw. Set your table saw blade to 45°. Run each piece through to create mitered corners. This forms a trapezoid shape.
Version B (Circular Saw): Mark your lines carefully. Set your circular saw blade to 45°. Make your cuts. Rotate and repeat to get the mitered pieces. Be precise with measurements.
Glue Up Your Pieces: Apply wood glue to the edges. Clamping all four sides gives you strong joints. You can use brad nails to speed things up if you have few clamps.
Admire Your Current Result: Let the glued box dry completely.
Sand and Finish: Sand the edges. Start with 80-grit and finish with 120-grit. Then, apply your chosen wood stain or paint.
Hanging – Part 1 (Hardware): Choose hardware for hanging. Drywall anchors and screws or angle brackets work well.
Hanging – Part 2 (Installation): Place the shelf on the wall. Mark and measure where the holes will go. Make sure it is level. Pre-drill holes. Insert anchors. Attach angle brackets. Mark where the shelf attaches to the brackets. Pre-drill shelf holes. Then, hang and screw in the shelves.
Set Up Your Shelves! Arrange your items on your new diy shelves.
You did it! You explored 10 easy diy shelves. You now know the joy of creating something with your own hands. This brings a great sense of accomplishment. You also save money and add a personal touch to your home with these custom shelves. Starting with one simple shelf builds your confidence. DIY projects help you develop new skills and improve troubleshooting abilities. Even small projects make a big difference in your living space. Look for more inspiration on sites like Make: DIY Projects or Hobby Lobby’s Creative Studio for more shelf ideas. Keep building your skills and transforming your wall with more shelves!
FAQ
What if I do not own all the tools you listed?
No problem! You can often borrow tools from friends or rent them from hardware stores. Many projects only need a few basic items. Start with what you have. You can always add more tools later as you gain confidence. Don’t let a lack of tools stop you.
What kind of wood works best for beginner shelves?
Pine is a great choice for beginners. It is affordable and easy to cut and sand. You can also find it at any hardware store. For a rustic look, consider reclaimed wood. Always choose straight, knot-free boards for the best results.
What is the safest way to hang shelves on drywall?
Always try to find wall studs first. Use a stud finder to locate them. Screw your shelves directly into the studs for the strongest hold. If you cannot find a stud, use heavy-duty drywall anchors. These anchors expand behind the wall and provide good support.
What can I do to make my DIY shelves look more professional?
Sanding is key! Sand all edges smooth. Fill any nail holes with wood putty. Then, paint or stain your shelves carefully. A clear coat of polyurethane adds protection and a polished finish. Take your time with these final steps.
What is the easiest project for a complete beginner?
The Floating Ledge DIY Shelf or Simple Crate Shelves are excellent starting points. They require minimal tools and simple steps. You will build confidence quickly with these projects. Pick one you like and just start building! You can do it.

