

Imagine the immense satisfaction of transforming your living space in just one weekend. Even small, focused efforts lead to significant visual and functional improvements for your home.
You can tackle these 10 quick and easy diy home projects. These are genuinely achievable weekend projects for anyone. These quick and easy diy home projects save you money and personalize your home. They also boost your home’s value; some diy efforts, like refinishing hardwood floors, show impressive returns. Start your weekend projects now and enjoy these impactful weekend projects.
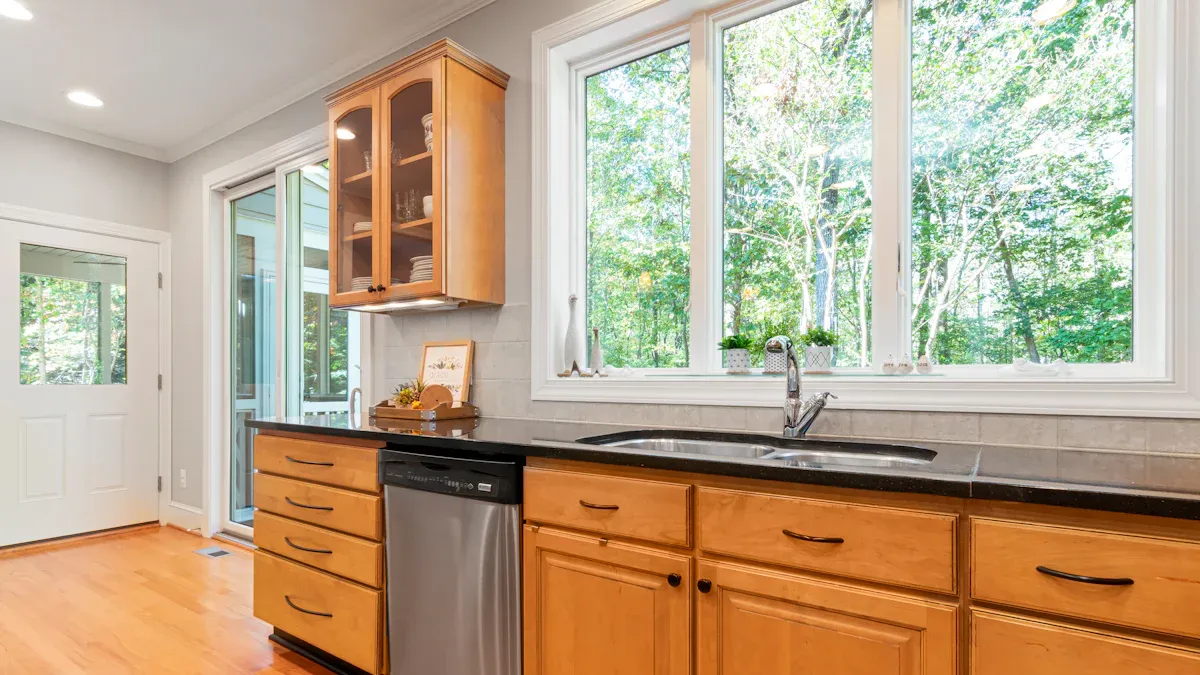
Update Cabinet Hardware
Simple Hardware Swap
You can make a big difference in your living space with a small change. Updating your cabinet hardware offers a simple, high-impact transformation for your kitchen or bathroom. New knobs and pulls instantly modernize your space. They give your cabinets a fresh, updated look. You can completely change the feel of your kitchen cabinets with minimal effort.
Consider the popular styles for your cabinets. Many homeowners choose sleek designs with modern materials. You will find straight lines and simple forms are very popular. These choices give your cabinets a contemporary elegance. Popular material options include stainless steel, brushed nickel, chrome, black matte metal, and clear cast acrylic. These materials give your kitchen a fresh, current feel. You can also explore geometric shapes for your cabinets. These add a clean, modern aesthetic. Minimalistic designs offer a subtle, refined touch for your kitchen. They complement various styles without overpowering the overall design. You might even try mixed materials for your cabinets. Combining metal with leather, wood, or glass creates unique textures and colors. This gives your home a classy and distinctive appearance. Upgrading your kitchen cabinets is a quick win. You will love your updated cabinets.
Time: 1-2 Hours
This project is incredibly fast. You can complete it in just one to two hours.
Materials: New Knobs/Pulls, Screwdriver
You only need a few items. Gather your new knobs or pulls. Make sure you have a screwdriver.
Steps: Remove Old, Install New
First, remove the old hardware from your cabinets. Use your screwdriver to unscrew them. Next, clean the surface of your cabinets where the hardware sits. Finally, install your new knobs or pulls. Screw them into place. It is that easy!
Create a Gallery Wall
Personalize with Art
You can truly make your space your own with a gallery wall. This project allows you to personalize a room with cherished art and photos. It creates a focal point that tells your story. You can mix different types of media. Combine photography with paintings and prints. Maintain consistent color palettes or group items by medium. Black-and-white photos can complement colorful artwork when you place them strategically. You can even incorporate 3D objects. Use small floating shelves for sculptures or collectibles. Shadow boxes also frame dimensional pieces.
Consider the ’60-30-10 Rule’ for media mixing. Allocate 60% to your main medium, 30% to a complementary one, and 10% as a ‘wild card’ piece. Frame selection is also important. Frames can unify different pieces. Use frames that relate without matching exactly. For example, use all black frames with varying widths. The ’70/30 rule’ suggests 70% similar frames for cohesion and 30% variation for interest. This creates a beautiful display in your home.
Time: 2-3 Hours
You can complete this project in just two to three hours. It is a perfect weekend activity.
Materials: Frames, Art/Photos, Hammer, Hangers, Tape
Gather your materials. You will need frames, your chosen art or photos, a hammer, picture hangers, and painter’s tape.
Steps: Plan Layout, Hang Frames
First, plan your layout. This is a crucial step. You can use the paper template method. Trace your frames on kraft paper. Then, tape the paper templates to your wall. This lets you visualize the arrangement. Alternatively, lay your frames on the floor. Measure the overall dimensions. Then, mark only the corner positions on the wall. A laser level helps ensure consistent alignment. Aim for consistent spacing between frames. Standard spacing is two to four inches. Three inches is very versatile. Tighter spacing creates intimacy. Wider spacing allows pieces to breathe. Consistency is key. A cut cardboard spacer ensures uniformity. Larger frames need more breathing room. Anchor your design with a large piece. Place your biggest piece first. Build the rest of the arrangement around it. Position it slightly off-center towards the middle for larger collections. This guides the eye around the wall. Once you finalize your layout, hang your frames. You will love this personal touch in your home.
Paint an Accent Wall

Add Color and Definition
You can easily transform any room with a single accent wall. This classic diy home improvement project adds a pop of color and definition to your space. It creates a focal point, drawing the eye and making a statement. You choose a bold hue or a subtle shade. The right color can completely change the mood of your home.
Consider popular choices for living rooms. A deep forest green like Vine Leaf brings a modern touch. Sophisticated Teal offers confidence and depth. For a dramatic feel, try Charcoal Gray or Navy Blue. These colors make a bold statement. If you prefer warmth, Burnt Orange or a relaxed Canyon Dusk terracotta tone adds energy and comfort. You can also choose a timeless color like Black for dramatic depth.
Think about the psychological effects of your chosen paint color. Blues and greens create a serene and peaceful atmosphere. They can lower respiration and blood pressure. These are perfect for living rooms or bedrooms. Yellows bring happiness and joy. They stimulate mental activity. Use yellow in a kitchen or laundry room. Warm colors like red, orange, and yellow energize and stimulate. Red boosts conversation. Orange promotes creativity. Yellow links to happiness. Cool colors such as blue, green, and purple soothe and calm. Blue promotes relaxation. Green brings balance. Purple combines stability with creativity. You can choose the perfect paint to set the right mood.
Time: 4-6 Hours
You can complete this project in four to six hours. It is a perfect weekend task.
Materials: Paint, Tape, Brushes/Rollers, Drop Cloths
You will need your chosen paint, painter’s tape, brushes or rollers, and drop cloths.
Steps: Prep, Tape, Paint, Clean Up
First, prepare your wall. Clean it thoroughly. Next, apply painter’s tape along the edges of your accent wall. This protects adjacent walls and trim. Then, apply your paint. Use a brush for edges and a roller for larger areas. Allow proper drying time between coats. Finally, remove the tape carefully. Clean up your tools. You will love your new accent wall.
Organize Your Pantry or Closet
Maximize Storage Space
You can transform your pantry or closet into a highly functional area. This project focuses on maximizing storage and reducing clutter. You will create a more efficient space in your home. Imagine finding everything you need quickly and easily. This brings immense satisfaction and peace of mind.
For your pantry, consider efficient organization systems. You can use tray dividers to separate baking sheets and cutting boards. Spice racks, either on cabinet doors or as pull-outs, free up shelf space. Door organizers are perfect for small items like foil and plastic wrap. Pull-out shelves or drawers give you easy access to items at the back of deep shelves. Lazy Susans are rotating trays that make items accessible. Adjustable shelving allows you to customize your storage to fit different item heights. Stackable, clear containers help you see contents and keep things fresh. Utilizing vertical space with wall-mounted shelves also frees up counter space.
For closets, especially in small spaces, smart storage solutions are key. The AURDAL system helps you use tricky little nooks. It assembles easily in tight areas. The EKET cabinet system offers flexible storage that you can arrange on the floor or wall. You can expand it by adding more units. The LÅDMAKARE system balances open and closed storage. It allows you to change door placement for adaptability. These systems help you make the most of every inch in your home.
Time: 3-5 Hours
You can complete this project in three to five hours. It is a rewarding way to spend your weekend.
Materials: Bins, Baskets, Labels, Shelving
Gather your materials. You will need bins, baskets, and labels. Consider adding shelving units if you need more storage.
Steps: Empty, Sort, Clean, Organize, Label
First, empty everything from your pantry or closet. Next, sort through all your items. Decide what to keep, donate, or discard. Then, clean the empty space thoroughly. Wipe down shelves and vacuum the floor. Now, organize your items using your new bins, baskets, and shelving. Group similar items together. Finally, label everything clearly. This helps you maintain your new, organized system.
Install Peel and Stick Wallpaper
Instant Wall Transformation
You can achieve an instant wall transformation with peel and stick wallpaper. This project offers a quick way to add pattern or texture to your space without a long-term commitment. It is perfect for renters. You can personalize your living areas without making permanent changes. Rental agreements often prohibit permanent alterations. This wallpaper provides an ideal solution. You can easily remove it at the end of your lease. It leaves no residue or damage on your walls. This ensures your rental unit stays in its original condition.
Peel and stick wallpaper offers many benefits:
Easy Installation: You need no glue or extra tools. Simply peel and stick.
No Damage: You can remove it without leaving residue or damaging walls.
Budget-Friendly: It is a cost-effective alternative to expensive traditional wallpaper. You also save on professional installation.
Variety of Styles: You will find a wide range of designs to match any taste.
High-quality options can last for years. Yet, you can still remove them cleanly when you move out or redecorate your home. This makes it a versatile and affordable design solution. You can achieve a stylish look without permanent changes.
Time: 2-4 Hours
You can complete this project in just two to four hours. It is a perfect weekend activity.
Materials: Peel and Stick Wallpaper, Smoothing Tool, Utility Knife
You will need your chosen peel and stick wallpaper. Get a smoothing tool to remove air bubbles. A utility knife helps with precise trimming.
Steps: Prep Wall, Measure, Apply, Trim
First, prepare your wall. Ensure it is clean, dry, and smooth. Next, measure your wall and cut the wallpaper to size. Leave a little extra for trimming. Then, carefully peel a small section of the backing. Apply the wallpaper to the top of your wall. Smooth it down with your tool as you go. Work slowly to avoid bubbles. Finally, trim any excess wallpaper with your utility knife. You will love your new, refreshed walls.
Upgrade Light Fixtures
Modernize Room Ambiance
You can dramatically change a room’s ambiance and style with new lighting. Upgrading light fixtures offers a powerful way to refresh your space. Imagine how a new fixture can become a focal point. It draws the eye and sparks conversation. Fixtures are now sculptural pieces. They blur the line between utility and artistry. You might find wall sconces mimicking seashell curves. Pendants with glass that ripples like water also exist.
Current trends offer exciting options. You will see curves, scallops, and organic silhouettes everywhere. These designs soften interiors. They add movement and feel timeless. Nature-inspired materials and textures are also popular. Look for glass fixtures with movement. Stone or terrazzo bases add elegance. Undulating silhouettes echo waves or dunes. You can find creative designs like asymmetrical chandeliers. Geometric pendant lights also make a statement. Ribbed-glass fixtures with built-in LED lights offer a distinctive flair. They act as ambient illuminators. Rich, colorful lamp shades transform simple lamps into striking accent pieces. Chandeliers are becoming true art installations. They push boundaries with unusual shapes. Biophilic lighting brings the calming effects of the outdoors inside your home. It incorporates natural elements like branches and leaves.
Time: 1-2 Hours Per Fixture
You can complete this project quickly. Allow one to two hours for each fixture you upgrade.
Materials: New Fixture, Screwdriver, Wire Nuts
You will need your new light fixture. Gather a screwdriver and wire nuts.
Steps: Turn Off Power, Remove Old, Install New, Test
Safety is paramount when working with electricity. Follow these steps carefully:
Turn off the power at the circuit breaker before starting any work.
Use a voltage tester to confirm the absence of electricity.
Wear safety glasses and gloves.
Ensure the junction box is securely mounted.
Remove your old fixture.
Strip the ends of the wires.
Connect the ground wire (usually green or bare copper) to the ground screw.
Connect the neutral wire (typically white) to the white wire from the ceiling.
Connect the hot wire (usually black) to the black wire from the ceiling.
Secure all connections with appropriately sized wire nuts.
Double-check all connections before tucking them into the junction box. This prevents sparks and fire.
Install your new fixture.
Turn the power back on and test your new light.
If your home was built before 1985, consult a professional before replacing ceiling lights. Older homes often have wiring with lower temperature ratings. This can degrade and pose fire risks with modern lightbulbs. A licensed electrician ensures safety and compliance.
Paint Your Front Door
Boost Curb Appeal
You can give your home an instant facelift by painting your front door. A freshly painted front door provides a significant boost to your home’s curb appeal. It creates a welcoming feel for anyone approaching your house. This simple project makes a big statement. You can choose a color that reflects your personality or complements your home’s exterior.
Consider popular front door colors that truly enhance curb appeal:
Black: This neutral color pairs well with anything. It offers a sophisticated, high-end look. Black draws attention to your front door. It is popular for Craftsman, Modern, and Contemporary homes.
Red: This bold color makes your home stand out. It provides a classic and retro appearance. Red symbolizes good luck and positive energy.
Blue: This versatile color offers many hues. It brings a calming and relaxing feel to your home’s exterior. Blue is popular for Coastal, Modern Farmhouse, Craftsman, and Traditional styles.
Yellow: This vibrant and cheerful color matches a lively personality. It pairs well with white, gray, dark green, or blue siding. Yellow works well on Mid-Century Modern, Traditional, Craftsman, or Cape Cod homes.
Choosing the right type of paint is also important for durability. Different paint types offer varying levels of resistance to weather and wear. You want a paint that lasts.

Epoxy paint offers extremely high durability. Oil-based paint also provides high resistance to fading and damage. Latex paint is a good option for many doors. Acrylic paint is less durable for exterior use. You should pick the best paint for your door material.
Time: 3-5 Hours
You can complete this project in three to five hours. It is a perfect weekend task.
Materials: Paint, Primer, Painter’s Tape, Brushes, Drop Cloth
You will need your chosen paint, a good primer, painter’s tape, brushes, and drop cloths.
Steps: Clean, Tape, Prime, Paint, Dry
First, clean your front door thoroughly. Remove any dirt or grime. Next, apply painter’s tape around the edges of your door. This protects the hardware and surrounding trim. Then, apply a coat of primer. Let the primer dry completely. Now, apply your chosen paint. Use smooth, even strokes. You may need two coats of paint for full coverage. Allow each coat to dry. Finally, remove the tape carefully. Your door will look amazing.
Install a Kitchen Backsplash
Stylish Kitchen Upgrade
You can give your kitchen a fresh, new look and added protection by installing a backsplash. This DIY project adds both style and functionality to your kitchen. It acts as an impenetrable barrier against moisture, grease, and food splatters. These elements can damage painted walls, leading to staining and mold growth. A backsplash protects your walls from water damage, mold, and mildew. This maintains the long-term quality of your kitchen‘s structure. Backsplashes made of tile are also flame resistant. This offers a significant safety benefit, especially near your stove. It ensures the material will not spread flames during a mishap.
Backsplashes offer a wide variety of materials, colors, and patterns. You can add your personal touch and enhance the aesthetic appeal of your kitchen. Spills and messes are common in kitchens. Backsplashes provide a surface you can easily wipe clean with a damp cloth or sponge. This simplifies maintenance. If your countertops do not sit flush against the wall, a backsplash can seal off cracks. This prevents insects and other pests from entering your home. Installing a backsplash can modernize your kitchen, add durability, and enhance its appeal. This increases your home’s value.
You have many tile options. Porcelain and ceramic tiles are very popular. They come in many shapes, sizes, colors, and patterns. They can even imitate natural stone. These tiles are budget-friendly, low-maintenance, and easy for DIYers. Glass tiles offer a glossy, light-reflecting surface. This brightens your kitchen and is very easy to clean. Natural stone brings beauty and elegance. It requires regular sealing to prevent staining.
Time: 4-8 Hours
You can complete this project in four to eight hours. It is a rewarding weekend task.
Materials: Tiles, Adhesive, Grout, Spacers, Trowel, Sponge
Gather your materials. You will need your chosen tiles, tile adhesive, grout, tile spacers, a trowel, and a sponge.
Steps: Prep Wall, Apply Adhesive, Set Tiles, Grout, Clean
First, prepare your wall. Ensure it is clean, dry, and smooth. Next, apply tile adhesive to the wall using your trowel. Work in small sections. Then, set your tiles into the adhesive. Use spacers to ensure even gaps between tiles. Allow the adhesive to dry completely. Now, mix and apply the grout to fill the gaps between your tiles. Use a rubber float to spread it. Wipe away excess grout with a damp sponge. Finally, clean your tiles thoroughly. You will love your stylish new backsplash.
Upgrade Your Showerhead
Enhance Shower Experience
You can instantly transform your daily routine. Upgrading your showerhead offers an immediate improvement in your shower experience. Imagine stepping into a shower that truly invigorates or relaxes you. Modern showerheads provide a variety of spray patterns. You can customize your shower to fit your mood.
Consider these exciting options:
PowerSpray: This boosts water force. Some models offer a concentrated center spray for rinsing thick hair.
Full Body: This maximizes spray coverage. You get a complete drenching experience.
Mist: This creates a gentle, soft experience. Fine water droplets surround you.
PowerPulse Massage: This delivers a powerful, therapeutic massage. It offers up to 2X the force of other retail shower heads.
Rain Shower: This provides a drenching, rain-like spray. You enjoy large coverage.
Intense PowderRain: This offers a velvety soft, super-silent, and effective jet. It uses an ultra-high number of micro-droplets.
Beyond comfort, you can also save resources. Many new showerheads are low-flow models. They promote energy efficiency and water conservation. You can decrease your home water consumption by 40 percent or more. This saves thousands of gallons of water each year. The average U.S. family can save over 2,000 gallons of water annually. Switching to a WaterSense showerhead can save 2,700 gallons of water and 330 kilowatt-hours of electricity every year. You will also reduce your monthly water bills significantly. This simple change benefits both you and the environment.
Time: 15-30 Minutes
You can complete this project very quickly. It takes only 15 to 30 minutes.
Materials: New Showerhead, Plumber’s Tape, Wrench (Optional)
You will need your new showerhead. Grab some plumber’s tape. A wrench might be helpful, but it is often optional.
Steps: Unscrew Old, Clean Threads, Apply Tape, Screw New
Unscrew your old showerhead. Turn it counter-clockwise.
Clean the threads on the shower arm. Remove any old tape or debris.
Apply plumber’s tape to the threads. Wrap it clockwise a few times.
Screw on your new showerhead. Hand-tighten it firmly. Use a wrench gently if needed, but do not overtighten.
Update Light Switches and Plates
Refresh Electrical Details
You can easily overlook small details. Yet, these small details make a big difference in your home. Updating your light switches and plates offers a significant refresh for any room. Old, discolored, or mismatched plates can detract from your carefully designed space. New, crisp plates instantly modernize your walls. They create a polished, cohesive look.
Consider the power of white switch plates. They offer a neutral yet sophisticated touch. White plates do not overpower other design elements. This allows bold wallpaper or intricate tiling to truly stand out. They also match existing fixtures. You create visual consistency by harmonizing with common white features like trim and moldings. White covers are versatile for future updates. They rarely need replacement when you redecorate or repaint. This makes them a stylish, safe long-term investment. Coordinating with white outlet covers prevents visual clutter. You create a unified appearance, especially in open-concept spaces. White finishes come in many varieties. Matte, glossy, or textured options complement various interior styles. White accents reflect light. This helps make small spaces feel larger and more open. When paired with natural elements, white switch covers contribute to a calm, airy atmosphere.
Time: 1-2 Hours
You can complete this project quickly. It takes only one to two hours.
Materials: New Switches/Plates, Screwdriver, Voltage Tester
You will need your new switches or plates. Gather a screwdriver. A voltage tester is also essential for safety.
Steps: Turn Off Power, Remove Old, Install New, Test
Safety is your top priority when working with electricity. Follow these steps carefully:
Turn off the power at the circuit breaker. This is your first step for any electrical project.
Use a voltage tester. Double-check that no electrical current is present after turning off the power.
Wear rubber-soled shoes. This minimizes the risk of electric shock.
Avoid working in wet conditions.
Wear safety goggles. Protect your eyes from sparks or debris.
Wear gloves. Safeguard your hands from cuts and shocks.
Now, remove your old switches and plates. Unscrew them carefully. Install your new switches and plates. Connect the wires securely. Screw them into place. Turn the power back on. Test your new switches. You will love the fresh, clean look.
You can see how easy these diy home projects are. They offer significant impact. Big changes do not require big time commitments. Pick one or two weekend projects from this list. Get started this weekend. These weekend projects will transform your home. You will feel immense satisfaction. Take pride in your personal accomplishment. Make your space truly yours. Start one quick diy project at a time. These weekend projects are perfect. Enjoy these weekend projects. These home improvements are simple. Your home will thank you for these weekend projects. These diy home projects are fun. Tackle these weekend projects.
FAQ
Can I really complete these DIY projects in a weekend?
Yes, you absolutely can! These projects are specifically chosen for their quick completion times. You will find immense satisfaction transforming your home in just two days. You can start enjoying your refreshed space right away.
What is the most impactful kitchen upgrade I can do quickly?
Updating your kitchen cabinet hardware offers a huge impact. It instantly modernizes your kitchen. You can also install a new kitchen backsplash. This adds style and protection to your kitchen. Both options make your kitchen feel brand new.
Do these projects require special tools or skills?
No, you do not need special tools or advanced skills. Most projects only require basic tools like screwdrivers or hammers. You will find simple, step-by-step instructions. You can easily follow them. These projects empower you to improve your home.
Will these projects increase my home’s value?
Yes, many of these projects can boost your home’s value. A freshly painted front door enhances curb appeal. An organized kitchen or updated light fixtures also make a positive impression. You invest in your home’s future.
How can I ensure my kitchen backsplash looks professional?
You can achieve a professional look for your kitchen backsplash. Take your time with preparation. Use spacers for even gaps. Wipe away excess grout promptly. You will create a beautiful and durable finish for your kitchen.

