
Do your plants need a fresh look? You can transform your displays! Creating your own diy planters offers amazing benefits. You personalize your space, saving money along the way. Many people want a home that minimizes environmental impact. However, expense often stops them. DIY projects help you achieve sustainability by repurposing items. This diy approach is budget-friendly. You will discover 15 creative diy planter ideas for both indoor and outdoor spaces.
Why DIY Planters
Save Money
You can save a lot of money when you make your own plant containers. Buying new pots can be expensive. Instead, you use items you already have. This diy approach cuts costs significantly. For example, an alternative design for a planter system, utilizing waste materials, resulted in a 43.84% reduction in total cost compared to a Waterboxx kit. The alternative design’s total cost was 7685 KD, while the Waterboxx kit’s total cost was 13,685 KD.

You can turn old tires into large planters. Empty tin cans become small, decorative diy planters. Plastic bottles, old teacups, and even wicker baskets are perfect for this diy project. You avoid spending money on new items.
Personalize Your Space
Your home should reflect your style. DIY projects let you create unique diy planters that match your decor perfectly. You can make sleek, modern designs with neutral colors. Or, you can choose vibrant colors and woven textures for a boho look. Imagine replicating expensive pottery styles with simple terra cotta pots. You can also use burlap for a natural, rustic feel. These personalized touches make your space truly yours. Your planters become a statement.
Boost Sustainability
Making your own planters is good for the planet. You reduce waste by giving old items a new purpose. This diy method keeps things out of landfills. Upcycling helps conserve resources. It means less need for new materials. This reduces pollution and greenhouse gas emissions. Choosing upcycled diy planters supports sustainable gardening. You help the environment with every plant you pot. This diy effort makes a real difference.
Unleash Creativity
Making diy items is fun. It lets your imagination run wild. You transform everyday objects into beautiful homes for your plants. This creative process brings joy. You discover new ways to use materials. Each project becomes a unique expression of your ideas. You will feel proud of what you create. It is a rewarding experience.
Indoor DIY Planter Ideas
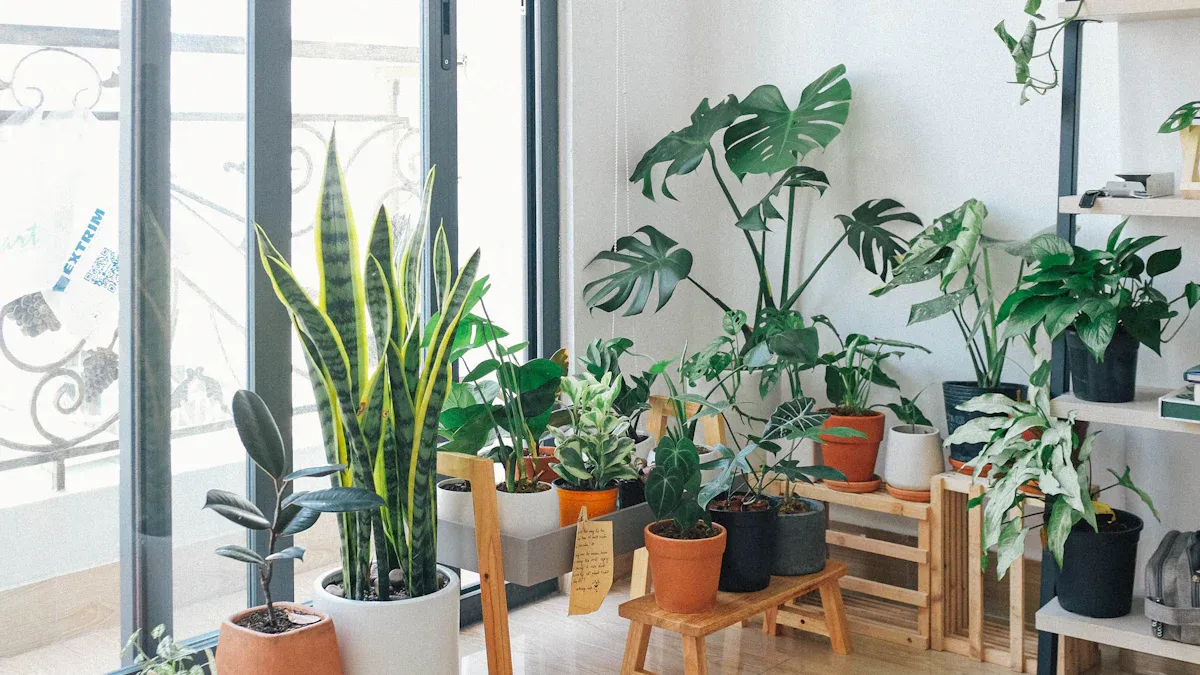
You can bring life and personality to your home with creative indoor planters. These diy planter ideas use common household items. They transform everyday objects into beautiful homes for your plants. You will love how these ideas complement your indoor decor.
Tin Can Planters
Look around your kitchen for empty tin cans. These humble items make fantastic indoor planters. You can easily turn them into charming homes for your small plants. Succulents, small flowers, and even seeds thrive in these containers. For example, succulents that are 2-3 inches wide fit perfectly in 15-ounce tin cans.
Before planting, prepare your cans properly. Drill drainage holes in the bottom. This is crucial for healthy plants, especially if you tend to overwater. You can also add a layer of pebbles inside to help with drainage. Use food cans because their internal coating helps prevent rust. If you plan to display them where they might get wet, paint or varnish the outside. This prevents rust. Now, get creative! You can decorate your tin cans in many ways. Try paper napkin decoupage for a Marimekko look. Paint them in rainbow colors. Combine them with denim seams for recycled jean planters. You can even give them a patina finish to resemble galvanized steel. These diy projects are simple and fun.
Mason Jar Hanging Planters
Mason jars offer a rustic charm for your indoor spaces. You can transform them into beautiful diy hanging planter displays. They are perfect for succulents and herbs, creating a lovely kitchen herb garden.
To hang your mason jar planters securely, you will need a piece of wood, a pipe clamp, a screw, and some nails. First, prepare the wood. For thicker wood, drill two deep holes in the back. Hang it on two long nails in the wall. This keeps it flat. Next, attach the pipe clamp to the wood. Open the clamp flat. Pre-drill a screw hole into the wood. Use a strong nail to widen a slit in the clamp, then screw through it into the wood. Finally, insert your mason jar into the clamp. Tighten the clamp to hold the jar firmly. The lip of the jar helps keep it from slipping. This method creates a sturdy and attractive display for your indoor planters.
Teacup and Teapot Planters
Do you have old teacups or teapots that are chipped or mismatched? Give them a new purpose as delightful indoor planters. They add a whimsical touch to any room.
When choosing your teacup or teapot, consider its size. You will need to drill at least one drainage hole in the base. Use a small diamond or ceramic drill bit. Apply painter’s tape to the bottom where you plan to drill. Pour water over the tape to keep the surface cool. This prevents cracking. Start drilling at a 45-degree angle, then straighten to 90 degrees. Allow the drill bit to cool down often to avoid shattering the cup. After drilling, cover the holes with a small piece of plastic screening or a coffee filter. This keeps soil in but lets water out. Choose small plants that do not grow too large or too fast, as teacups have limited depth.
Old Book Planters
Transform an old book into a unique planter. This diy project creates a surprising and elegant home for your plants. It is a conversation starter for sure.
First, you need to prepare the book. You can carve a rectangle in the middle using an X-Acto knife. Start with the cover and work through the pages. Alternatively, you can drill an opening. Mark the spot and use a drill with a hole saw. Drill a small section, clear the pages, and repeat until you are near the last few pages. Do not drill all the way through. Next, glue the pages together. Apply spray adhesive between pages or glue along the page side. This keeps the planter from opening. Then, you must waterproof the inside. Trim a plastic container to fit the cutout, or line the hole with a plastic zip-top bag. You can also apply a gap filler or sealant into the opening. This protects the book from water. Finally, plant your succulent. Layer the bottom with rocks for drainage, then add soil. Place your succulent and top with decorative rocks.
Crate or Pallet Planters
Wooden crates and pallets offer a rustic and versatile option for indoor planters. You can create charming displays with these repurposed items.
When selecting pallets, choose ones that appear new and clean. Make sure they were used for non-toxic transport, like from a bakery. Avoid pallets stamped with ‘MB’ (Methyl bromide) or ‘SF’ (Sulphuryl fluoride), as these indicate toxic chemical fumigation. Pallets stamped with ‘HT’ (heat-treated) are the safest choice. To make your planter last, line it with landscaping fabric or plastic bags. This prevents soil from escaping and retains moisture. You can also paint the wood with a non-toxic wood preserver. Seal inside joints with non-toxic silicone sealant. This prevents moisture and rot. Use a good soil mix, like 20% vermiculite, 40% compost, and 40% potting mix. Fill the planter, press the soil firmly, and then water it. Now you can sow seeds or plant mature plants.
Recycled Plastic Bottle Planters
Plastic bottles are abundant and easy to repurpose into indoor planters. This diy idea is super sustainable and budget-friendly. You can create various shapes and sizes from different bottles.
To make a plastic bottle planter, first clean the bottle thoroughly. Decide where you want to cut it. You can cut the top off to make a simple pot, or cut a window into the side for a horizontal planter. Always ensure you create drainage holes in the bottom. You can use a hot nail or a drill for this. Decorate your plastic bottle planters with paint, fabric, or markers. You can even create self-watering planters by inverting the top half into the bottom half. This is a great diy project for kids too.
Colander Planters
Colanders are not just for draining pasta! They make surprisingly effective and stylish indoor planters. Their built-built-in holes solve the drainage problem instantly.
These planters are especially good for herbs and salad greens. These plants often have a high turnover rate, and colanders provide natural drainage. You never have to worry about wet roots. You can water and even wash your plants directly in the sink. This makes maintenance incredibly easy. Hang your colander planters in a sunny window or place them on a shelf for a unique and functional display.
Outdoor DIY Planter Ideas

Your garden and patio deserve unique touches. These outdoor diy planter ideas help you create stunning displays. They withstand the elements and hold larger plants. You will enhance your garden’s beauty with these durable and creative planters.
Tire Planters
Old tires can become vibrant garden features. You transform them into eye-catching planters. They offer great durability and size for many plants.
First, prepare your tire. Clean it thoroughly with soapy water. A degreaser helps with oily spots. Scrub well so paint sticks. Next, drill 6-8 drainage holes in the bottom. Space them 1-2 inches apart. This prevents root rot. You can also create a “starburst” design. Choose a flexible tire. Draw flower petal shapes on it. Carefully cut these patterns with a sharp knife. Slit between petals down to the steel belt. This helps the tire flip. Use both hands to pull petals and push with your knee. Slowly invert the tire. Clean it again after flipping.
Now, make it beautiful! Spray paint the exterior. Use paint suitable for outdoor use. Work in a well-ventilated area. Lay down a dropcloth. Wait one hour between coats. Let the planter dry overnight before adding soil. You can choose bright colors for a fun look. Paint them in complementary or contrasting colors. Create themes like giant sushi rolls or coffee cups. Apply patterns like polka dots or stripes. After painting, apply an outdoor sealant. This protects colors from sun and rain. Your tire planters will last a long time.
Cinder Block Planters
Cinder blocks offer amazing versatility and strength. You can build impressive structures with them. These planters provide exceptional stability. They withstand soil pressure and prevent erosion.
You can stack cinder blocks horizontally or vertically. This allows for many configurations. Create tiered walls on sloped landscapes. Transform steep areas into usable garden spaces. For a 4-foot high planter, a fence behind it adds stability. Fill blocks with soil. This adds considerable weight and stability. You can also cantilever blocks. Anchor protruding blocks with at least two blocks above. Or use one soil-filled block. Assess stability as you lay out blocks. Consult your cinder block supplier for advice on gluing blocks. They can suggest suitable adhesives for higher walls or windy areas.
Old Shoe or Boot Planters
Give old footwear a new life. Turn worn-out shoes or boots into charming planters. They add a whimsical touch to your garden.
These planters are perfect for small plants. Succulents thrive in them. You can also plant small flowers. Make sure to add drainage holes if the shoes do not have them. Simply poke holes in the sole. Fill with soil and plant your chosen greenery. Arrange them on steps, hang them on a fence, or place them among larger pots. They bring a smile to anyone who sees them.
Wheelbarrow Planters
An old wheelbarrow makes a fantastic mobile garden. It offers a large planting area. You can move your garden display around easily.
Drill drainage holes in the bottom of the wheelbarrow. This prevents waterlogging. Fill it with good quality soil. Plant a mix of flowers, herbs, or even small vegetables. The wheelbarrow becomes a focal point. You can paint it a bright color. Or let it rust naturally for a rustic look. It is a practical and charming diy solution.
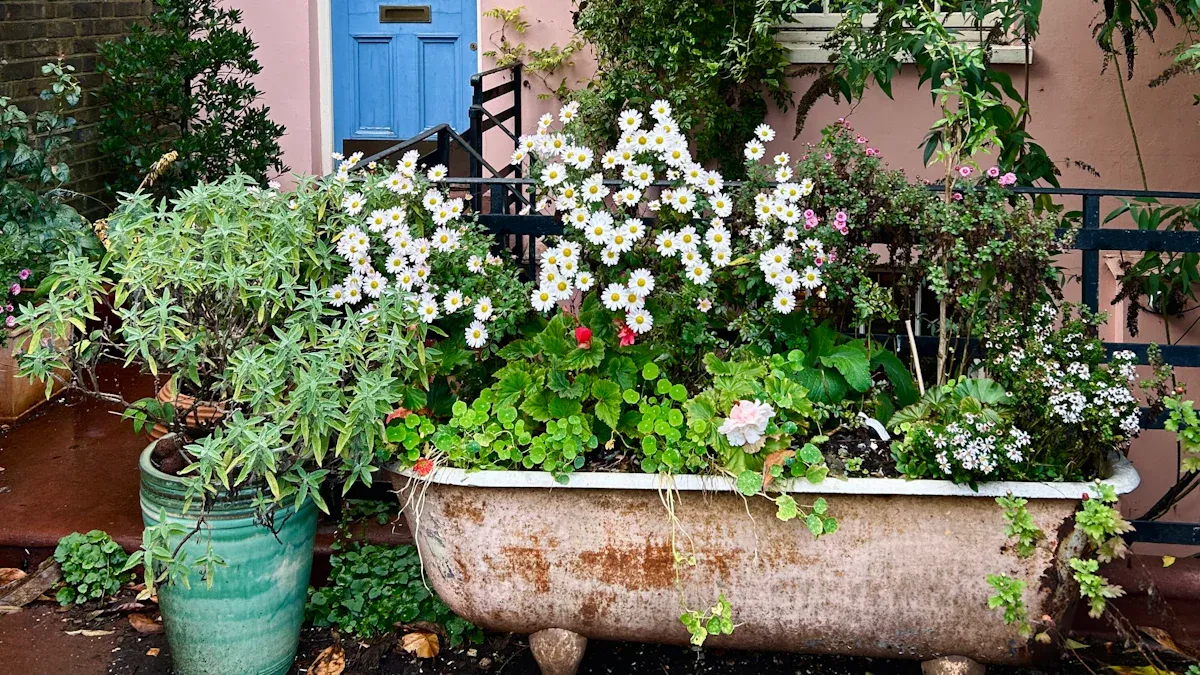
Bathtub or Sink Planters
Repurpose old bathtubs or sinks into unique garden features. These planters are durable and make a bold statement. They come with built-in drains.
First, place the sink in its final position. This avoids heavy lifting later. Elevate the sink on bricks or wooden blocks. This improves drainage. Fill the bottom with 1-2 inches of gravel, crocks, or small rocks. This ensures proper drainage. It also prevents soil from clogging the drain. Fill the sink with compost up to 1 inch from the top. Sow seeds or plant your chosen plants. Top-dress with grit or gravel. This helps retain moisture and prevents soil erosion. Then, water your new garden. The thickness of stoneware sinks protects roots from extreme temperatures. They become long-lasting garden features.
Wooden Pallet Vertical Garden
Save space with a vertical garden made from wooden pallets. This diy project is perfect for small yards or balconies.
Lay the pallet face down. Cut landscaping fabric to fit the pallet’s width. Make it at least twice its length. This lines the front and back, creating a soil pocket. Staple the fabric to the front of the pallet. Keep it taut. Fill the pallet with soil while it is still face down. If you use irrigation, string it through now. Close the back with excess fabric. Staple it to the wooden slats. This creates a secure pocket. Stand the pallet upright. Lean it against a fence. Secure it with bungee cords. Let the soil settle for a few days. Water from the top. Cut small 2-3 inch slits in the fabric. These are for planting. Your vertical garden is ready!
PVC Pipe Planters
PVC pipes offer a modern and customizable option. You can create sleek, multi-tiered planters. This diy approach is very versatile.
You can cut PVC pipes with a hand saw or a miter saw. A miter saw is efficient for repetitive cuts. Use a ‘stop block’ for consistent sections. Sand the pipes for cleaner edges. This helps paint or stain adhere better. Drill slanted drainage holes with a small drill bit. Add mesh screening over holes to prevent soil loss. For a faux wood style, sand pipes until matte. This is critical for stain adhesion. Use a paddle bit for rope holes. Use a standard drill bit for drainage holes. Hot glue PVC pipe plugs into ends. Thread rope through holes. Tie knots under each pipe to secure. These planters look great and are very functional. You can even explore diy concrete planters for a similar modern, durable aesthetic.
Woven Basket Planters
Woven baskets add natural texture and warmth to your outdoor space. You can transform them into beautiful planters.
You need to waterproof them. Prepare your basket, a drop cloth, and waterproof sealant. Work in a well-ventilated area. Apply the first coat of sealant. Use a brush or spray. Ensure an even, thin layer. Coat the interior and bottom. Smooth out any excess. Let it dry completely. Apply a second coat for maximum durability. Allow final drying for 24-48 hours. Reapply annually as needed. You can also use natural alternatives like beeswax, linseed oil, or tung oil. These repel moisture and nourish fibers. Professional designers often use a dual-container system. Keep the plant in its original plastic pot. Place this pot inside the woven basket. This protects the basket from direct water contact.
Tips for Successful DIY Planters
You can make your diy planters thrive with a few key practices. These tips ensure your plants stay healthy and your creations last.
Ensure Proper Drainage
Good drainage is vital for any planter. You must prevent water from pooling at the bottom. This stops root rot. Always drill drainage holes in your planters. If you use a colander, its built-in holes already solve this for you. For other containers, add a layer of gravel or small stones before adding soil.
Choose the Right Plants
Selecting the correct plants for your diy containers makes a big difference.
Small Planters: Choose a single plant like a lantana or geranium. You can also blend up to three compact species.
Medium Planters (10” to 16”): Use highly-textured plants like ornamental grass as a ‘thriller’. You can follow the ‘thriller, filler, spiller’ design principle.
Large Planters (bigger than 18”): These are perfect for dwarf trees, such as a Japanese maple. A towering Alocasia makes a stunning focal point.
Use Appropriate Soil
The right soil mix gives your plants the nutrients they need.
Flowering Plants: They love a mix that holds moisture but drains well. Use compost, peat moss, and a bit of sand.
Succulents and Cacti: These need gritty, well-draining soil. Mix sand and perlite with minimal organic matter.
Vegetables and Herbs: They thrive in nutrient-rich soil. Use compost as the base, peat moss for moisture, and sand for structure.
Indoor Plants: They benefit from well-aerated soil. Blend equal parts of peat moss and perlite, adding compost for nutrients.
Consider Waterproofing
Protect your planters from moisture damage. You can clean the planter first. Then, apply a surface primer to reduce porosity. Next, apply a seamless waterproofing material. Spray or roller-brush it until the surface is covered. Let it dry overnight in a well-ventilated area. Materials like HYDRALASTIC 836 work well.
Prioritize Safety
Always put safety first when creating your diy planters. Wear personal protective equipment like goggles and gloves when recommended. Never mix disinfectants with other chemicals. This avoids dangerous gases. Choose non-toxic, environmentally-friendly products when possible. Avoid products with ‘poison’, ‘danger’, ‘warning’, or ‘caution’ for children. Work in a well-ventilated area. Do not eat or drink in your work area. Be aware of material degradation. Some materials, like plastic, can contaminate soil. Cinder blocks can contain heavy metals. Avoid using building walls as planter walls. This prevents waterproofing issues and root intrusion.
You now see that creating your own diy planters is a fantastic way to personalize your space. You enhance your plants displays. You gain creativity, sustainability, and cost-effectiveness. You also get unique diy planters. Try these diy planter ideas. Share your diy creations. You will find joy in gardening and satisfaction from your diy planters and planters.
FAQ
What materials work best for DIY planters?
You can use many common items. Old tin cans, mason jars, and plastic bottles are great for indoors. For outdoors, consider tires, cinder blocks, or old wheelbarrows. Repurposing these items saves money and helps the environment. Choose materials you already have.
What plants thrive in DIY planters?
Small plants do well in teacups or tin cans. Succulents and herbs are perfect for these. Larger outdoor planters, like tire or wheelbarrow planters, can hold bigger flowers or vegetables. Always match the plant size to your planter.
What is the most important step for DIY planter success?
Ensuring proper drainage is key. Your plants need drainage holes. This prevents water from sitting too long. Waterlogging can harm plant roots. You can drill holes or add a layer of gravel. This keeps your plants healthy.
What are the main benefits of making your own planters?
You personalize your space. You save money on store-bought pots. Making planters also boosts sustainability by repurposing items. This creative process brings you joy. You add unique charm to your home and garden. 🌱
